Hello! Welcome back to our course on Enterprise Networking.
In our last lesson, we explored the different modes of operation for Cisco Access Points, such as Local, FlexConnect, and Bridge mode. We saw how these modes determine the AP's role and how it handles client traffic, laying the groundwork for designing flexible and scalable wireless networks.
Today, we'll address a fundamental aspect of user mobility within these networks. The learning outcome for this lesson is to explain the Layer 2 and Layer 3 roaming processes in a wireless network.
We will analyze what happens "under the hood" when a wireless client moves from the coverage area of one access point to another. This process, known as roaming, is critical for maintaining seamless connectivity for applications like voice calls, video conferencing, and large file transfers. We'll break down the key differences between Layer 2 and Layer 3 roaming, examine the mechanisms that make them possible, and discuss their practical applications in enterprise network design.
What is Wireless Roaming?
At its core, roaming is the process of a wireless client moving its connection from one Access Point (AP) to another. It's important to remember that the client device is always the one that decides when to roam. The network infrastructure can assist and influence this decision, but the final choice rests with the client. This decision is typically based on the Received Signal Strength Indication (RSSI) from nearby APs.
The process generally involves three distinct phases.
Cisco Catalyst 9800 Series: A Primer on Enterprise WLAN Roaming
To understand the fundamentals, let's turn to an official Cisco guide. This section breaks down the three phases of the 802.11 roaming process.
Read the section titled '3. 802.11 roaming (Layer 2 roaming)'. Focus on understanding the three phases: Scanning, Authentication, and Reassociation. Pay attention to how the client's view of its environment (RSSI) triggers the process.
As the reading highlights, after the client reassociates with a new AP, the network's job is to ensure the client's session continues uninterrupted. How the network accomplishes this depends on the underlying IP topology, which leads us to the crucial distinction between Layer 2 and Layer 3 roaming.
- Layer 2 Roam: Occurs when the client's new AP is connected to the same IP subnet/VLAN as the old AP. The client's IP address does not need to change.
- Layer 3 Roam: Occurs when the client's new AP is connected to a different IP subnet/VLAN. Without special mechanisms, the client would need a new IP address, breaking its active sessions.
Let's explore each of these in detail.
Layer 2 Roaming: Mobility Within a Subnet
Layer 2 roaming is the simpler and faster of the two. It happens when a client moves between APs, but its IP address remains valid on the new segment because the SSID is mapped to the same VLAN across those APs.
There are two main scenarios for Layer 2 roaming. Let's watch a video that explains them clearly.
Wi-Fi Roaming (Layer 2 & Layer 3) - Cisco CCNP ENCOR 350-401
This video from MixedNetworks provides a concise explanation of the different roaming events, starting with the two types of Layer 2 roaming.
Watch the segments on Intra-Controller Roaming (00:42 - 01:13) and Inter-Controller Layer 2 Roaming (01:13 - 01:53). Focus on how the client's database entry is handled in each case.
To summarize the video's points:
-
Intra-Controller Roaming:
- Scenario: A client roams between two APs associated with the same Wireless LAN Controller (WLC).
- Process: This is the most seamless roam. The WLC already has the client's information (MAC address, security context, etc.). It simply updates the client's entry in its database to point to the new AP. No communication with other controllers is needed.
- Result: Extremely fast, minimal disruption.
-
Inter-Controller Layer 2 Roaming:
- Scenario: A client roams between APs associated with different WLCs, but those controllers have interfaces in the same client subnet/VLAN.
- Process: The controllers must be configured as part of a mobility group. They communicate using mobility messages (over UDP port 16666). The client's database entry is moved from the original WLC to the new WLC.
- Result: Still very fast, as the client keeps its IP address and the session state is simply transferred.
A Note on Fast Secure Roaming
In modern networks using WPA2/WPA3-Enterprise security, the "authentication" phase of roaming can introduce significant delay if a full 802.1X re-authentication is required for every roam. This latency is unacceptable for real-time applications like VoIP.
To address this, several fast secure roaming standards have been developed. While a deep dive is for a later topic, it's important to be aware of them:
- PMKID Caching / Opportunistic Key Caching (OKC): The client and WLC cache the master key (PMK) from the initial authentication. During a roam, they can use this cached key to bypass the full 802.1X process and proceed directly to the 4-way handshake.
- 802.11r (Fast BSS Transition - FT): The most effective standard. It allows the key negotiation to happen much more quickly, often as part of the reassociation frame exchange itself, dramatically reducing roaming time.
These mechanisms are essential for making Layer 2 roaming truly seamless in secure environments.
Layer 3 Roaming: Mobility Across Subnets
Layer 3 roaming is where Cisco's centralized architecture truly shines. This is required when a client moves between APs that are mapped to different VLANs and IP subnets. A typical example is roaming between buildings on a large campus, where each building has its own subnet.
Without a Layer 3 roaming mechanism, the client's IP address would become invalid, and it would need to perform a new DHCP request, get a new IP, and re-establish all application sessions—a highly disruptive process.
Cisco solves this with the Anchor-Foreign Controller architecture.
Wi-Fi Roaming (Layer 2 & Layer 3) - Cisco CCNP ENCOR 350-401
Let's return to the MixedNetworks video to understand the mechanics of Layer 3 roaming and the anchor-foreign relationship.
Watch the segment on Inter-Controller Layer 3 Roaming from 01:53 to 03:01. Pay close attention to the definitions of 'Anchor' and 'Foreign' controllers and how the client's IP address is maintained.
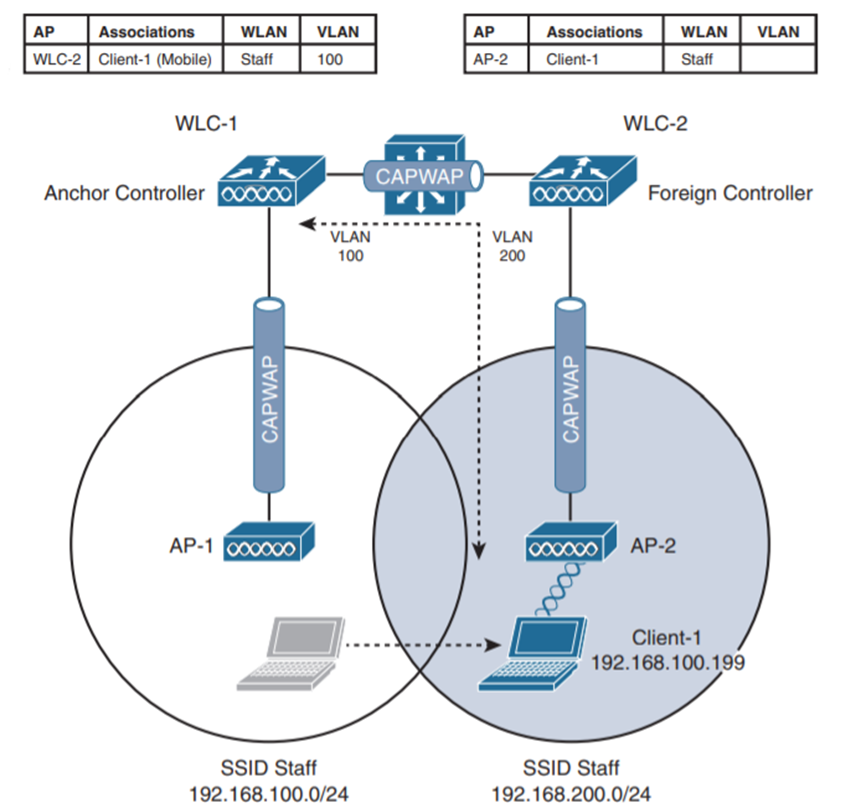
As the video explained, the key components are:
- Anchor Controller: The WLC to which the client first associated. The client's session is "anchored" here, meaning this is the point of presence for its IP address on the network.
- Foreign Controller: The new WLC to which the client roams.
The process works as follows:
- The client roams to an AP on a different subnet, managed by a new (Foreign) WLC.
- The Foreign and Anchor WLCs exchange mobility messages.
- Instead of moving the client's database entry, the Anchor controller copies it to the Foreign controller. The Anchor marks the client's state as 'Anchor', while the Foreign marks it as 'Foreign'.
- A CAPWAP tunnel is dynamically built between the Foreign and Anchor controllers.
- The client keeps its original IP address. All of its traffic is sent from the new AP to the Foreign WLC, encapsulated into the CAPWAP tunnel, and sent across the wired network to the Anchor WLC.
- The Anchor WLC decapsulates the traffic and forwards it onto the client's original VLAN, making the roam completely transparent to the client and any servers it's communicating with.
This diagram illustrates the traffic flow perfectly:
Test your understanding!
A user on a VoIP call walks from Building A (subnet 10.10.10.0/24) to Building B (subnet 10.10.20.0/24). Their smartphone roams from an AP in Building A to an AP in Building B. For the call to continue without interruption, what must happen to the user's data traffic after the roam?
Show answer
The user's VoIP data traffic must be tunneled from the foreign controller in Building B back to the anchor controller in Building A. The anchor controller then forwards the traffic onto the wired network using the user's original IP address from the 10.10.10.0/24 subnet. This prevents the IP address from changing and the call from dropping.
Auto-Anchor Mobility: A Practical Use Case
A powerful application of the anchor/foreign concept is Auto-Anchor, also known as Guest Anchor. In this design, you're not waiting for a client to roam. Instead, you pre-configure a specific WLAN (e.g., your Guest SSID) to always anchor its traffic to a designated WLC.
This is a common security best practice. All guest traffic, regardless of where the user connects, is tunneled to a single WLC located in a Demilitarized Zone (DMZ). From there, the traffic can be securely sent straight to the internet, completely isolated from the internal corporate network. As a solutions engineer, this is a fundamental design pattern for secure guest access.
Comparison: Layer 2 vs. Layer 3 Roaming
Let's summarize the key differences in a table.
| Aspect | Layer 2 Roaming | Layer 3 Roaming |
|---|---|---|
| Client IP Address | Unchanged (remains on same subnet) | Unchanged (preserved via tunneling) |
| Trigger | Client moves between APs on the same VLAN/subnet. | Client moves between APs on different VLANs/subnets. |
| Client State | Moved from original WLC to new WLC. | Copied from Anchor WLC to Foreign WLC. |
| Traffic Path | AP -> WLC -> Wired Network. | AP -> Foreign WLC -> CAPWAP Tunnel -> Anchor WLC -> Wired Network. |
| Use Case | Single building, contiguous campus floors, locations where a single client VLAN can be spanned. | Large multi-building campuses, geographically separate offices, secure guest network designs. |
| Complexity | Simpler, lower overhead. | More complex, adds tunneling overhead. |
This information is also presented well in the "Mastering Layer 2 and Layer 3 Roaming" article. Feel free to use the table there as another reference.
Conclusion
In this lesson, we dissected the processes that enable seamless client mobility in a Cisco wireless network. Understanding these mechanisms is crucial for designing and troubleshooting enterprise wireless deployments.
Key Takeaways:
- Roaming is a client-initiated process to move between APs, influenced by the network infrastructure.
- Layer 2 Roaming occurs within the same IP subnet. It can be intra-controller (simplest case) or inter-controller (state is moved between WLCs). It is fast and efficient.
- Layer 3 Roaming is required when moving between subnets. It uses an Anchor/Foreign controller model to preserve the client's IP address. Traffic is tunneled via CAPWAP from the foreign WLC back to the anchor WLC.
- Auto-Anchor is a practical security application of L3 roaming, used to centralize and isolate guest traffic in a DMZ.
- Fast roaming technologies like 802.11r are critical to minimize latency from security handshakes during any roam.
Preview of the Next Lesson:
Now that we've covered the architecture, AP modes, and roaming theory, we're ready to put it into practice. In our next lesson, we will begin to configure a wireless LAN controller and access points for secure client connectivity, applying the concepts we've learned to build a functional and secure WLAN.