Hello! Welcome back to your CCNP ENCOR course.
In our last lesson, you successfully configured a secure WLAN on a Catalyst 9800 controller using the modern Profiles and Tags model. You established the foundational link between the WLC and a RADIUS server, setting the stage for robust, centralized authentication.
Today, we're going to build upon that foundation and do a deep dive into the authentication mechanism itself. Our learning outcome is to configure client authentication for a WLAN using WPA3 and 802.1X/EAP. This means we will move beyond just pointing the WLC at a RADIUS server and explore the full, end-to-end configuration required on both the WLC and the authentication server—Cisco Identity Services Engine (ISE)—to bring a WPA3-Enterprise network to life.
Understanding the WPA3-Enterprise Framework
Before we jump into configuration, let's clarify the key technologies involved. WPA3-Enterprise isn't a new authentication protocol itself; rather, it's a security standard that mandates the use of IEEE 802.1X for authentication while enhancing the cryptographic security of the wireless connection.
- WPA3-Enterprise: This standard requires 192-bit cryptographic strength (in its Enterprise mode), uses stronger encryption for management frames (PMF), and, most importantly for us, uses an 802.1X authentication process.
- 802.1X: This is the IEEE standard for Port-Based Network Access Control. It defines three roles in the authentication process:
- Supplicant: The client device (e.g., a laptop or smartphone) requesting access.
- Authenticator: The network device that controls access to the network (in our case, the AP/WLC).
- Authentication Server: The centralized server that validates the supplicant's credentials (typically a RADIUS server like Cisco ISE).
- EAP (Extensible Authentication Protocol): This protocol provides a framework for the actual authentication conversation. It's the "language" the supplicant and authentication server use to prove identity. EAP messages are encapsulated by the authenticator and passed between the supplicant and the server. Common EAP methods include EAP-TLS (certificate-based) and PEAP (password-based).
The following diagram illustrates the complete WPA3-Enterprise authentication flow.
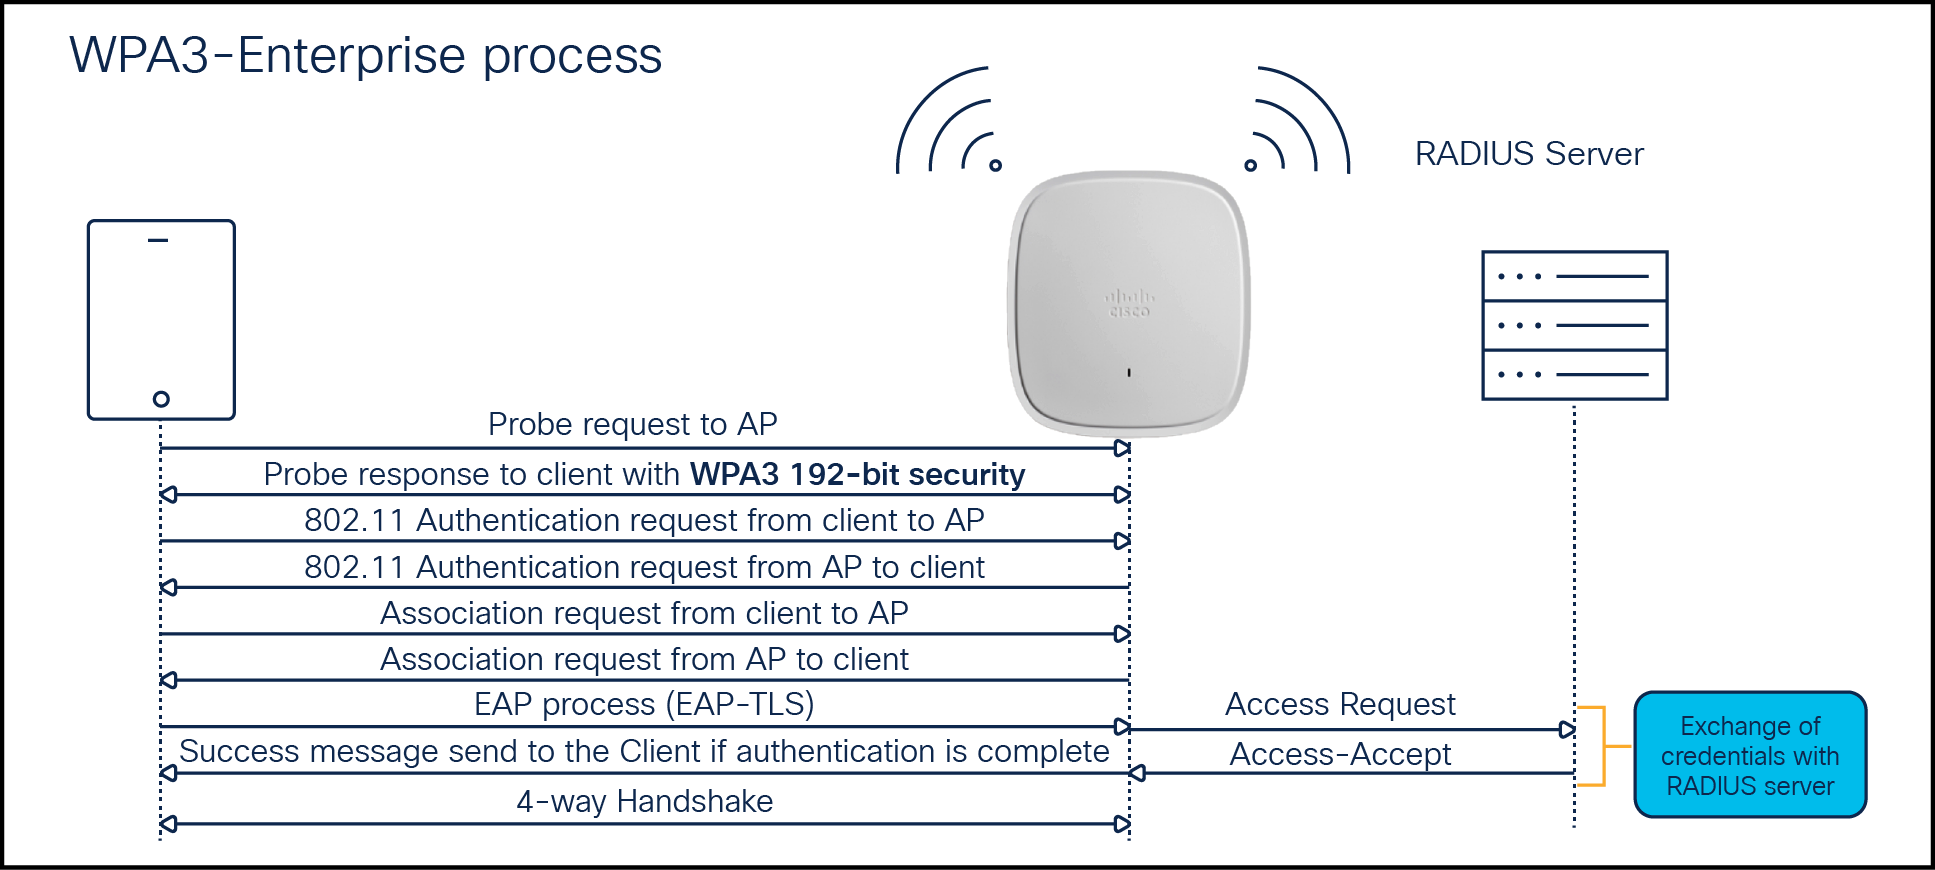
Step 1: Configuring the Authenticator (Catalyst 9800 WLC)
In the previous lesson, you created the basic AAA constructs. Now, we'll refine the WLAN Profile to specifically enable WPA3-Enterprise security.
Wi-Fi Protected Access 3 Configuration Guide
The official Cisco configuration guide for the Catalyst 9800 details the precise settings for WPA3. We will focus on the 'WPA3 enterprise' section.
Please review the sections 'Configure WPA3 enterprise (GUI)' and 'Configure WPA3 enterprise' (CLI). Notice the key parameters: the Layer 2 Security Mode is set to WPA3, and the Auth Key Management (AKM) is set to 'dot1x-sha256'. This tells the WLC to use 802.1X with a stronger hashing algorithm required by WPA3.
To summarize the key WLC configuration steps within your existing WLAN Profile:
- Navigate to your WLAN Profile: Go to
Configuration > Tags & Profiles > WLANsand select the WLAN you created previously. - Set Layer 2 Security:
- Go to the Security > Layer 2 tab.
- Set Layer 2 Security Mode to
WPA2+WPA3(for backward compatibility) orWPA3for a strict WPA3-only policy. - Ensure WPA3 Policy is checked. For a WPA3-Enterprise only setup, you would uncheck WPA2 Policy.
- Under Auth Key Mgmt, check
802.1x-SHA256. This is the AKM for WPA3-Enterprise. You can uncheck plain802.1xif you only want to support WPA3 clients. - Protected Management Frame (PMF) must be set to
Requiredfor a WPA3-only policy orOptionalfor a mixed-mode policy.
- Verify AAA Settings:
- Go to the Security > AAA tab.
- Ensure the correct Authentication List is selected, which points to your Cisco ISE server group. We configured this in the last lesson.
These settings configure the WLC to act as an 802.1X authenticator specifically for WPA3-Enterprise sessions.
Step 2: Configuring the Authentication Server (Cisco ISE)
This is the core of our lesson. The WLC passes the authentication request to ISE, but ISE makes the actual decision. You need to configure ISE to recognize the WLC, know the users, and have policies to decide what to do.
The following resource is an excellent guide for the entire 802.1X setup, but we'll focus on the ISE-specific part.
Configure 802.1X Authentication on Catalyst 9800 Wireless Controller Series
This Cisco support document provides a clear, step-by-step guide to configuring both the WLC and ISE. We will focus on the 'ISE Configuration' section.
Read the entire 'ISE Configuration' section carefully. This covers the five critical tasks we need to perform: (1) Declare the WLC on ISE, (2) Create a new user, (3) Create an Authorization Profile, (4) Create a Policy Set, and (5) Create the Authentication and Authorization Policies within that set.
Let's walk through these critical ISE tasks. To make this more practical, we'll also use a video that demonstrates these steps. While the video uses a wired switch, the principles and clicks within ISE are nearly identical for a wireless setup.
1. Add the WLC as a Network Device
ISE needs to trust RADIUS requests from your WLC. You must add the WLC as a "Network Device" and configure a shared secret that matches the one on the WLC.
Cisco ISE (Radius Server) MAB with Wired Dot1X Authentication configuration || EVE-NG Full Lab
This video demonstrates adding a network device to ISE. Imagine the 'switch' being shown is your Catalyst 9800 WLC.
Watch from 13:36 to 15:20. Pay close attention to the fields for IP address and the RADIUS 'Shared Key'. This key must be identical on both the WLC and ISE.
2. Create a User Identity
For this example, we'll use ISE's internal user database. In a real-world scenario, ISE would likely be integrated with an external identity store like Active Directory.
Cisco ISE (Radius Server) MAB with Wired Dot1X Authentication configuration || EVE-NG Full Lab
Next, let's see how to create a user identity within ISE.
Watch from 15:20 to 16:41. The presenter creates a new user and assigns them to a group. This is the username and password the supplicant will use to connect to the Wi-Fi.
3. Define Authentication and Authorization Policies
This is where the logic happens. ISE uses Policy Sets to group authentication and authorization rules.
- Authentication Policy: This rule answers the question, "Is this user who they say they are?". It checks the credentials against an identity source (like the internal user database we just added to).
- Authorization Policy: This rule answers the question, "Now that I've confirmed who they are, what are they allowed to do?". The result of this policy is an Authorization Profile, which can permit access, deny access, or return specific attributes to the WLC, such as a VLAN ID or a Quality of Service (QoS) policy.
The LINK article you read provides excellent screenshots for creating these policies. A key best practice is to create a condition that matches the incoming request to the specific WLAN, for example by using the RADIUS:Called-Station-ID ENDS_WITH <SSID_NAME> attribute.
Test your understanding!
A network requirement states that authenticated wireless users connecting to the 'Corporate-WiFi' SSID should be placed into VLAN 150. In the previous lesson, you configured a default VLAN in the WLC's Policy Profile. To meet this new requirement dynamically based on RADIUS authentication, where should you primarily configure this VLAN 150 assignment?
- In the WLAN Profile on the WLC.
- In the Policy Profile on the WLC.
- In the Authorization Profile on ISE, which is then returned to the WLC.
- In the Authentication Policy on ISE.
Show answer
The correct answer is 3. In the Authorization Profile on ISE.
While you can set a default VLAN in the WLC's Policy Profile, for dynamic, user-specific assignments, you configure the VLAN as a RADIUS attribute in the ISE Authorization Profile. The WLC must also have "AAA Override" enabled in its Policy Profile to accept and apply this attribute sent from ISE.
Step 3: Verification and Troubleshooting
With both the WLC and ISE configured, you are ready to test. The most powerful tool for seeing the entire process is the ISE Live Logs.
Cisco ISE (Radius Server) MAB with Wired Dot1X Authentication configuration || EVE-NG Full Lab
The video we've been referencing concludes with a troubleshooting and verification section that highlights the ISE Live Logs.
Watch the segment from 26:30 to 28:15. You will see how a successful authentication appears in the Live Logs, showing the username, the policies that were matched, and the results that were returned. This is an indispensable tool for troubleshooting 802.1X issues.
On the WLC, you can use the verification commands from the Cisco guide to confirm the security configuration and check client status.
Wi-Fi Protected Access 3 Configuration Guide
This guide provides useful CLI commands for verifying your WPA3 setup on the WLC.
Review the 'Verify WPA3 SAE and OWE' section. Pay particular attention to the output of show wlan id <id> and show wireless client mac-address <mac> detail. The latter command is very detailed and will show you the Authentication Key Management being used (e.g., SAE or 802.1X), the Encryption Cipher, and whether Protected Management Frames are active.
Conclusion
In this lesson, you have configured a complete WPA3-Enterprise solution, covering both the authenticator (WLC) and the authentication server (ISE). This is a critical skill for any enterprise network engineer.
Key Takeaways:
- WPA3-Enterprise enforces the use of 802.1X/EAP for robust, centralized authentication.
- The WLC configuration requires enabling the WPA3 Policy and using the
802.1x-SHA256Auth Key Management type. - Cisco ISE configuration is a multi-step process: you must define the WLC as a trusted network device, create user identities, and build policies that authenticate users and authorize their access.
- Authorization Policies in ISE are powerful; they can return attributes like VLANs or ACLs to the WLC by using AAA Override.
- ISE Live Logs are your primary tool for monitoring and troubleshooting the 802.1X authentication process.
Preview of the Next Lesson:
You've now learned how to design and build a secure wireless network. But what happens when things go wrong? In the next lesson, we will focus on troubleshooting. The learning outcome is to analyze wireless client connectivity issues using controller logs and tools. We will explore common failure scenarios and the systematic approach to diagnosing them using the tools available on the Catalyst 9800 WLC.