Hello! Welcome to our next lesson.
In our previous session, we focused on controlling network behavior by designing and implementing a Quality of Service (QoS) policy. Now that we know how to manage traffic flow, it's time to learn how to monitor the network's health, performance, and status.
This brings us to this lesson's learning outcome: Configure and verify SNMP (v2c and v3) for network monitoring. We will explore the Simple Network Management Protocol (SNMP), a cornerstone of network observability. You will learn the fundamental concepts of SNMP and then dive into the configuration of its two most common versions: the simpler, less secure SNMPv2c, and the modern, secure SNMPv3. As a solutions engineer, a solid grasp of SNMP is essential, as it's the primary way many of your customers gather critical data from their network devices.
1. SNMP Fundamentals: How Network Monitoring Works
Before we touch the command line, let's establish a solid theoretical foundation. SNMP operates on a simple but powerful manager-agent model.
- SNMP Manager: This is typically a server running Network Management Station (NMS) software (e.g., SolarWinds, PRTG, Cisco Prime). It's the central system that polls devices for information and receives alerts.
- SNMP Agent: This is software running on the managed devices (routers, switches, firewalls). It collects and stores information about the device and responds to requests from the SNMP Manager.
- Management Information Base (MIB): A hierarchical database within the agent that stores managed objects. Think of it as a highly organized library of all the things that can be monitored on a device.
- Object Identifier (OID): A unique address that points to a specific object within the MIB. For example, there are OIDs for interface status, CPU utilization, and device uptime.

To get a comprehensive overview of these components, the different versions of SNMP, and the types of messages they exchange, please watch the following video.
Free CCNA | SNMP | Day 40 | CCNA 200-301 Complete Course
This video from Jeremy's IT Lab provides an excellent introduction to SNMP. It clearly explains the core components, the evolution from v1 to v3, and the different message types used for communication.
Watch from 01:28 to 16:54. Focus on these key concepts: The roles of the NMS (Manager) and Managed Devices (Agent). The purpose of the MIB and OIDs. The key differences between SNMPv1, v2c, and v3, especially regarding security. The function of the primary message types: Get (read), Set (write), Trap (unreliable notification), and Inform (reliable notification).
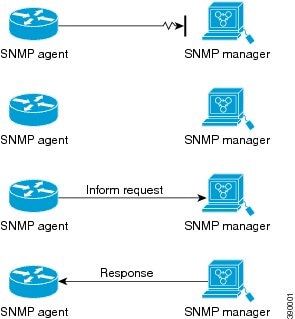
As you just learned, a key distinction is between Traps and Informs. Both are notifications sent from an agent to a manager, but a Trap is a "fire-and-forget" message sent via UDP. An Inform, on the other hand, requires an acknowledgment from the manager, adding a layer of reliability.
2. Configuring and Verifying SNMPv2c
SNMPv2c is still widely used due to its simplicity. Its security relies on a "community string," which acts as a plain-text password. Because this password is sent unencrypted, SNMPv2c is only suitable for trusted, internal networks where security is not a primary concern.
SNMPv2c Configuration Steps
Configuration is straightforward:
- Define community strings: One for read-only (
RO) access and, if needed, one for read-write (RW) access. - (Optional) Set device information: Define the device's location and a contact person.
- Define the NMS host: Specify the IP address of the NMS that is allowed to poll this device.
- Enable notifications (traps): Configure the device to send traps to the NMS for specific events.
Here is a sample configuration:
! Set optional device info
snmp-server location "Building A, IDF 2"
snmp-server contact "net-admin@example.com"

! 1. Define community strings
! RO string for general monitoring
snmp-server community CCNPRO ro
! RW string for configuration changes (use with caution)
snmp-server community CCNPRW rw

! 3. Define the NMS host and associate it with the RO community
snmp-server host 192.168.10.100 version 2c CCNPRO

! 4. Enable specific traps to be sent to the NMS
snmp-server enable traps snmp linkup linkdown
snmp-server enable traps config
The video from Jeremy's IT Lab that you watched earlier also includes a great demonstration of this process and, importantly, shows a packet capture that reveals the community string in plain text, highlighting the security risk.
SNMPv2c Verification
To verify your configuration, you can use these commands:
show run | include snmp: Displays all SNMP-related commands in your running configuration.show snmp community: Shows the configured community strings, their access level (RO/RW), and any associated access lists.
3. Configuring and Verifying SNMPv3
SNMPv3 is the industry standard for secure network monitoring. It replaces the simple community string with a robust User-based Security Model (USM) that provides:
- Authentication: Verifies that the message is from a valid source (using MD5 or SHA).
- Encryption (Privacy): Encrypts the packet payload to prevent eavesdropping (using DES, 3DES, or AES).
SNMPv3 Security Model and Levels
SNMPv3 introduces three key components for configuration: View, Group, and User.
- View: Defines what a user can see (which OID trees are accessible).
- Group: Defines how a user can access it. It maps users to views and specifies the security level required.
- User: Defines who can access the device, including their authentication and privacy credentials.
These components are used to enforce one of three security levels:
noAuthNoPriv: No authentication, no privacy. (Essentially SNMPv1 behavior).authNoPriv: Authentication but no privacy.authPriv: Both authentication and privacy. This is the recommended best practice.
This next video is an excellent, focused guide to configuring SNMPv3 from the ground up, explaining each component as it's configured.
Understanding and Configuring SNMPv3
This CBT Nuggets video provides a fantastic, step-by-step walkthrough of configuring SNMPv3. It does a great job of demystifying the View, Group, and User model.
Watch from 03:23 to 10:35. Follow the configuration of the three main SNMPv3 elements: View: Learn how to create a view to control access to specific MIBs (e.g., limiting access to only interface statistics or granting full access with iso included). Group: Understand how to create a group, associate it with a view, and define the security level (e.g., priv for authPriv). User: See how to create a user, assign them to a group, and set the authentication (SHA) and privacy (DES/AES) passwords.
SNMPv3 Configuration Steps (authPriv)
Let's consolidate what you've just seen into a best-practice configuration template. For a detailed text-based walkthrough with additional tips, the article "Cisco Switch / Router SNMPv3 Configuration" is an excellent companion resource.
Cisco Switch / Router SNMPv3 Configuration for IOS / IOS-XE
To complement the video, this article by Jacob Fredriksson provides clear, copy-paste-friendly configuration examples for SNMPv3 read-only and read-write access. It also includes valuable verification commands and best practices.
Skim through the sections 'Introduction', 'General SNMP Configuration', 'SNMPv3 ReadOnly Configuration', and 'Verification / Show commands'. You don't need to read every word, but use it as a reference for the command syntax and pay close attention to the list of show commands for verification.
Here is a configuration example for read-only access using the authPriv security level:
! Create an access-list to permit only your NMS server(s)
ip access-list standard NMS_ACL
 permit 192.168.10.100
 deny   any

! 1. Create a view giving access to the entire MIB tree
snmp-server view ALL_VIEW iso included

! 2. Create a group, map it to the view, specify the 'priv' security level, and apply the ACL
snmp-server group MONITOR_GROUP v3 priv read ALL_VIEW access NMS_ACL

! 3. Create a user, assign to the group, and set auth/priv passwords
! Format: snmp-server user <user> <group> v3 auth <sha|md5> <auth_pass> priv <aes|des|3des> [128|192|256] <priv_pass>
snmp-server user snmp-ro-user MONITOR_GROUP v3 auth sha StrongAuthP@ss! priv aes 128 StrongPrivP@ss!

! 4. Configure the host to send traps/informs to, using the created user's credentials
snmp-server host 192.168.10.100 version 3 priv snmp-ro-user
snmp-server enable traps
Test your understanding!
After configuring SNMPv3, you run show running-config but notice the snmp-server user command line is missing. Why is this, and which command should you use to verify the configured users?
Show answer
For security reasons, SNMPv3 user credentials (including the username and encrypted passwords) are not stored in the running or startup configuration file. To see the configured SNMPv3 users, their group associations, and their security settings, you must use the command show snmp user.
SNMPv3 Verification
Verification is critical for SNMPv3. Use these commands to check each component of your configuration:
show snmp view: Verifies the configured views.show snmp group: Shows the group name, security model, access levels, and associated view.show snmp user: The most important command. It displays configured users, the group they belong to, and their authentication/encryption settings.show snmp host: Shows which NMS hosts are configured to receive notifications.
Conclusion
Congratulations! You have now covered the essentials of configuring and verifying both SNMPv2c and SNMPv3, a critical skill for network monitoring and management.
Key Takeaways:
- SNMP provides network visibility through a Manager/Agent model, using MIBs and OIDs to access data.
- SNMPv2c is simple to configure using plain-text community strings but is inherently insecure.
- SNMPv3 is the secure standard, providing authentication and encryption through a User-Group-View model.
- The
authPrivsecurity level is the recommended best practice for SNMPv3. - Verification commands like
show snmp userandshow snmp groupare essential for troubleshooting SNMPv3, as user details are not in the running configuration.
Preview of the Next Lesson:
So far in this course, our focus has been primarily on unicast traffic—communication from one point to another. In our next lesson, "Analyze multicast fundamentals including IGMP operation and multicast addressing," we will explore a different communication model. You'll learn how networks efficiently deliver traffic from one source to many destinations simultaneously, a process that is fundamental to services like IPTV and enterprise video streaming.