Hello! Welcome back.
In our previous lesson, we analyzed the individual mechanisms in the Quality of Service (QoS) toolkit: classification, marking, queuing, congestion avoidance, policing, and shaping. You now have the vocabulary and conceptual understanding of what each tool does.
This lesson bridges the gap between theory and practice. We will take those individual components and use them to achieve this lesson's learning outcome: Design and implement a QoS policy for voice, video, and data traffic. You will learn how to synthesize these tools into a cohesive policy using Cisco's standard framework, a critical skill for both the ENCOR exam and your role as a solutions engineer.
1. From Tools to Policy: The Modular QoS CLI (MQC)
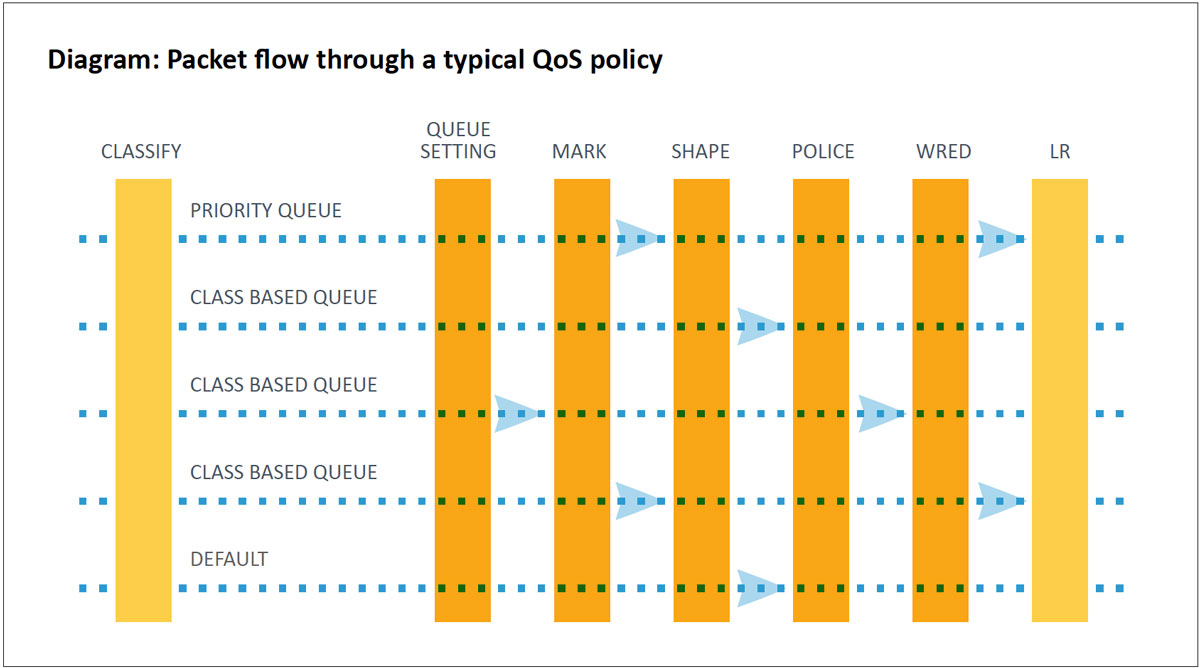
To combine the various QoS mechanisms into a working policy, Cisco uses a framework called the Modular QoS CLI (MQC). As its name implies, it's a structured, three-step process that makes QoS configurations logical, scalable, and reusable. Your experience with structured data formats like JSON will likely make the logic of MQC feel intuitive.
The three steps are:
- Classify (
class-map): Identify and group the traffic you want to treat. This is the "who" or "what" of your policy (e.g., all voice traffic, all traffic from a specific application). - Define Policy (
policy-map): Specify the actions to apply to the classified traffic. This is the "how" (e.g., give voice traffic priority, guarantee bandwidth for video, rate-limit guest traffic). - Apply Policy (
service-policy): Attach the policy to a specific interface in a specific direction (inbound or outbound). This is the "where" and "when."
Configuring QoS on Cisco Devices - CCNP Enterprise
To start, let's get a clear overview of this three-step MQC framework. This article from Network Journey provides concise tables that summarize the MQC components and their purpose.
Read the sections 'Theory in Brief' and 'Summary / Comparison / Pros & Cons'. Focus on understanding the role of class-map, policy-map, and service-policy in the MQC structure. The table provides a great at-a-glance reference.
2. Designing an Enterprise QoS Policy
Before writing a single line of configuration, a good engineer designs the policy. A common approach is to categorize applications into a handful of classes based on their network requirements (latency, jitter, bandwidth). For this lesson, we will design a simple but effective 4-class model suitable for a typical enterprise WAN edge:
- Real-Time (Voice): High priority, sensitive to delay and jitter.
- Interactive (Video): High priority, needs guaranteed bandwidth, less delay-sensitive than voice.
- Critical Data: Business-critical applications that need guaranteed bandwidth.
- Best Effort / Scavenger: All other traffic, including bulk file transfers or non-business applications.
This table from a Cisco design guide provides excellent recommendations for how to treat various application classes. We will use it as a reference for our design choices.
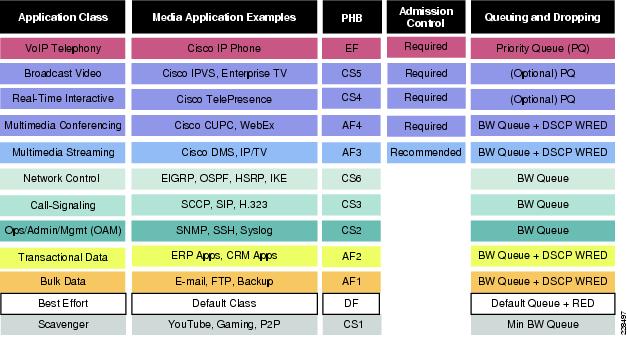
Based on these recommendations, here is our 4-class design:
| Traffic Class | Examples | Marking (DSCP) | Queuing Strategy | MQC Implementation |
|---|---|---|---|---|
| Voice | VoIP calls (RTP) | EF (46) | Strict Priority Queue | priority (LLQ) |
| Video | Video Conferencing | AF41 (34) | Guaranteed Bandwidth | bandwidth (CBWFQ) |
| Critical Data | ERP, Database | AF21 (18) | Guaranteed Bandwidth | bandwidth (CBWFQ) |
| Best Effort | Email, web, etc. | Default (0) | Remaining Bandwidth | class-default |
This design ensures that:
- Voice traffic gets immediate priority to minimize delay and jitter.
- Video and critical data are guaranteed a fair share of the bandwidth and won't be starved by other traffic.
- All remaining traffic is handled on a best-effort basis.
3. Implementing the Policy with MQC
Now, let's translate our design into a Cisco IOS configuration. We will follow the three MQC steps precisely. The following video provides a fantastic live demonstration of this entire process.
This is where we put it all together. Watch this excellent demonstration from Kevin Wallace as he configures class maps and policy maps for different types of traffic, including voice and email, and applies them to an interface.
Watch from 01:16:12 to 01:28:00. Follow along as he performs the three steps of MQC. Pay close attention to: Class-maps: How he uses match-any for the email class and match protocol using NBAR. Policy-map: The critical difference between the priority command (for LLQ/voice) and the bandwidth command (for CBWFQ/email). Service-policy: Applying the policy to an interface in the output direction and verifying with show policy-map interface.
To solidify your understanding, let's walk through the configuration for the 4-class policy we designed.
Step 1: Create class-maps to Classify Traffic
We'll create a class map for each of our priority traffic types. We'll match them based on the DSCP values we decided on in our design.
! Create class-map for Voice traffic marked with EF
class-map match-any VOICE
 match ip dscp ef

! Create class-map for Video traffic marked with AF41
class-map match-any VIDEO
 match ip dscp af41

! Create class-map for Critical Data traffic marked with AF21
class-map match-any CRITICAL-DATA
 match ip dscp af21
Any traffic not matching these classes will automatically fall into the default class, class-default.
Step 2: Create a policy-map to Define Actions
Here, we create a single policy map that brings all our classes together and assigns the queuing actions we designed. We'll name our policy WAN-EDGE-QOS.
policy-map WAN-EDGE-QOS
 ! Give Voice traffic strict priority and reserve 15% of the bandwidth
 class VOICE
  priority percent 15

 ! Guarantee 30% of bandwidth for Video
 class VIDEO
  bandwidth percent 30

 ! Guarantee 25% of bandwidth for Critical Data
 class CRITICAL-DATA
  bandwidth percent 25

 ! All other traffic gets what's left over, with fair queuing
 class class-default
  fair-queue
Note: The percentages in a bandwidth percent command are minimum guarantees during congestion. If the link is not congested, a class can use more than its allocated percentage. The priority percent command, however, is a maximum limit (a policer) to prevent the priority queue from starving all other traffic.
Test your understanding!
In the policy-map above, the bandwidth percentages (15 + 30 + 25) add up to 70%. What happens to the remaining 30% of the interface bandwidth?
Show answer
The remaining 30% of the bandwidth is available to be shared among all the non-priority classes (VIDEO, CRITICAL-DATA, and class-default) based on their configured weights (30, 25, and the default weight for class-default). If a class doesn't use its full guarantee, that unused portion is also available for other classes to use. The class-default class will handle all traffic not explicitly matched and will compete for this remaining bandwidth.
Step 3: Apply the service-policy to an Interface
Finally, we apply our policy to the egress WAN interface. QoS queuing policies are almost always applied in the output direction, as this is where congestion occurs when a faster LAN interface feeds a slower WAN interface.
interface GigabitEthernet0/0/1
 description Link to WAN/Internet
 service-policy output WAN-EDGE-QOS
4. Verification and Automation
After applying the policy, you must verify it's working as expected. The single most useful command for this is show policy-map interface <interface-name>.
For a complete, text-based configuration example and verification output, this resource from the Cisco community is an excellent reference.
Implementation of QoS of MQC Architecture Framework and Syntax
This Cisco Community article provides a comprehensive router configuration for QoS, showing the full MQC structure with multiple classes. It's a great reference to see a complete policy laid out.
Scan through the 'Router Configurations of QoS' section. You don't need to memorize every command, but notice how the configuration follows the class-map -> policy-map -> service-policy structure we've discussed. Also, look at the show policy-map and show class-map outputs at the end to see how to verify the configuration.
A Note on AutoQoS
Manually creating complex policies can be time-consuming. Cisco provides a feature called AutoQoS, which is a macro that automatically generates and applies a sophisticated, best-practice MQC policy. While you need to know how to configure MQC manually for the exam, being aware of AutoQoS is valuable in your role as a solutions engineer.
There are different AutoQoS modes, such as auto qos voip which optimizes for voice, and auto discover qos which first listens to the traffic on an interface and then builds a custom policy.
To see how you can automate this process, this final clip from Kevin Wallace's video introduces and demonstrates AutoQoS on both routers and switches.
Watch from 01:28:00 to 01:31:30. Understand what AutoQoS is and the basic concept behind auto qos voip and auto discover qos. This is a practical tool to be aware of for rapid deployments.
Conclusion
In this lesson, you have progressed from analyzing QoS tools to designing and implementing a functional QoS policy for a realistic enterprise scenario. This is a significant step in your CCNP journey and a highly practical skill.
Key Takeaways:
- The Modular QoS CLI (MQC) is the standard 3-step framework for QoS configuration:
class-map,policy-map, andservice-policy. - Effective QoS starts with a design that categorizes traffic based on business needs and technical requirements (latency, jitter, bandwidth).
- LLQ (
priority) is used for real-time traffic like voice, providing a strict priority but policed queue. - CBWFQ (
bandwidth) is used for other traffic classes, providing a minimum bandwidth guarantee during congestion. - Verification is crucial. The
show policy-map interfacecommand is your primary tool for confirming that traffic is being classified and queued correctly.
Preview of the Next Lesson:
We have now covered how to control and prioritize traffic flow. The next logical step is to monitor the health and performance of the network. In our next lesson, "Configure and verify SNMP (v2c and v3) for network monitoring," we will shift our focus from configuration to observability, exploring how to use the Simple Network Management Protocol to gather critical data from your network devices.