Hello! Welcome to the next lesson in our journey through IP Services.
In our previous session, we covered how devices get their IP addresses automatically using DHCP, configuring both DHCP servers and relay agents. Now, we'll focus on ensuring all those devices agree on what time it is.
This lesson addresses the learning outcome: Configure and verify NTP in a client/server hierarchy for time synchronization.
Accurate time is not just a convenience; it's critical for modern network operations. It's the foundation for correlating log messages across multiple devices during troubleshooting, validating the timestamps on security certificates, and implementing time-based security policies. As a solutions engineer, you know that when you're trying to piece together a sequence of events during a network incident, having synchronized clocks is non-negotiable.
Today, we'll explore the Network Time Protocol (NTP), understand its hierarchical structure, and then configure a practical client/server topology on Cisco IOS devices.
1. NTP Fundamentals: Stratum and Synchronization
Before we jump into configuration, let's understand how NTP works. NTP operates in a hierarchical model to distribute time from a highly accurate source throughout a network. The key concept here is stratum.
A device's stratum level indicates how many "hops" it is from an authoritative time source.

- Stratum 0: These are the reference clocks themselves, such as atomic or GPS clocks. They are the most accurate sources but are not directly used in the network.
- Stratum 1: These are servers directly connected to Stratum 0 clocks. They are considered the most authoritative time servers on the network. Public NTP servers on the internet are often Stratum 1 or 2.
- Stratum 2: A server that receives its time from a Stratum 1 server.
- Stratum 3: A server that receives its time from a Stratum 2 server, and so on.
- Stratum 15: This is the highest valid stratum level.
- Stratum 16: Indicates that a device is unsynchronized or the source is unreachable.
NTP uses UDP port 123 for communication. A client will periodically poll a server to request the time, and the protocol includes sophisticated algorithms to account for network delay, ensuring high accuracy.
To get a solid grasp of these core concepts, let's watch a short video.
NTP, Easy as 1-2-3... Simplifying Network Time Protocol
This clip from Kevin Wallace Training concisely explains the "why" behind NTP and breaks down the stratum hierarchy.
Watch the first 5 minutes and 19 seconds of the video. Focus on the reasons why accurate time is critical and how the stratum number reflects a time source's trustworthiness.
2. Designing an NTP Hierarchy
In an enterprise network, you don't want every single device reaching out to public internet time servers. This is inefficient and creates a heavy dependency on external connectivity. The best practice is to create an internal, hierarchical structure.
Use Best Practices for Network Time Protocol - Cisco
For a deeper look into enterprise NTP design, let's consult a Cisco best practices guide. This will provide the architectural context for our configuration.
Read the section titled 'NTP Architecture.' Focus on understanding the three models presented, especially the recommended 'Hierarchical structure.' This is the model we will be implementing.
As the guide explains, a hierarchical structure is scalable and stable. A typical design involves:
- A small number of core routers or dedicated servers that sync with reliable external (public) Stratum 1 or 2 servers.
- These internal "master" servers then provide time to distribution layer devices.
- Access layer switches and other clients then sync with their local distribution layer devices.
This creates a clean, tiered model for time distribution that is robust and easy to manage.
3. Configuring NTP in a Client/Server Hierarchy
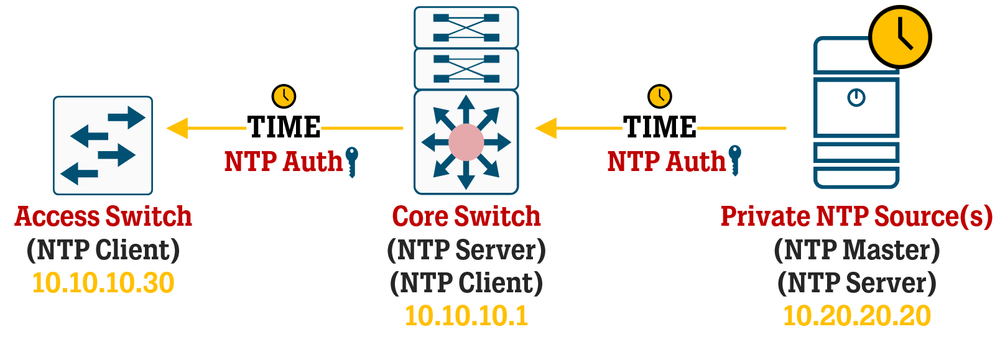
Let's put this theory into practice. Our goal is to configure an internal NTP hierarchy. We'll use a scenario where one router acts as our primary internal time server, and another acts as a client.
Step 1: Configure the NTP Server
There are two main ways to set up your primary internal server.
Method A: Sync with Public Servers (Recommended)
This is the most common and recommended approach for networks with internet access. The router syncs with reliable public NTP servers and then serves this time to your internal network.
Method B: Configure as Master Clock (Isolated Networks)
If the network is isolated or if you want a local authoritative source for a lab, you can configure a router to act as an NTP "master". It uses its own internal clock as the source. This is less accurate than a public source but ensures all internal devices are synchronized with each other.
The following video demonstrates both configuration approaches, as well as crucial best practices like using loopback interfaces.
Free CCNA | NTP | Day 37 | CCNA 200-301 Complete Course
Jeremy's IT Lab provides a comprehensive walkthrough of NTP configuration. We will focus on the sections covering server and client setup.
Watch the video from 18:44 to 27:46. Pay close attention to: Configuring the device to sync with public NTP servers (ntp server <ip>). The rationale and configuration for using a loopback interface as the NTP source (ntp source loopback0). Configuring a device to act as a master clock for an isolated network (ntp master).
Example Configuration
Let's configure our Core Switch (Core-SW) from the diagram to sync with public NTP servers and our Access Switch (Access-SW) to sync with the Core Switch.
On the Core Switch (Core-SW):
! Configure timezone and daylight saving for correct local time display
! Note: NTP itself always communicates in UTC.
clock timezone EST -5
clock summer-time EDT recurring

! Best Practice: Create a loopback interface to use as a stable source IP
interface Loopback0
 ip address 10.10.10.1 255.255.255.255

! Use the loopback as the source for all NTP packets
ntp source Loopback0

! Point the switch to one or more reliable public NTP servers.
! Using hostnames from pool.ntp.org is a common practice.
ntp server 0.pool.ntp.org
ntp server 1.pool.ntp.org

! (Optional, for isolated networks) If this switch had no internet access,
! you would use this command instead of the 'ntp server' commands above.
! The number '3' sets the stratum level.
! ntp master 3
Step 2: Configure the NTP Client
Now, we configure the Access Switch to use our Core Switch as its time source.
On the Access Switch (Access-SW):
! Configure local timezone
clock timezone EST -5
clock summer-time EDT recurring

! Point the client to the internal NTP server's IP address (the loopback of Core-SW)
ntp server 10.10.10.1
With this simple hierarchy, Core-SW gets accurate time from the internet (becoming Stratum 2 or 3), and Access-SW gets accurate time from Core-SW (becoming Stratum 3 or 4).
4. Verifying NTP Operation
Configuration is only half the battle. You must be able to verify that synchronization is working correctly. The most important commands are show ntp status and show ntp associations.
A crucial point for verification is that NTP does not synchronize instantly. It can take several minutes (sometimes 10-15 minutes) for a device to vet a time source and achieve synchronization. Initially, you will likely see a stratum of 16, which means "unsynchronized." This is normal.
NTP, Easy as 1-2-3... Simplifying Network Time Protocol
Let's return to the Kevin Wallace video, which does an excellent job of demonstrating this initial delay and the verification process.
Watch from 08:39 to 11:59. Notice the initial output of show ntp status showing stratum 16, and how after a delay, it changes to a synchronized state. This is a critical real-world behavior to recognize.
Key Verification Commands
Let's look at what the output of these commands tells us.
System Management Configuration Guide, Cisco IOS XE 17.x
The official Cisco documentation provides detailed examples of the verification commands. We'll use it to understand the command output.
In the 'Verifying Network Time Protocol' section, review the descriptions and sample outputs for show ntp status and show ntp associations detail. Don't worry about every single field in the detail output; focus on the key indicators.
-
show ntp status: This is your primary command.Core-SW# show ntp status Clock is synchronized, stratum 3, reference is 199.102.46.73 ...Clock is synchronized: The most important line. If it says "unsynchronized," it's not working yet.stratum 3: This device's stratum level.reference is 199.102.46.73: The IP address of the server this device is currently synchronized with.
-
show ntp associations: This command shows the state of all configured servers.Access-SW# show ntp associations address ref clock st when poll reach delay offset disp *~ 10.10.10.1 199.102.46.73 3 6 64 377 1.24 0.281 0.49 * sys.peer, # selected, + candidate, - outlyer, x falseticker, ~ configured- The most important symbol is the asterisk (
*), which indicates this is the "sys.peer"—the server your device has chosen to synchronize with. st 3: The stratum of the server (10.10.10.1).reach 377: An octal value indicating the success of the last 8 polls.377means all 8 were successful.
- The most important symbol is the asterisk (
Test your understanding!
You are setting up a new branch office. The branch router (BR-RTR) has a loopback0 interface with IP 172.18.100.1. The company's two main NTP servers are located in the headquarters data center at 10.1.1.10 and 10.1.1.11.
What is the complete NTP configuration required on BR-RTR to ensure it synchronizes with the HQ servers using best practices?
Show answer
The configuration should include setting the NTP source to the stable loopback interface and defining both HQ servers for redundancy.
! Set the source interface for NTP packets
ntp source Loopback0

! Configure both HQ servers for redundancy
ntp server 10.1.1.10
ntp server 10.1.1.11
While not strictly required for synchronization, it's also best practice to configure the local timezone so the show clock command displays the correct local time.
clock timezone PST -8
clock summer-time PDT recurring
Conclusion
In this lesson, you've learned how to implement one of the most fundamental IP services. Ensuring consistent time across all network devices is a cornerstone of network stability, security, and manageability.
Key Takeaways:
- NTP is Critical: It's essential for log correlation, certificate validation, and time-based access control.
- Stratum Hierarchy: NTP uses stratum levels (0-15) to measure the distance from an authoritative reference clock. Stratum 16 means unsynchronized.
- Hierarchical Design: The best practice is to build an internal NTP hierarchy, where core devices sync externally and serve time to internal clients.
- Configuration:
ntp server <ip-address>configures a device as an NTP client.ntp master [stratum]configures a device as an authoritative source (for isolated networks).ntp source <interface>is a best practice to provide a stable source IP address for NTP packets.
- Verification:
show ntp statusprovides a high-level summary of synchronization state.show ntp associationsshows the status of configured servers. Remember that synchronization is not instant.
Preview of the Next Lesson:
We've covered how devices get addresses (DHCP) and how they agree on the time (NTP). Next, we will venture into the world of one-to-many communication. In the upcoming lesson, we will explain multicast fundamentals, including IGMP operation and multicast addressing, which is the foundation for efficiently delivering streaming video, financial data, and other group-based traffic across the network.