Hello! Welcome back to our study of IP Services.
In the previous lesson, we demystified Network Address Translation (NAT), covering the configuration of static, dynamic, and Port Address Translation (PAT). You learned how to enable private IPv4 networks to communicate with the public internet, a cornerstone of modern networking.
Today, we move from address translation to address assignment. Manually configuring IP addresses on every client, server, and device in an enterprise network is not scalable or efficient. This is where the Dynamic Host Configuration Protocol (DHCP) comes in. This lesson will address the learning outcome: Configure a Cisco IOS device as a DHCP server and DHCP relay agent.
We'll explore the fundamental process behind DHCP and then dive into the two key roles a Cisco device can play: acting as a full-fledged DHCP server for smaller deployments and, more commonly, acting as a relay agent to forward requests to a centralized DHCP server.
1. DHCP Fundamentals: How It Works
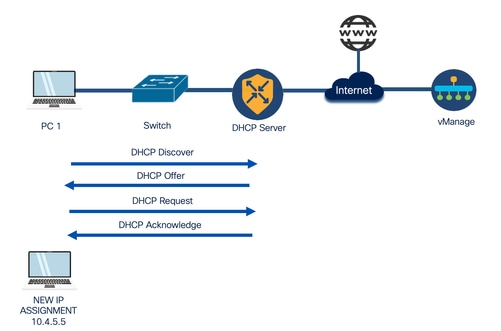
Before we configure anything, it's essential to understand the automated four-step conversation that occurs between a client needing an IP address and a server that can provide one. This process is often called DORA.
DHCP and DHCP Relay | Cisco CCNA 200-301
To start, let's watch a segment from Keith Barker - The OG of IT. This video clearly explains the problem DHCP solves, the core four-packet exchange, and the underlying protocols involved.
Watch the video from the beginning up to the 15:17 mark. Focus on: The 'DORA' acronym: Discover, Offer, Request, Acknowledge. The roles of the client and server in this exchange. The key IP addresses (source 0.0.0.0, destination 255.255.255.255) and UDP ports (67 and 68) used in the initial Discover packet.
As the video explained, the DORA process is a sequence of four messages:
- Discover: The client, having no IP address, sends a broadcast message (
destination 255.255.255.255) on its local network segment, effectively shouting, "Is there a DHCP server out there?" - Offer: Any DHCP server on that segment that hears the Discover message can reply with an Offer message. This is typically a unicast message back to the client's MAC address, containing a proposed IP address, subnet mask, lease duration, and other options (like a default gateway and DNS server).
- Request: The client receives one or more Offers and chooses one. It then sends a broadcast Request message, announcing to all servers which offer it has accepted. This informs the chosen server to finalize the lease and tells any other offering servers that they can return their offered addresses to their available pools.
- Acknowledge (ACK): The chosen server sends a final unicast Acknowledge message to the client, confirming the lease. The client can now use the IP address.
2. Configuring a Cisco IOS Device as a DHCP Server
While large enterprises typically use dedicated servers (like Windows Server or Linux-based systems) for DHCP, a Cisco router or multilayer switch can be configured to perform this role. This is a common solution for small offices, branch locations, or lab environments.
The configuration consists of three main parts:
- Excluding Addresses: Reserving specific IP addresses so they are not accidentally leased to clients. You must always exclude addresses used by router interfaces, servers, printers, and other statically assigned devices.
- Creating a DHCP Pool: Defining a pool of addresses to be leased out and configuring the associated options.
- Verification: Checking that the pool is configured correctly and that clients are receiving leases.
IP Addressing: DHCP Configuration Guide, Cisco IOS Release 15SY
The official Cisco IOS documentation provides the definitive guide to the commands we'll be using. We'll use it as a reference as we build our configuration.
Skim through the sections 'Excluding IP Addresses' and 'Configuring a DHCP Address Pool'. Pay close attention to the summary tables that list the key commands like ip dhcp excluded-address, ip dhcp pool, network, default-router, dns-server, and lease.
Configuration Example
Let's imagine a small office network 192.168.50.0/24. The router's LAN interface is 192.168.50.1, and we want to use this router as the DHCP server. We also have a printer at 192.168.50.10 that needs a static IP.
! Step 1: Exclude addresses from being leased.
! We exclude the router's own IP and the printer's IP.
! It's good practice to exclude a small range for future static assignments.
R1(config)# ip dhcp excluded-address 192.168.50.1 192.168.50.10

! Step 2: Create the DHCP pool and define its parameters.
R1(config)# ip dhcp pool LAN-POOL-50
R1(dhcp-config)# network 192.168.50.0 255.255.255.0
R1(dhcp-config)# default-router 192.168.50.1
R1(dhcp-config)# dns-server 8.8.8.8 1.1.1.1
R1(dhcp-config)# domain-name myoffice.local
R1(dhcp-config)# lease 7  ! Lease for 7 days
R1(dhcp-config)# end
Verification
Once configured, you can use show commands to verify its operation.
show ip dhcp pool [pool-name]: Displays information about the configured pool(s), including the total addresses, leased addresses, and excluded addresses.show ip dhcp binding: Shows the list of current leases, mapping IP addresses to client MAC addresses and showing lease expiration times.
R1# show ip dhcp binding
IP address      Client-ID/              Lease expiration        Type
                Hardware address
192.168.50.11   01a2.b3c4.d5e6          May 28 2024 10:00 AM    Automatic
3. Configuring a DHCP Relay Agent
The DHCP server model works perfectly as long as clients and the server are in the same broadcast domain (the same VLAN/subnet). But what happens in a typical enterprise network with many VLANs?
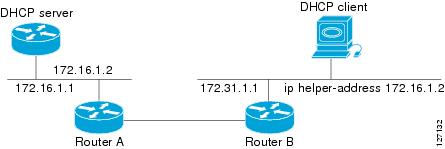
The initial DHCP Discover message is a broadcast, which routers, by default, do not forward. The solution is to configure the router (or Layer 3 switch) as a DHCP Relay Agent. This feature tells the router to listen for DHCP broadcasts and forward them as unicasts to a specified DHCP server.
The ip helper-address Command
The magic happens with one simple command: ip helper-address.
Chapter: Configuring the Cisco IOS XE DHCP Relay Agent
Let's turn to the official Cisco documentation for the DHCP Relay Agent to understand its function and configuration.
Read the sections 'DHCP Relay Agent Overview' and 'Packet Forwarding Address'. This is a critical concept. Focus on how the relay agent uses the giaddr field to inform the DHCP server about the client's original subnet.
As the documentation explains, when the relay agent forwards the client's Discover broadcast, it performs two key actions:
- It changes the destination IP address from
255.255.255.255to the unicast IP of the DHCP server. - It inserts its own IP address (from the interface that received the broadcast) into the
giaddr(Gateway IP Address) field of the DHCP packet.
The DHCP server uses the giaddr to identify which subnet the original request came from, allowing it to select an address from the correct pool for its DHCP Offer.
Configuration and Verification
The ip helper-address command is applied on the Layer 3 interface that faces the DHCP clients. In a modern network, this is typically the Switched Virtual Interface (SVI) for a given VLAN.
Let's assume we have clients in VLAN 20 (10.10.20.0/24) and VLAN 30 (10.10.30.0/24). The central DHCP server is at 10.1.1.100.
! On the multilayer switch or router performing inter-VLAN routing

! Configuration for VLAN 20
L3-SW(config)# interface Vlan20
L3-SW(config-if)# ip address 10.10.20.1 255.255.255.0
L3-SW(config-if)# ip helper-address 10.1.1.100

! Configuration for VLAN 30
L3-SW(config)# interface Vlan30
L3-SW(config-if)# ip address 10.10.30.1 255.255.255.0
L3-SW(config-if)# ip helper-address 10.1.1.100
That's it. Now, DHCP Discover broadcasts from clients in either VLAN will be forwarded to the server at 10.1.1.100.
To verify the configuration, simply use show ip interface <interface_name> or show running-config interface <interface_name> to confirm the helper address is present. The ultimate verification is, of course, a client in that VLAN successfully obtaining an IP address.
For a final, comprehensive look that ties the relay concept and configuration together, let's revisit Keith Barker's video.
DHCP and DHCP Relay | Cisco CCNA 200-301
This section of the video demonstrates the configuration of ip helper-address on a multilayer switch and uses Wireshark to analyze the relayed packets. This is an excellent way to see the theory in practice.
Watch from 15:17 to 48:26. Observe: The explanation of why a relay is needed when the server is in a different VLAN. The configuration of ip helper-address on the SVIs. The Wireshark analysis showing the DORA process from both the client-to-relay and relay-to-server perspectives. Notice the difference in IP headers in both captures.
Test your understanding!
A company has three user VLANs:
- VLAN 10: Sales (172.16.10.0/24)
- VLAN 20: Marketing (172.16.20.0/24)
- VLAN 30: Engineering (172.16.30.0/24)
A dedicated DHCP server is located in the data center on a different subnet with the IP address 10.254.1.50. You are configuring a new distribution layer switch that handles the inter-VLAN routing for these three user groups.
What is the minimum configuration required on this switch to ensure all users can obtain IP addresses automatically? (Assume VLANs and SVIs are already created with the correct .1 address in each subnet).
Show answer
You need to configure the DHCP relay agent on the SVI for each user VLAN.
interface Vlan10
 ip helper-address 10.254.1.50

interface Vlan20
 ip helper-address 10.254.1.50

interface Vlan30
 ip helper-address 10.254.1.50
By adding the ip helper-address command to each SVI, the switch will intercept DHCP broadcast requests from clients in each VLAN and forward them as unicast packets to the central DHCP server.
Conclusion
In this lesson, you have mastered the fundamentals of DHCP and learned how to configure a Cisco IOS device to function as both a DHCP server and a DHCP relay agent. This is a critical skill for automating network deployments and management.
Key Takeaways:
- DORA Process: DHCP relies on a four-step process: Discover, Offer, Request, and Acknowledge.
- Cisco IOS DHCP Server: A router can be a DHCP server by creating
ip dhcp pools, defining network parameters (network,default-router,dns-server), and excluding static IPs withip dhcp excluded-address. - DHCP Relay Agent: When clients and servers are on different subnets, a relay agent is required.
ip helper-address: This command, applied to the client-facing Layer 3 interface (like an SVI), enables the relay function.- The
giaddrfield: The relay agent uses thegiaddrfield to tell the server which subnet the request originated from, enabling the server to assign an address from the correct pool.
Preview of the Next Lesson:
Now that we've covered address translation (NAT) and address assignment (DHCP), we will turn our attention to another crucial IP service: time synchronization. In the next lesson, you will learn to configure and verify NTP in a client/server hierarchy, ensuring that all devices on your network share a consistent and accurate time.