Hello! Welcome to the next lesson in our OSPF module.
In our last session, we analyzed the OSPF Designated Router (DR) and Backup Designated Router (BDR) election process. We covered why it's essential for efficiency on multi-access networks and the rules that govern the election, such as OSPF priority and Router ID.
Today, we transition from theory to practice. This lesson is dedicated to the hands-on task of bringing an OSPF network to life. Our goal is to master the learning outcome: Configure and verify single-area OSPFv2 for IPv4 and OSPFv3 for IPv6. We'll cover the fundamental commands to activate OSPF, advertise networks, and confirm that everything is working as expected for both major IP versions.
1. Single-Area OSPFv2 (for IPv4) Configuration
Let's begin with OSPFv2, the version used for IPv4 routing. The configuration process involves three main steps: enabling the OSPF process, defining a router ID, and activating OSPF on the relevant interfaces.
Step 1: Start the OSPF Process and Define the Router ID
First, we enter OSPF configuration mode from the global configuration mode.
R1(config)# router ospf <process-id>
- The
process-idis a number from 1 to 65535 that identifies the OSPF process on the local router. It does not need to match on neighboring routers.
Next, it's a critical best practice to manually set the Router ID (RID). As we learned in the last lesson, the RID is the ultimate tie-breaker in the DR/BDR election. Relying on an automatically selected IP address can lead to unpredictable behavior if interfaces go down. A stable RID is essential.
R1(config-router)# router-id <A.B.C.D>
- The RID is a 32-bit number in IPv4 address format that must be unique within your OSPF domain.
2.2.13 Packet Tracer - Point to Point Single Area OSPFv2 Configuration
Let's see this in action. The video 'Point to Point Single Area OSPFv2 Configuration' from Tech Acad starts by demonstrating how to initiate the OSPF process and assign a unique Router ID to each device.
Watch from 01:37 to 04:22. Notice the use of the router ospf 10 command to start the process and the router-id command to explicitly set the RID for each of the three routers in the topology.
Step 2: Activate OSPF on Interfaces
With the process running, you need to tell OSPF which interfaces should participate and which networks to advertise. There are two primary methods to do this.
Method A: The network Command
This is the traditional method, configured under the router ospf process.
R1(config-router)# network <network-address> <wildcard-mask> area <area-id>
network-addressandwildcard-mask: This pair identifies which interfaces to enable OSPF on. The wildcard mask is the inverse of a subnet mask (e.g., a/24subnet mask of255.255.255.0corresponds to a wildcard mask of0.0.0.255). Any interface whose IP address falls within the range defined by the network address and wildcard mask will be enabled for OSPF.area <area-id>: This assigns the interface to a specific OSPF area. For this lesson, we are working exclusively inarea 0, the backbone area.
Method B: The Interface-Specific Command
A more modern and explicit approach is to enable OSPF directly on the interface. This avoids wildcard mask calculations and clearly documents which interfaces are running OSPF.
R1(config)# interface <type-number>
R1(config-if)# ip ospf <process-id> area <area-id>
- This command directly enables OSPF process
<process-id>on this specific interface and assigns it to<area-id>.
The following video demonstrates all three variations: using a network/wildcard pair, using an IP address with a quad-zero wildcard mask (a common technique to enable OSPF on a single interface), and using the interface-specific command.
2.2.13 Packet Tracer - Point to Point Single Area OSPFv2 Configuration
To understand how to activate OSPF on interfaces, let's watch the next part of the 'Point to Point Single Area OSPFv2 Configuration' video. It demonstrates all the methods we've just discussed.
Watch from 04:22 to 14:56. This extended segment is very practical. 04:22 - 08:59: Shows using the network command with calculated wildcard masks on R1. 08:59 - 11:53: Shows an alternative network command usage on R2, specifying the interface's exact IP address with a 0.0.0.0 wildcard mask. 11:53 - 14:56: Demonstrates the interface-specific configuration method on R3 (ip ospf 10 area 0).
Step 3: Configure Passive Interfaces
By default, OSPF sends Hello packets out of all enabled interfaces. This is unnecessary and a security risk on interfaces connected to end-user LANs where no OSPF neighbors will ever exist. We can suppress these packets by configuring the interface as passive.
R1(config-router)# passive-interface <interface-name>
The interface's network will still be advertised, but the router will no longer send or process OSPF Hellos on that link.
2.2.13 Packet Tracer - Point to Point Single Area OSPFv2 Configuration
The video 'Point to Point Single Area OSPFv2 Configuration' concludes the configuration section by demonstrating how to secure LAN interfaces.
Watch from 14:56 to 17:18 to see how the passive-interface command is applied to the LAN-facing interfaces of all three routers to prevent unnecessary OSPF traffic.
2. OSPFv2 Verification
After configuration, you must verify that OSPF is operating correctly. Several show commands are essential for this.
The Cisco Press article 'Configure, Verify, and Troubleshoot Single Area OSPFv2 for IPv4' provides a clear, concise guide to the most important verification commands.
Please read the section titled 'Example 16.2 Verifying Single Area OSPF'. Focus on the purpose of the three commands shown: show ip ospf neighbor, show ip route, and ping.
Here's a summary of the key verification commands:
| Command | Purpose |
|---|---|
show ip ospf neighbor |
The most important command. It confirms that the router has formed adjacencies with its neighbors. You can see the neighbor's RID, priority, state (e.g., FULL/DR), and the interface the neighbor is reachable on. |
show ip protocols |
Provides a summary of the entire OSPF process, including the process ID, Router ID, networks being advertised, and passive interfaces. |
show ip route ospf |
Displays only the OSPF-learned routes in the routing table. Routes are marked with an "O". |
show ip ospf interface [brief] |
Shows detailed OSPF information for each interface, such as the area, cost, timers, and DR/BDR status for the segment. |
3. Transitioning to OSPFv3 (for IPv6)
Now, let's shift our focus to OSPFv3. While its goal is the same—to provide link-state routing—its implementation for IPv6 has some key differences from OSPFv2.
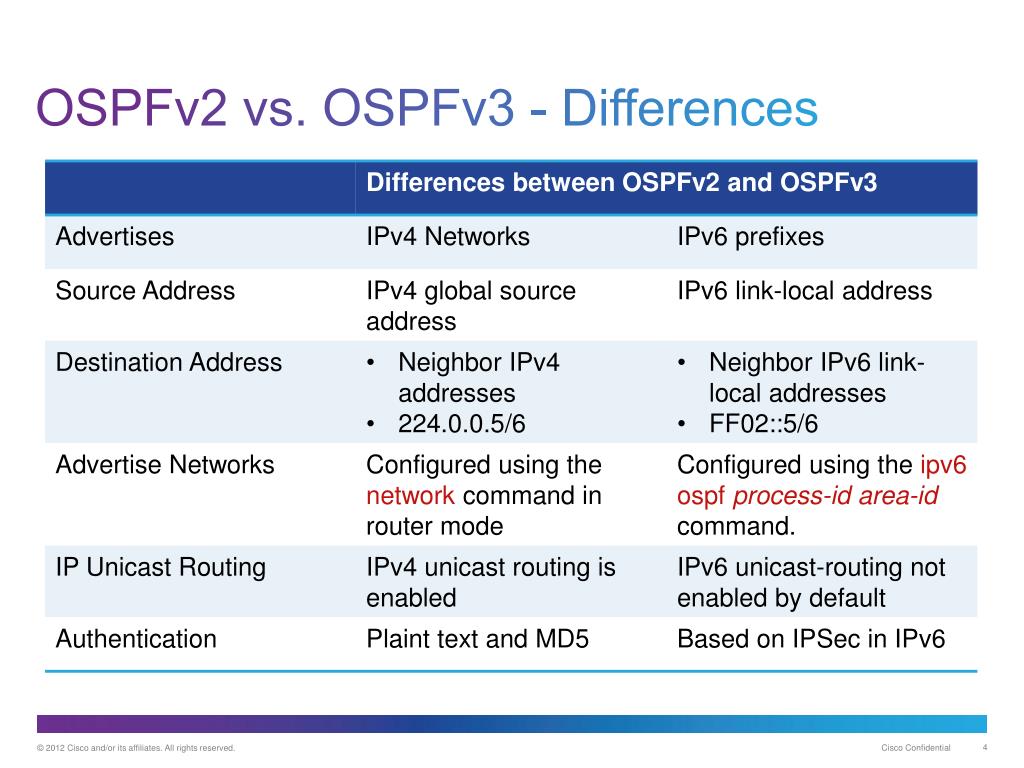
The most significant changes are:
- Activation: OSPFv3 is only enabled on a per-interface basis. The
networkcommand is not used. - Addressing: It uses IPv6 link-local addresses for neighbor adjacencies.
- Router ID: It still uses a 32-bit IPv4-style Router ID, which must be manually configured in an IPv6-only environment.
4. Single-Area OSPFv3 (for IPv6) Configuration
Configuring OSPFv3 is generally more straightforward than OSPFv2.
Step 1: Global Prerequisites
Before starting, ensure global IPv6 routing is enabled.
R1(config)# ipv6 unicast-routing
Step 2: Configure the OSPFv3 Process
Similar to OSPFv2, you start an OSPFv3 process. However, the command now specifies IPv6. A Router ID is mandatory.
R1(config)# ipv6 router ospf <process-id>
R1(config-rtr)# router-id <A.B.C.D>
Step 3: Activate OSPFv3 on Interfaces
This is the crucial step. You enable OSPFv3 directly on each participating interface.
R1(config)# interface <type-number>
R1(config-if)# ipv6 address <ipv6-address/prefix>
R1(config-if)# ipv6 ospf <process-id> area <area-id>
Note that passive-interface works the same way as in OSPFv2, but it's configured under the ipv6 router ospf process.
OSPF Configuration Guide - IPv6 Routing: OSPFv3
For a definitive guide on OSPFv3, we'll turn to the official Cisco documentation. This resource outlines the key differences and the configuration process.
First, read the subsection 'Comparison of OSPFv3 and OSPF Version 2' to solidify your understanding of the differences. Then, review the table in the section 'Configuring the OSPFv3 Device Process'. Focus on the commands for Step 3 (router ospfv3), Step 10 (passive-interface), and Step 12 (router-id). The other steps relate to more advanced features we will cover later.
Test your understanding!
You are configuring OSPFv3 on a router that has only IPv6 addresses. You enable the process with ipv6 router ospf 1 and enable it on an interface with ipv6 ospf 1 area 0. However, the process doesn't start, and no adjacencies are formed. What crucial configuration step are you likely missing?
Show answer
You are missing the router-id <A.B.C.D> command under the ipv6 router ospf 1 process. OSPFv3 still requires a 32-bit Router ID. If there are no IPv4 addresses on the router from which to derive one automatically, the process will not start until a Router ID is manually configured.
5. OSPFv3 Verification
Verification commands for OSPFv3 are parallel to their OSPFv2 counterparts, simply substituting ipv6 for ip.
show ipv6 ospf neighborshow ipv6 protocolsshow ipv6 route ospfshow ipv6 ospf interface [brief]
The Cisco documentation you just reviewed contains a comprehensive list of these commands in the section "Verifying OSPFv3 Configuration and Operation."
6. A Comprehensive Configuration Example
We have covered the individual components of a single-area OSPF configuration. Now, let's watch a complete walkthrough that ties together many of these concepts, including some optional parameters for tuning OSPF behavior.
This walkthrough covers:
- Activating OSPF using both
networkand interface-specific commands. - Setting Router IDs.
- Configuring passive interfaces.
- Influencing the DR/BDR election with
ip ospf priority. - Modifying link cost with
auto-cost reference-bandwidthandip ospf cost. - Injecting a default route with
default-information originate. - Adjusting timers.
2.7.1 Packet Tracer - Single-Area OSPFv2 Configuration
The video 'Single-Area OSPFv2 Configuration' from Tech Acad provides an excellent end-to-end Packet Tracer activity that demonstrates a realistic configuration scenario, including many of the optional parameters we've discussed.
Watch this video from 01:35 to 28:05. You don't need to memorize every single command, but focus on how the different pieces fit together to build a functional OSPF network. Observe how the configuration directly addresses the requirements laid out in the activity.
Conclusion
In this lesson, we have put OSPF theory into practice. You learned the essential commands to configure and verify a single-area OSPF network for both IPv4 and IPv6.
Key Takeaways:
- OSPFv2 Configuration: Activated via
router ospf <pid>and either thenetworkcommand or theip ospf <pid> area <aid>interface command. - OSPFv3 Configuration: Activated via
ipv6 router ospf <pid>and theipv6 ospf <pid> area <aid>interface command. Thenetworkcommand is not used. - Router ID: A unique, 32-bit RID is mandatory for both versions and should always be manually configured for stability.
- Passive Interfaces: Use the
passive-interfacecommand under the OSPF process to suppress Hellos on LAN segments for efficiency and security. - Verification: A standard set of
showcommands (... ospf neighbor,... route ospf,... protocols,... ospf interface) are used to verify adjacencies, learned routes, and interface status for both v2 and v3.
Preview of the Next Lesson:
A single area is effective for smaller networks, but OSPF's true power lies in its scalability. To support large enterprise networks, we must divide the network into a hierarchy of multiple areas. In our next lesson, we will focus on how to design multi-area OSPF hierarchies using area types (standard, stub, totally stubby, NSSA).