Welcome to the next step of our coding journey! In the last lesson, we successfully installed the Python interpreter, which is the core "engine" that understands and runs Python code. Now that your computer speaks Python, we need a sophisticated workshop where you can write, manage, and test your programs. This lesson will guide you through installing and setting up a professional code editor, Visual Studio Code, which will be your primary tool for all the coding we do in this course.
Our goal is to get your development environment fully configured. By the end of this lesson, you will have installed Visual Studio Code, equipped it with the necessary Python tools, and connected it to the interpreter from our previous lesson, making you ready to write your first program.
Why Use a Code Editor?
You could technically write Python code in a simple text editor like Notepad or TextEdit, but that would be like trying to build a car with only a wrench. A specialized code editor, or an Integrated Development Environment (IDE), provides a suite of tools designed to make programming easier, faster, and less error-prone.
We will be using Visual Studio Code (VS Code), which is a free, highly popular, and powerful code editor developed by Microsoft. It's a great choice for beginners because it's relatively lightweight but can be extended to handle complex projects.
Here are a few key features that a code editor like VS Code provides:
- Syntax Highlighting: It colors different parts of your code (keywords, variables, strings, etc.) to make it much more readable.
- IntelliSense (Code Completion): It intelligently suggests code as you type, which helps you write code faster and with fewer typos.
- Integrated Terminal: It includes a command-line terminal directly within the editor, so you don't have to switch windows to run your code.
- Debugging Tools: It helps you find and fix errors in your code by allowing you to step through it line by line.
Let's get started with the installation.
Step 1: Install Visual Studio Code
First, you need to download and install VS Code on your computer. The official VS Code YouTube channel provides a great video that walks through the entire setup process. We will refer to different parts of this video as we go.
Setting up VS Code for Python Beginners 🐍
This video, "Setting up VS Code for Python Beginners," will be our primary guide for this lesson. It clearly demonstrates each step of the process.
For now, just watch the first segment on downloading the application from the official website, code.visualstudio.com, and installing it.
Follow the instructions in the video for your operating system (Windows, macOS, or Linux). Accept the default settings during the installation process. Once it's installed, open the application.
For those who prefer a text-based guide, the article from DataCamp also provides clear instructions.
Setting Up VSCode For Python: A Complete Guide
This section of the DataCamp guide offers a concise, text-based alternative for the installation process.
Please read the section titled "Installing VSCode" for direct links and a quick overview of the installation.
Step 2: A Quick Tour of the Interface
When you first open VS Code, the interface might look a bit busy, but it's organized into a few logical areas. Taking a moment to familiarize yourself with them will make the tool much less intimidating.
Let's return to the video from the VS Code channel for a guided tour.
Setting up VS Code for Python Beginners 🐍
The presenter gives a clear and concise tour of the main components of the VS Code user interface.
Watch the segment from "a quick little tour" where the following areas are explained: Activity Bar (far left, with icons for different views) Sidebar (shows files, search results, etc.) Editor (the main area where you'll write code) Panels (at the bottom, includes the terminal) Status Bar (the blue bar at the very bottom)
Don't worry about memorizing everything right now; you'll become comfortable with these areas through use.
Step 3: Install the Python Extension
Out of the box, VS Code is a general-purpose editor. To unlock its powerful Python-specific features, you need to install the official Python extension. This extension, also provided by Microsoft, bundles together everything you need for a great Python experience, including IntelliSense, linting (checking for errors), and debugging support.
The following image shows you what to look for in the Extensions view.
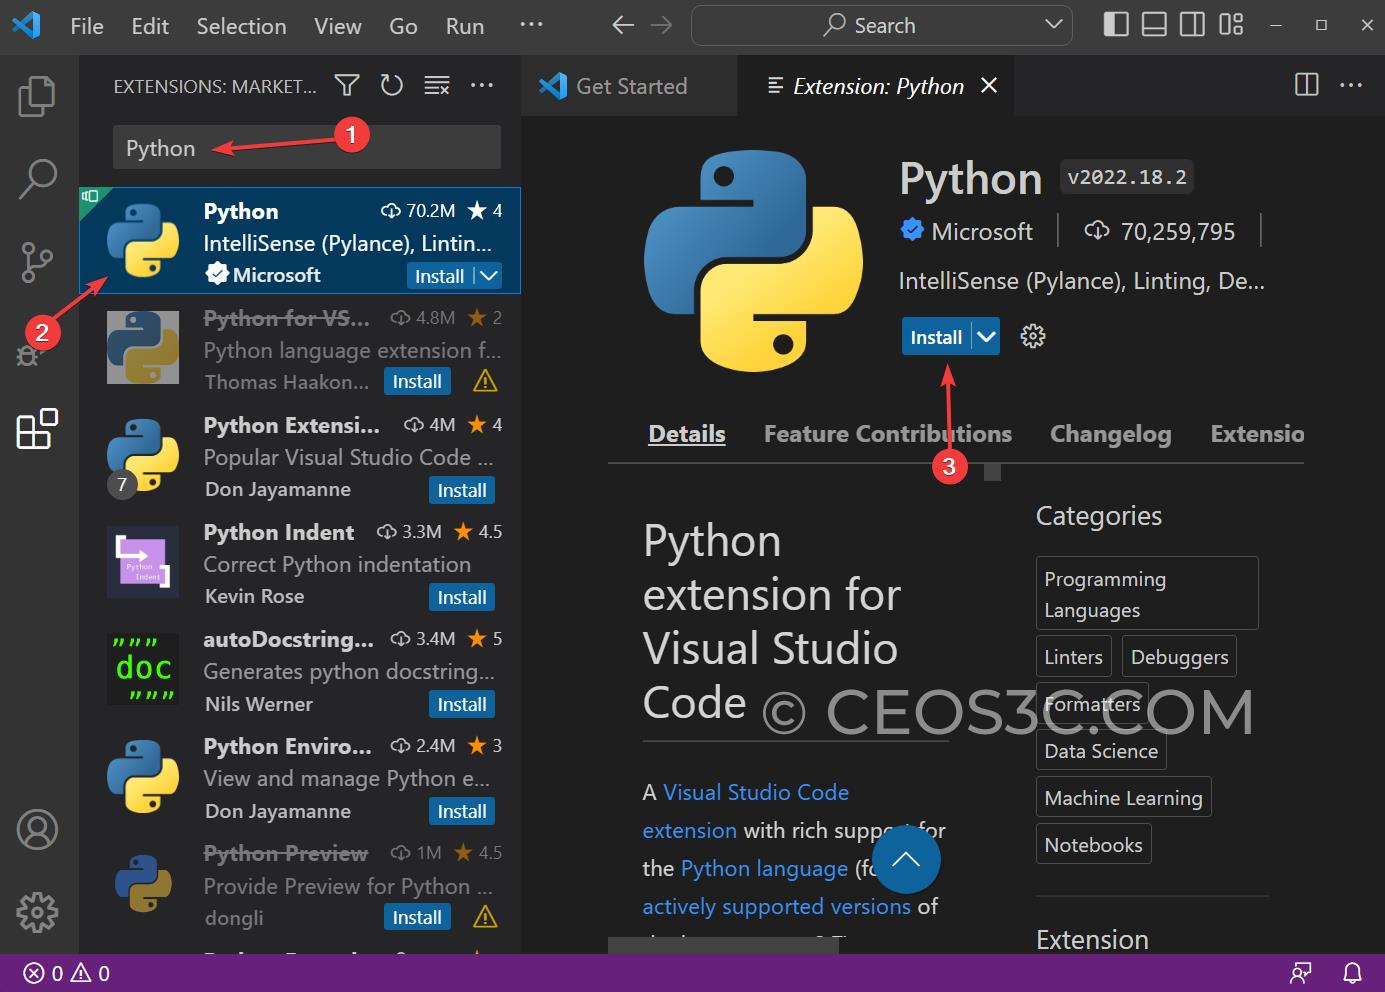
Let's go back to our video guide to see this process in action.
Setting up VS Code for Python Beginners 🐍
This part of the video shows exactly how to find and install the essential Python extension from the VS Code Marketplace.
Watch the segment from "let's head into the extension marketplace" to see how to search for and install the Microsoft Python extension.
Once you click "Install," VS Code will download and set up the extension for you. This one-time setup is the key to turning VS Code into a first-class Python IDE.
Step 4: Select Your Python Interpreter
Now that the Python extension is installed, you need to perform one final, crucial step: you must tell VS Code which Python interpreter to use. This connects the editor to the Python "engine" you installed in our last lesson. This allows VS Code to run your code and provide accurate code completions.
You can do this using the Command Palette, which is a powerful search bar for all of VS Code's commands.
- Open the Command Palette:
- On Windows/Linux: Press
Ctrl+Shift+P - On macOS: Press
Cmd+Shift+P
- On Windows/Linux: Press
- Type
Python: Select Interpreterinto the search box that appears. - Select that command from the list. You will then be shown a list of Python interpreters that VS Code has found on your system.
- Choose the one you installed in the previous lesson (it will likely be labeled as "Recommended" and show the latest version, like Python 3.12.x).
The video guide demonstrates this process clearly.
Setting up VS Code for Python Beginners 🐍
This final segment shows how to link your VS Code setup with the Python installation from our previous lesson.
Watch from where the presenter discusses interpreters. Pay close attention to how they use the Command Palette (Ctrl+Shift+P or Cmd+Shift+P) to find and select the correct Python interpreter.
Once you select the interpreter, you'll see the Python version appear in the status bar at the bottom-left of the VS Code window. This confirms that your editor is now fully configured for Python development!
Optional: Personalize Your Workspace with Profiles
VS Code offers many ways to customize your experience. One advanced feature is Profiles, which let you save different configurations (settings, extensions, UI layouts) for different tasks. For example, you could have one profile for Python development and another for web development.
The GIF below demonstrates how you can create a new profile specifically for Python. This is an optional step, but it's a good example of how flexible VS Code can be.
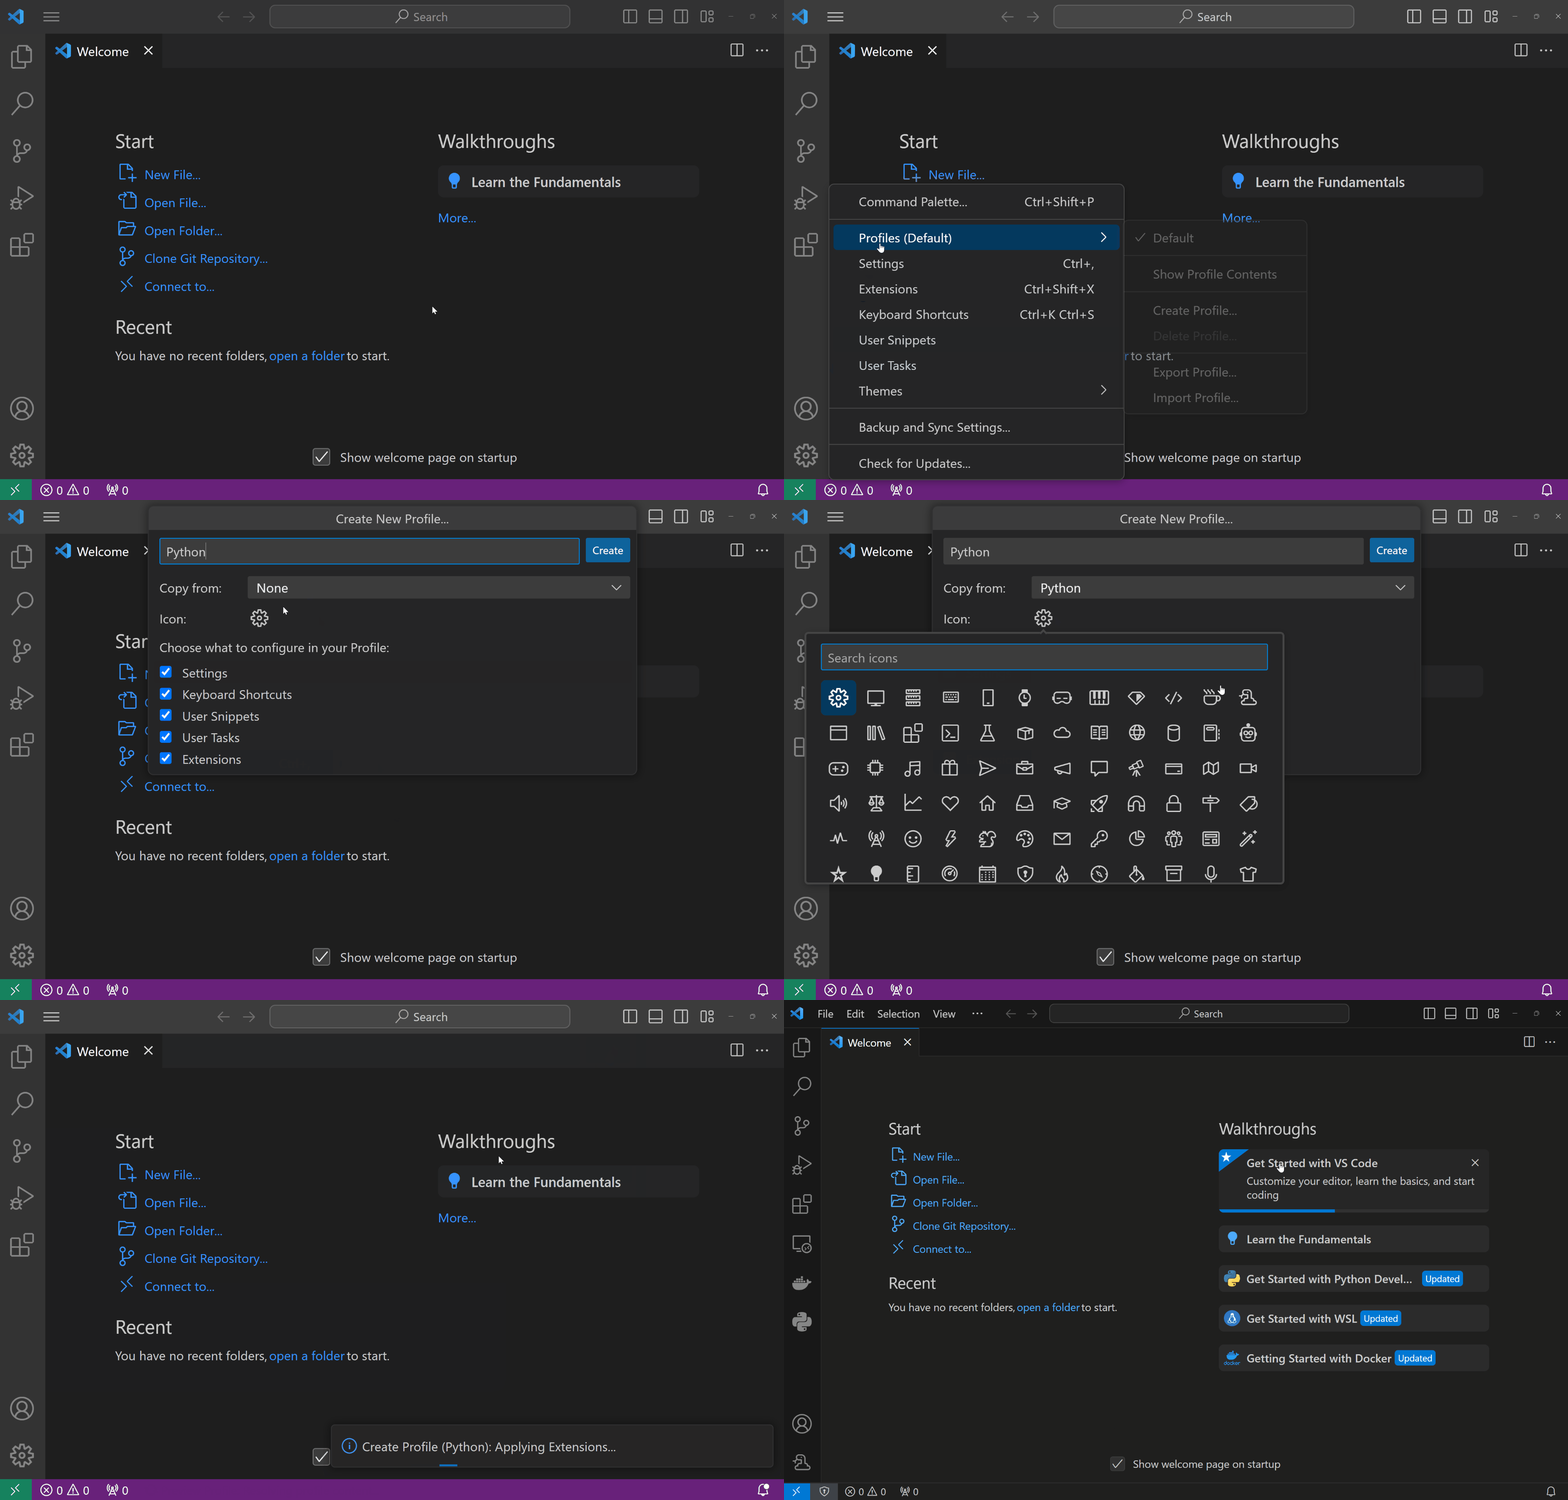
For now, the default setup is perfect for our needs, but it's useful to know that such customization is possible as you grow as a developer.
Conclusion
Excellent work! You have successfully set up your professional coding environment. While it involved a few steps, this is a one-time process that lays the foundation for all your future coding projects.
Let's summarize the key takeaways:
- A code editor like Visual Studio Code provides essential tools like syntax highlighting and code completion that make programming much easier.
- The Python extension from Microsoft is what transforms VS Code into a powerful Python IDE.
- Selecting the Python interpreter is the crucial step that connects VS Code to your Python installation, allowing it to run and understand your code.
Your environment is now complete. You have the Python interpreter (the engine) and a configured code editor (the cockpit). In our next lesson, we will finally put these tools to use. You will write and run your very first Python program—a classic "Hello, World!"—and see your code come to life.