Introduction
Welcome to the final lesson in our module on data modeling. In our previous lessons, we dove deep into building robust dimension tables, culminating in the implementation of Type 2 Slowly Changing Dimensions to preserve a full historical record of your data. We now have the building blocks for our analytical model.
This lesson brings everything together to address the learning outcome: Construct a star schema with fact and dimension tables in the gold layer.
The gold layer of the Medallion Architecture is designed for business intelligence and analytics. The star schema is the most common and effective data modeling pattern for this purpose. It organizes data in a way that is intuitive for analysts and highly optimized for the types of queries they run.
Today, you will learn to:
- Identify the core components of a star schema: fact and dimension tables.
- Follow a step-by-step process to transform silver-layer data into a gold-layer star schema.
- Implement this model using practical SQL, connecting dimensions to a central fact table.
What is a Star Schema?
At its core, a star schema consists of one or more fact tables referencing any number of dimension tables. Imagine a star: the fact table is the center, and the dimension tables are the points.
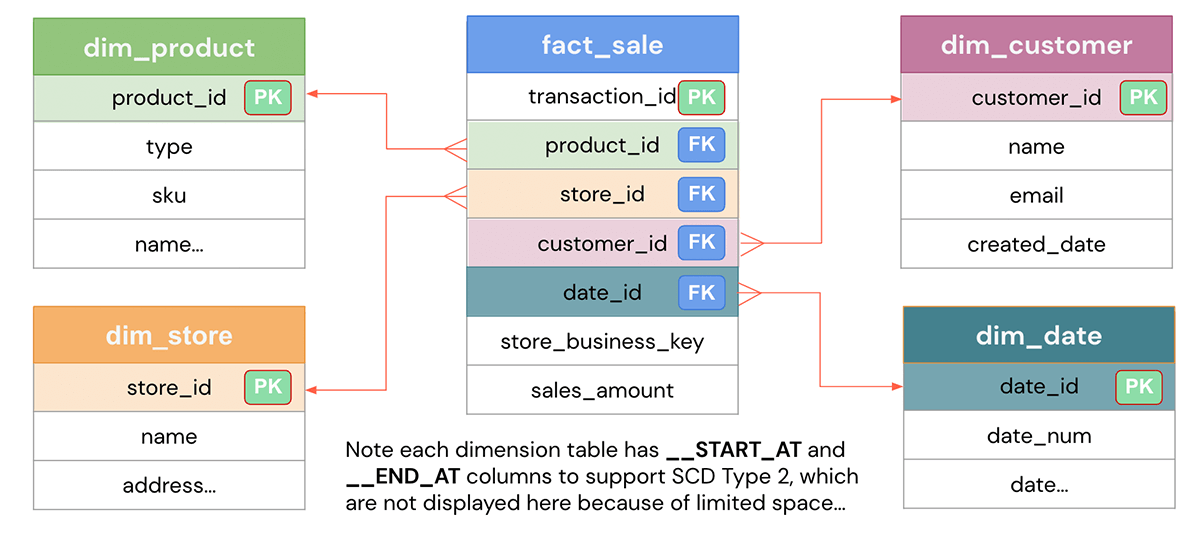
The roles of these tables are distinct:
- Dimension Tables: They contain descriptive, contextual attributes. Think of them as answering the "who, what, where, when, and why" of a business event. For example, a
dim_customertable describes customers, and adim_producttable describes products. These tables are generally wide (many columns), denormalized, and hold the attributes you'll use to filter, group, and label your data. We've spent the last two lessons building these. - Fact Tables: They store the measurements, metrics, or "facts" of a business process. They are typically very granular and deep (many rows). A fact table holds two essential types of data:
- Measures: Numeric values that can be aggregated (e.g.,
sales_amount,quantity_sold). - Foreign Keys: Keys that link to the primary keys of the dimension tables, creating the connections in the schema.
- Measures: Numeric values that can be aggregated (e.g.,
To get a clear overview of these concepts and their role in the gold layer, the following video provides an excellent introduction.
Building The Gold Layer: Star Schema Modeling | Data Engineer Portfolio Project | #SQL Project 9
This video, from the 'Data with Baraa' channel, introduces the process of building a gold layer, explains the different types of data models, and clarifies the distinction between fact and dimension tables.
Please watch the video from the beginning to 07:46. Focus on: The overall process for building the gold layer. The difference between conceptual, logical, and physical data models. The comparison of star vs. snowflake schemas and why the star schema is often preferred for analytics. The clear definition of fact tables (answering 'how much/many') and dimension tables (answering 'who/what/where').
A Practical Walkthrough: Building a Star Schema
The best way to understand how to construct a star schema is to build one. We will follow a hands-on project that transforms a set of silver-layer tables into a clean, queryable star schema in the gold layer. The rest of the video you just started provides a complete walkthrough.
Your background as a Data Engineer will be very useful here, as the process involves familiar steps: analyzing source data, writing SQL for data integration and transformation, and ensuring data quality.
Step 1: Analyze Source Data and Identify Business Objects
Before writing any code, the first step is to analyze your silver-layer tables and identify the core business entities you need to model. This involves grouping related source tables into logical concepts that will become your facts and dimensions.
Building The Gold Layer: Star Schema Modeling | Data Engineer Portfolio Project | #SQL Project 9
Let's continue with the video project. The presenter now analyzes the source data to identify the key business objects that will form the star schema.
Watch from 07:46 to 10:47. Observe how the presenter visually groups the source tables into 'product', 'customer', and 'sales' objects. This conceptual step is critical for planning your data model before implementation.
Step 2: Construct the Dimension Tables
With the business objects defined, you can start building the dimension tables. This process typically involves:
- Joining one or more silver-layer tables.
- Cleaning and integrating data (e.g., resolving conflicting information from different sources).
- Applying user-friendly column names.
- Generating a surrogate key—a unique ID generated within the data warehouse that serves as the primary key for the dimension.
Building The Gold Layer: Star Schema Modeling | Data Engineer Portfolio Project | #SQL Project 9
Now we move to the implementation. The video demonstrates how to write the SQL to create the 'Dim_Customers' and 'Dim_Products' tables.
Watch from 11:39 to 34:35. This is a detailed section, so focus on the patterns: Dim Customers (11:39 - 27:20): Note how three source tables are joined using LEFT JOIN to avoid data loss. Pay attention to the logic used to integrate the gender column from two different sources and how a surrogate key (customer_key) is generated using the ROW_NUMBER() window function. Dim Products (27:20 - 34:35): See how the query filters for only current product records (end_date IS NULL) and again generates a surrogate key (product_key).
Step 3: Construct the Fact Table
This is where the star schema comes together. The fact table links to the dimensions you just created. The crucial step here is to perform a lookup against your new dimension tables to retrieve their surrogate keys.
The process is as follows:
- Start with your source transactional data (e.g., a
sales_transactionstable from the silver layer). - For each foreign key in the source (e.g.,
product_id,customer_id), join to the corresponding dimension table (Dim_Products,Dim_Customers). - Select the surrogate key from the dimension table, not the original business key.
- Include the numeric measures from the transactional data.
Building The Gold Layer: Star Schema Modeling | Data Engineer Portfolio Project | #SQL Project 9
This final implementation step shows how to build the 'Fact_Sales' table, connecting it to the dimensions we just created.
Watch from 34:35 to 38:57. The key takeaway here is the 'data lookup' process. Observe how the sales data is joined with gold.dim_products and gold.dim_customers specifically to fetch their surrogate keys (product_key, customer_key). This is the action that links the star schema.
Step 4: Validate and Document
A data model is only useful if it's correct and people know how to use it. The final steps of a production pipeline should always be validation and documentation.
Building The Gold Layer: Star Schema Modeling | Data Engineer Portfolio Project | #SQL Project 9
The video concludes by demonstrating how to validate the model's relationships and create documentation like an entity-relationship diagram and a data catalog.
Watch from 38:57 to 47:46. Note the simple LEFT JOIN queries used to verify that every key in the fact table has a corresponding entry in the dimension tables. Also, appreciate the value of creating a visual diagram and a data catalog to help business users understand and trust the data model.
Databricks Best Practices for Star Schemas
The video provided excellent, universally applicable SQL patterns. To optimize these for Databricks and prepare for the certification, let's incorporate some platform-specific best practices from the official Databricks documentation.
Surrogate Keys with IDENTITY Columns
While ROW_NUMBER() works, a more modern and integrated approach in Databricks for generating surrogate keys is to use IDENTITY columns. You can define this directly in your CREATE TABLE statement. This simplifies your INSERT logic as the key is generated automatically.
CREATE TABLE main.gold.dim_customer (
  customer_key BIGINT GENERATED ALWAYS AS IDENTITY,
  customer_number INT,
  first_name STRING,
  -- ... other columns
)
This best practice is detailed in the articles "Implementing a dimensional data warehouse with Databricks SQL" (LINK) and "Star Schema Data Modeling Best Practices on Databricks SQL" (LINK).
Informational Constraints
Databricks supports defining PRIMARY KEY and FOREIGN KEY constraints. While they are not enforced, they serve two critical purposes:
- Query Optimization: The query planner can use this information to optimize joins.
- Data Lineage: Unity Catalog uses these constraints to automatically discover relationships between tables and visualize data lineage.
-- In the fact table DDL
CREATE TABLE main.gold.fact_sales (
  order_number STRING,
  product_key BIGINT,
  customer_key BIGINT,
  -- ... measures
  CONSTRAINT fk_product FOREIGN KEY (product_key) REFERENCES main.gold.dim_product(product_key),
  CONSTRAINT fk_customer FOREIGN KEY (customer_key) REFERENCES main.gold.dim_customer(customer_key)
)
This is another key recommendation from resources LINK and LINK.
Performance with CLUSTER BY
For large tables, join performance is critical. A powerful optimization is to use CLUSTER BY (Liquid Clustering) on your fact table, using the foreign keys to the most frequently filtered dimensions. This co-locates related data, significantly speeding up joins.
-- On your fact table
CLUSTER BY (customer_key, product_key)
This performance tip is highlighted in "Star Schema Data Modeling Best Practices on Databricks SQL" (LINK).
Documentation with COMMENT
As seen in the video, documentation is vital. In Databricks, the best way to do this is by adding COMMENTs directly to your tables and columns. This metadata is then visible to all users in the Catalog Explorer, making your data model self-describing.
COMMENT ON TABLE main.gold.fact_sales IS 'Transactional sales data, linked to customer and product dimensions.';
ALTER TABLE main.gold.fact_sales ALTER COLUMN sales_amount COMMENT 'Total sale amount in USD.';
Conclusion
Congratulations! You have now learned how to design and build the most important analytical structure in a data warehouse. By constructing a star schema, you are transforming cleansed silver-layer data into a highly performant and business-friendly gold-layer asset.
Key Takeaways:
- A star schema organizes data into descriptive dimension tables and quantitative fact tables.
- The fact table is the center of the star, containing numeric measures and foreign keys that point to the dimensions.
- Building a star schema involves identifying business objects, building dimension tables with surrogate primary keys, and then building the fact table by looking up those surrogate keys.
- In Databricks, you can optimize your star schema using
IDENTITYcolumns, informationalPRIMARY KEYandFOREIGN KEYconstraints,CLUSTER BYfor performance, andCOMMENTs for documentation.
Preview of the Next Lesson:
We have now completed our module on data modeling within the Medallion Architecture. You've built bronze, silver, and gold tables, and you understand how to manage historical data and create analytical models. The next logical step is to govern and secure these assets. Our next module, "Data Governance and Security with Unity Catalog," will begin by teaching you how to navigate the Unity Catalog three-level namespace, which provides the foundational structure for managing all the data assets you've learned to create.