Introduction
In our last lesson, you successfully built a Continuous Integration (CI) pipeline to automatically run tests on your pull requests. This ensures that every code change is validated before being merged, forming a critical quality gate. Now, it's time to tackle the second half of CI/CD: Continuous Deployment.
This lesson directly addresses the learning outcome: Deploy pipelines and associated assets across environments using Databricks Asset Bundles.
We will extend the automation concepts from the previous lesson to not just test your code, but to deploy it. You will learn how to structure a Databricks Asset Bundle (DAB) to manage configurations for multiple environments—such as development, staging, and production—and how to automate the deployment process using your CI/CD pipeline. Mastering this skill is essential for any professional Data Engineer, as it enables reliable, repeatable, and automated promotion of data pipelines from development to production.
1. What are Databricks Asset Bundles? A Quick Recap
As we've discussed, a Databricks Asset Bundle (DAB) is a standardized way to package all your project's components—notebooks, Python code, Delta Live Tables pipelines, and Databricks Jobs—along with their settings. The entire bundle is defined in a databricks.yml file, which acts as the single source of truth for your project.
The real power of bundles for CI/CD lies in their ability to define and manage deployments to multiple environments.
CI/CD for Databricks: Advanced Asset Bundles and GitHub Actions
Let's start with a brief recap of what a bundle is and why it's central to the development lifecycle. This video from Databricks provides a concise overview.
Watch the section from 03:05 to 06:46. Pay close attention to: The concept of targets as a way to define different deployment environments (dev, test, prod). How the databricks.yml file is the core of the bundle definition. The key commands databricks bundle validate and databricks bundle deploy.
2. Structuring a Bundle for Multiple Environments
The key to managing deployments across different environments is the targets block in your databricks.yml file. A target is a named configuration that represents a specific deployment destination, typically corresponding to a Databricks workspace or a logical environment within a workspace (e.g., dev, staging, prod).
Here’s a conceptual example of a databricks.yml file with three targets:
bundle:
  name: my-data-project


# Include resource definitions from other files
include:
  - resources/*.yml


# Define the deployment environments
targets:


  # Development target
  dev:


    # 'development' mode creates user-isolated resources (e.g., job named 'dev_user@email_com_my_job')
    mode: development
    default: true
    workspace:
      host: https://<dev-workspace>.databricks.net


  # Staging target for integration testing
  staging:
    workspace:
      host: https://<staging-workspace>.databricks.net


    # Deploy jobs and assets with their defined names, no user prefix
    mode: production


  # Production target
  prod:
    workspace:
      host: https://<prod-workspace>.databricks.net
    mode: production


    # Requires an explicit --target prod flag to deploy, preventing accidental deployments
Your experience with tools like Airflow, which often require managing connections and variables for different environments, provides a good parallel. In DABs, targets serve a similar purpose, but they codify the entire environment's configuration, including compute, permissions, and asset-specific parameters, directly within your version-controlled project.
3. Managing Environment-Specific Configurations
Simply defining targets isn't enough. Your staging environment will need different configurations than prod—for example, different source data paths, cluster sizes, or target schemas. Hardcoding these values in your job definitions would defeat the purpose of having a single codebase.
The solution is parameterization using variables. You define variables for all environment-specific settings and then provide different values for each target.
A Structured Approach to Variables
A robust pattern is to separate your variable definitions into a dedicated folder, with files for common and environment-specific values.
Supercharging Databricks Asset Bundles
The article 'Supercharging Databricks Asset Bundles' outlines an excellent, scalable pattern for organizing variables. This is a best practice for production-grade projects.
Read the sections 'The Power of Parameterization' and 'Real-World Example: Parameterizing SharePoint Workflows'. Focus on: The hierarchical file structure for variables (common.yml, {workflow}.dev.yml, etc.). How to reference these variables in a resource definition (e.g., "${var.sharepoint.target_schema}"). The use of type: complex to group related variables into a single object.
By adopting this structure, your databricks.yml file becomes cleaner, and managing configurations for a new environment is as simple as adding a new variable file.
Reusing Configuration with YAML Anchors
For complex configurations that are reused across multiple jobs within the same file, such as a cluster definition, you can use YAML anchors to avoid repetition. This adheres to the Don't Repeat Yourself (DRY) principle.
Databricks Asset Bundles: Advanced Examples
To keep your YAML definitions clean and maintainable, you can use anchors. This article provides a clear example.
Read the section 'YAML Anchors for code re-use'. Note how the &mycluster anchor is defined and then reused with *mycluster in multiple job definitions.
4. Deploying Pipelines and Associated Assets
The term "assets" in a bundle includes everything your pipeline needs to run. This means not just the job or DLT pipeline definition, but also the notebooks it calls and any custom Python libraries (.whl files) it depends on. When you run databricks bundle deploy, all referenced local files are packaged and uploaded to the target workspace.
For shared code used across multiple projects or bundles, a common pattern is to build it as a Python wheel file and upload it to a location on DBFS or in the workspace. The bundle can then reference this pre-built library.
Databricks Asset Bundles: Advanced Examples
This article also demonstrates how to manage and deploy a shared Python library as a wheel file, a common requirement in complex projects.
Quickly review the section 'Shared Python Package (externally built wheel)'. Understand how a wheel file can be built, uploaded to the workspace, and then referenced within a job task's libraries section.
5. Automating Deployment with GitHub Actions
Now, let's tie everything together. We will extend the CI workflow from the previous lesson to perform Continuous Deployment (CD). The strategy is to trigger deployments based on merges to specific branches, a common practice in Git-based workflows.
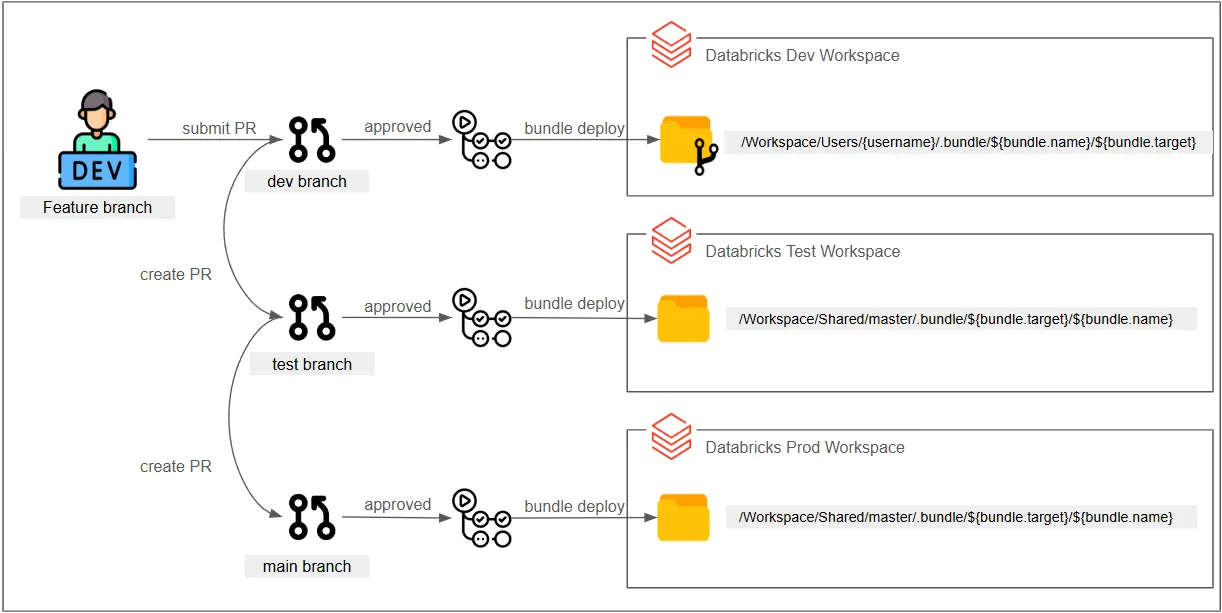
The core of this automation is the databricks bundle deploy command, executed within a GitHub Actions workflow.
# Example step in a GitHub Actions workflow
- name: Deploy to Production
  run: databricks bundle deploy --target prod
  env:


    # Service principal credentials for authentication
    DATABRICKS_HOST: ${{ secrets.DATABRICKS_HOST }}
    DATABRICKS_CLIENT_ID: ${{ secrets.DATABRICKS_CLIENT_ID }}
    DATABRICKS_CLIENT_SECRET: ${{ secrets.DATABRICKS_CLIENT_SECRET }}
The following video provides a comprehensive walkthrough of a professional CI/CD pipeline that implements this branching and deployment strategy.
CI/CD for Databricks: Advanced Asset Bundles and GitHub Actions
This advanced session from Databricks demonstrates a complete CI/CD workflow, showing how different actions are triggered at each stage of the development lifecycle.
Watch the segment from 07:37 to 23:25. It's a bit long but packed with practical details that match your hands-on preference. Focus on: Branching Strategy (07:37 - 15:51): Understand the proposed 'modified git flow' and the different actions taken at each stage (PR to dev, merge to dev, PR to main, merge to main). Live Demo (15:51 - 23:25): Observe how a PR to the dev branch triggers validation, and a subsequent merge triggers a databricks bundle deploy --target test_automated command. This is the 'CD' part in action.
This video clearly distinguishes between CI (running tests on a PR) and CD (deploying after a merge), bringing together the concepts from this lesson and the previous one.
6. Putting it all together: A Practical Scenario
Let's consolidate these concepts with a practical thought exercise.
Scenario:
You are tasked with deploying a Delta Live Tables (DLT) pipeline across three environments. The pipeline's definition is in resources/dlt_pipeline.yml.
Requirements:
devEnvironment:- Target name:
dev - Runs in
developmentmode to create user-specific instances. - Uses a
devcatalog. - Cluster size:
small(1 worker).
- Target name:
stagingEnvironment:- Target name:
staging - Runs in
productionmode. - Uses a
stagingcatalog. - Cluster size:
medium(4 workers). - Deployment is automated when code is merged into the
releasebranch.
- Target name:
prodEnvironment:- Target name:
prod - Runs in
productionmode. - Uses a
maincatalog. - Cluster size:
large_autoscale(8-16 workers). - Deployment is triggered manually in the GitHub Actions UI after a merge to the
mainbranch.
- Target name:
Your Task:
Based on what you've learned, how would you structure your project? Think about:
- What would the
targetsblock indatabricks.ymllook like? - How would you organize your variable files (
variables/)? - What would the variable definitions for
catalog_nameandcluster_configlook like? - How would you reference these variables in your
resources/dlt_pipeline.ymlfile? - What would the triggers look like in your GitHub Actions workflow file(s)?
Take a few minutes to sketch out a solution. This exercise directly mirrors the kind of thinking required for the Databricks certification exam and real-world projects.
Click to see a possible solution outline
databricks.ymltargetsblock:- Define
dev,staging, andprodtargets with their respectivemodeandworkspace.host.
- Define
- Variable Files:
variables/common.yml: Could define default variable structures.variables/dlt.dev.yml:catalog_name: dev,cluster_size: small.variables/dlt.staging.yml:catalog_name: staging,cluster_size: medium.variables/dlt.prod.yml:catalog_name: main,cluster_size: large_autoscale.
- DLT Pipeline Resource (
resources/dlt_pipeline.yml):- The DLT resource would reference variables like
catalog: "${var.catalog_name}". - The cluster definition would reference a complex variable, e.g., using
label: "${var.cluster_size}".
- The DLT resource would reference variables like
- GitHub Actions (
.github/workflows/deploy.yml):- A job for staging deployment triggered by
on: push: branches: [ release ], which runsdatabricks bundle deploy --target staging. - A job for production deployment triggered by
on: workflow_dispatch, which runsdatabricks bundle deploy --target prod.workflow_dispatchallows for manual triggering.
- A job for staging deployment triggered by
Conclusion
Congratulations! You have now learned how to implement a full CI/CD lifecycle for your Databricks projects. By leveraging Databricks Asset Bundles, you can confidently and automatically deploy your data pipelines and all their associated assets across multiple environments.
Key Takeaways:
targetsare King: Thetargetsblock indatabricks.ymlis the cornerstone of multi-environment deployment.- Parameterize Everything: Use variables to abstract away environment-specific configurations like catalogs, schemas, and cluster settings. A structured variable file system is a best practice.
- Deploy with a Command: The
databricks bundle deploy --target <env>command is the engine that drives your deployments. - Automate with CI/CD: Integrate the deployment command into your GitHub Actions workflow, triggered by merges to specific branches (
dev,main), to achieve Continuous Deployment. - Bundles Include All Assets: A deployment includes not just the job definition but also all dependent notebooks and libraries, ensuring a complete and consistent package.
Preview of the Next Module:
This lesson concludes our deep dive into CI/CD for Databricks. You have now covered the entire development lifecycle, from writing code and testing it, to deploying it automatically.
In the next module, "Professional Certification Scenarios," we will pivot to applying this knowledge. You will be presented with realistic, exam-style scenarios that require you to analyze a problem and select the most appropriate Databricks tools and patterns to solve it—drawing on everything you've learned about data ingestion, the Medallion Architecture, orchestration, governance, and CI/CD.