Introduction
Hello! In our last lesson, we focused on securing your pipelines by managing credentials with Databricks Secret Scopes. This ensures that your jobs can safely access the data and services they need. Now, we'll address the other side of production governance: controlling the compute resources themselves.
Without guardrails, it's easy for cluster configurations to sprawl, leading to inconsistent environments and unpredictable costs. This lesson directly tackles that challenge and aligns with the learning outcome: Configure cluster policies to control compute resource usage and costs.
As a data engineer, you understand that resource management is as critical as code quality for building a robust and efficient platform. Here, you'll learn how to implement governance-as-code within Databricks to enforce standards, optimize costs, and simplify the user experience for your entire team. This is a core competency for production operations and a key area for the certification exam.
By the end of this lesson, you will be able to:
- Explain the role of cluster policies in workspace governance and cost management.
- Interpret and write cluster policy definitions using JSON.
- Configure policies to restrict cluster size, instance types, and auto-termination.
- Use virtual policy attributes like
dbus_per_hourandcluster_typefor high-level control. - Enforce mandatory tagging for cost attribution.
- Assign policies to users and groups and set usage limits.
1. The "Why": Policies for Governance and Cost Control
Before diving into the "how," let's establish why cluster policies are so important. In a workspace without policies, users can create clusters of any size, with any configuration, and leave them running indefinitely. This leads to two major problems:
- Cost Overruns: Large, idle clusters can quickly consume your budget.
- Inconsistent Environments: Different teams using different Spark versions or configurations can lead to works-on-my-machine problems and make platform management difficult.
Cluster policies solve this by allowing administrators to define a set of rules that constrain the options available in the cluster creation UI.
To understand cost, you first need to understand the Databricks Unit (DBU). A DBU is a normalized unit of processing power on the Databricks platform, and your costs are a function of the DBUs your clusters consume over time. The DBU rate depends on the VM instance type, size, and workload type (e.g., Jobs compute is cheaper than All-Purpose compute).
Best Practices for Cost Management on Databricks
This blog post, 'Best Practices for Cost Management on Databricks,' provides an excellent foundation. It explains DBUs and introduces cluster policies as the primary tool for managing compute resources.
Read the sections 'What is a DBU?' and 'Managing costs through cluster policies,' including the 'What are cluster policies?' subsection. This will frame the problem and introduce the solution we'll be implementing.
2. The Anatomy of a Cluster Policy
A cluster policy is a JSON document that defines rules for cluster attributes. Each rule specifies an attribute (like node_type_id) and a policy type that constrains it.
Policy Types
There are two main categories of policy types:
- Fixed policies: These lock down an attribute to a specific value. Examples:
fixed,forbidden. - Limiting policies: These restrict the user's choices to a set of options. Examples:
allowlist,blocklist,range,regex.
The official documentation provides the definitive reference for all possible policy types and attributes. You don't need to memorize it, but it's crucial to know where to find this information.
Skim the section 'Supported policy types'. Focus on understanding the purpose of fixed, allowlist, and range policies, as these are the most common ones you will use for cost control.
Policy Attributes
Policies can control nearly any setting you see in the cluster creation UI. For cost and resource management, some of the most important attributes are:
autotermination_minutes: Enforces shutdown of idle clusters.autoscale.min_workersandautoscale.max_workers: Controls the size of an autoscaling cluster.node_type_id: Restricts the available VM instance types.custom_tags.*: Forces users to apply tags (e.g., for cost centers).- Virtual Attributes:
dbus_per_hour: A powerful attribute to set a direct cap on the hourly cost of a cluster.cluster_type: Restricts a policy tojob,all-purpose, ordltcompute.
This JSON definition is then added in the Databricks UI, as shown below.

3. Hands-On: Creating a Practical Cluster Policy
Let's apply these concepts by building a policy. This is best done through a hands-on demonstration. The following video provides a clear, step-by-step walkthrough of creating a custom policy from scratch.
11. Azure Databricks Cluster Policies | Create and manage compute policies in Azure Databricks
This video by Vijay Gadhave provides a complete, practical demonstration of creating and applying a cluster policy. It aligns perfectly with your preference for hands-on learning.
Watch the following sections: Introduction (00:00 - 01:55): A great overview of the benefits of cluster policies. Defining Requirements (02:52 - 04:43): See how a set of business requirements translates into policy rules. Creating the Policy (04:43 - 10:56): Follow along as the presenter writes the JSON and explains each rule (fixed, allowlist). This is the core of the lesson.
Your Turn: Create a "General Development" Policy
Based on the video and documentation, let's consolidate this into a single, practical policy you might create for a development team. In your Databricks workspace, navigate to Compute, then the Policies tab, and click Create policy.
You can start from the "Unrestricted" family and define your own rules. Here is a sample JSON for a "General Development" policy. This policy aims to provide flexibility while still maintaining strong cost controls.
{
  "autotermination_minutes": {
    "type": "fixed",
    "value": 60,
    "hidden": true
  },
  "autoscale.max_workers": {
    "type": "range",
    "maxValue": 10,
    "defaultValue": 4
  },
  "node_type_id": {
    "type": "allowlist",
    "values": [
      "Standard_DS3_v2",
      "Standard_DS4_v2"
    ],
    "defaultValue": "Standard_DS3_v2"
  },
  "driver_node_type_id": {
    "type": "fixed",
    "value": "Standard_DS3_v2",
    "hidden": true
  },
  "custom_tags.cost_center": {
    "type": "unlimited",
    "defaultValue": "development"
  },
  "dbus_per_hour": {
    "type": "range",
    "maxValue": 50
  }
}
Let's break down what this policy does:
autotermination_minutes: Forces all clusters to terminate after 60 minutes of inactivity. Thehidden: trueproperty removes this option from the UI, preventing users from changing it.autoscale.max_workers: Allows clusters to scale up to a maximum of 10 worker nodes, but defaults to 4, encouraging users to be mindful of the resources they request.node_type_id: Restricts developers to two cost-effective instance types ("T-shirt sizes").driver_node_type_id: Locks the driver node to the smallest instance type to prevent oversizing.custom_tags.cost_center: Ensures all clusters are tagged with acost_centertag. Here,unlimitedwith adefaultValuemakes it easy for users, but for stricter governance, you could use anallowlistto force a selection.dbus_per_hour: This is a powerful catch-all. It ensures that no matter what combination of settings a user chooses, the total DBU consumption per hour cannot exceed 50.
4. Managing Policy Permissions and Limits
Creating a policy is only half the battle. You also need to control who can use it. This is done on the Permissions tab of the policy editor.
You can grant the Can use permission to specific users or groups. This is how you tailor compute resources to different teams (e.g., a "Power User" policy for the data science team, and a more restrictive "Job" policy for production ETL).
Furthermore, you can set a Max clusters per user, providing another layer of resource control.
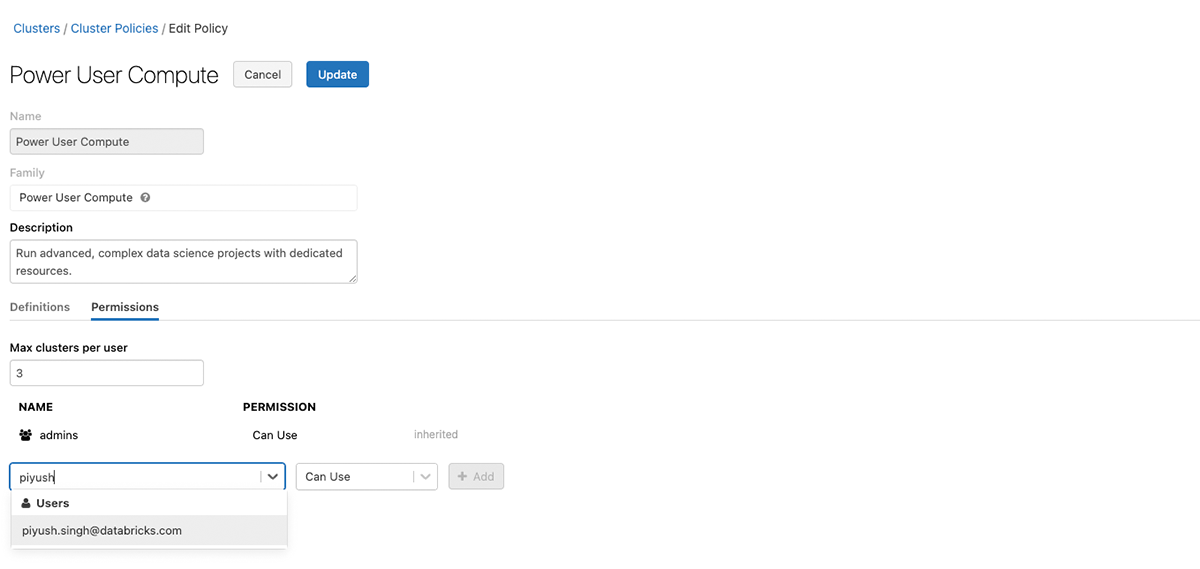
This combination of JSON definitions and UI-based permissions gives you a complete framework for governing compute usage in your workspace.
Databricks Cost Management: Tips and Tools to Stay Under Budget
For a final reinforcement of these concepts, let's refer back to the cost management presentation from Databricks.
Watch the sections on 'Control' (24:22 - 26:19) and tagging (26:19 - 28:52). This will summarize how policies and tags work together to form a comprehensive cost control strategy.
Conclusion
You've now learned how to move from an ungoverned, free-for-all compute environment to one that is secure, cost-effective, and standardized. By mastering cluster policies, you are equipping yourself with one of the most powerful administrative tools on the Databricks platform.
Key Takeaways:
- Policies Enforce Governance: They are JSON-based rule sets that restrict cluster creation options to control costs and ensure consistency.
- Control Key Attributes: The most effective policies limit
autotermination_minutes,autoscale.max_workers,node_type_id, and enforcecustom_tagsfor cost attribution. - Use Virtual Attributes for Broad Control:
dbus_per_hoursets a hard cap on hourly cost, whilecluster_typeensures policies are used for their intended purpose (e.g., jobs vs. interactive). - Permissions are Crucial: Policies are only effective when assigned to the correct users and groups, with appropriate limits like max clusters per user.
- Start with Templates: Databricks provides policy families (e.g., Personal Compute, Job Compute) that serve as excellent starting points for your own custom policies.
Preview of the Next Lesson:
Now that we have control over how our compute resources are configured, the next logical step is to automate when they run. In the upcoming lesson, "Trigger workflows based on file arrival events," we will explore how to build event-driven pipelines that automatically launch jobs as new data lands in your cloud storage, moving us further into the realm of production automation.