Introduction
Hello! In our previous lesson, you mastered scheduling jobs and monitoring their run history, which are crucial skills for automating and managing production pipelines. We saw how to set up schedules and use the UI to diagnose both successful and failed runs.
So far, our tasks have operated in isolation. To build sophisticated, modular data pipelines, tasks need to communicate and share information. This lesson focuses on that exact capability, addressing the learning outcome: Use job parameters and task values to pass data between tasks.
This concept is central to modern data orchestration. By passing data—such as filenames, record counts, or configuration details—from one task to another, you can create dynamic workflows that adapt to changing data and conditions. Your experience with pipeline tools like Airflow will provide a strong conceptual foundation here; the mechanism is similar to passing information via XComs.
By the end of this lesson, you will be able to:
- Differentiate between job parameters, task parameters, and task values.
- Use
dbutils.jobs.taskValues.set()to create an output value from a task. - Use dynamic value references (
{{...}}) to consume a task's output in a downstream task. - Build a multi-task job where data flows from one task to the next.
1. The Building Blocks of Dynamic Workflows
Before we dive into the code, it's important to understand the different ways you can parameterize a job in Databricks.
Let's start with the official documentation to define the key terms we'll be using throughout this lesson. Understanding the distinctions is crucial.
Read the introductory sections: 'What can you do with parameters?' and 'What is the difference between job and task parameters?'. Pay close attention to the definitions of: Job parameter: A global value for the entire job. Task parameter: An input value for a specific task. Task values: An output value from a task, designed to be used by other tasks.
To summarize the key distinction:
- Job/Task Parameters are primarily for providing input to your workflow from the outside (either statically defined or at runtime).
- Task Values are for passing output generated by one task during a run to be used as input by another task in the same run. This is the mechanism for inter-task communication.
2. The Core Mechanism: Task Values
The primary tool for enabling communication between tasks is the dbutils.jobs.taskValues utility. A task can use dbutils.jobs.taskValues.set() to declare a named output, and a downstream task can then reference this value.
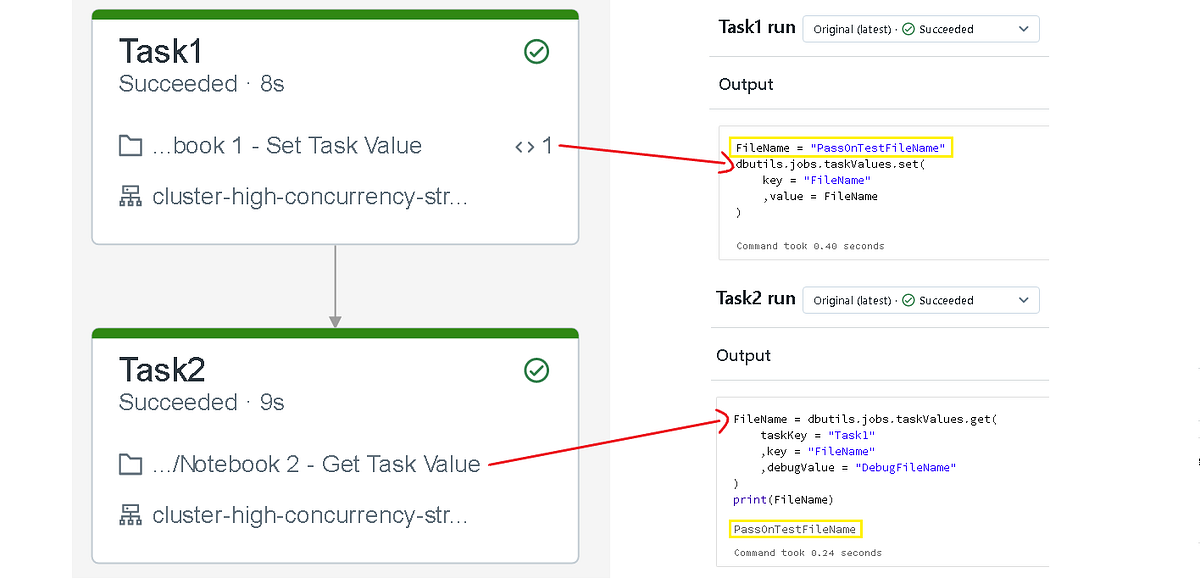
Let's look at a practical demonstration of how this works.
22 Workflows, Jobs & Tasks | Pass Values within Tasks | If Else Cond | For Each Loop & Re-Run Jobs
This video provides a complete walkthrough of building a workflow that passes data between tasks. We'll start by seeing how a value is set.
Watch from 07:08 to 12:22. The presenter writes a notebook that extracts the day of the week from an input date. The most important part for our purpose is the final line of code introduced around the 12:00 mark: dbutils.jobs.taskValues.set(key="input_day", ...). This is the command that makes the calculated day available to other tasks in the workflow.
As the documentation notes, the value you set must be convertible to JSON and have a size limit of 48 KiB. This is suitable for passing control information, metadata, small lists, or configuration details, but not for passing large datasets.
3. Referencing Task Values
Once a task value is set, how do other tasks access it? There are two primary methods, with one being strongly recommended over the other.
Method 1: Dynamic Value References (Recommended)
The modern, recommended approach is to use dynamic value references in the Databricks Jobs UI. This method lets you reference a task value without hardcoding any task names into your notebook code, making your tasks more reusable and your workflow less brittle.
Use task values to pass information between tasks
The Databricks documentation explains this recommended approach and why it is superior.
Read the section 'Reference task values'. Focus on the syntax for dynamic value references: {{tasks.<task_name>.values.<key>}}. Understand the reasoning for why this is preferred over using the get() method in your code.
Now, let's see this powerful feature in action. The video uses the task value we saw being set earlier to control an If/else condition task.
22 Workflows, Jobs & Tasks | Pass Values within Tasks | If Else Cond | For Each Loop & Re-Run Jobs
Returning to our video example, observe how the dynamic value reference is configured in the UI to create a conditional branch in the workflow.
Watch from 13:58 to 18:17. Pay close attention to how the 'check_day' task is configured (starting around 16:00). The presenter sets the condition using the dynamic value {{tasks.01_set_day.values.input_day}} == 'Sunday'. This demonstrates how the output from the first task directly controls the logic of the second, without the second task's code needing to know anything about the first.
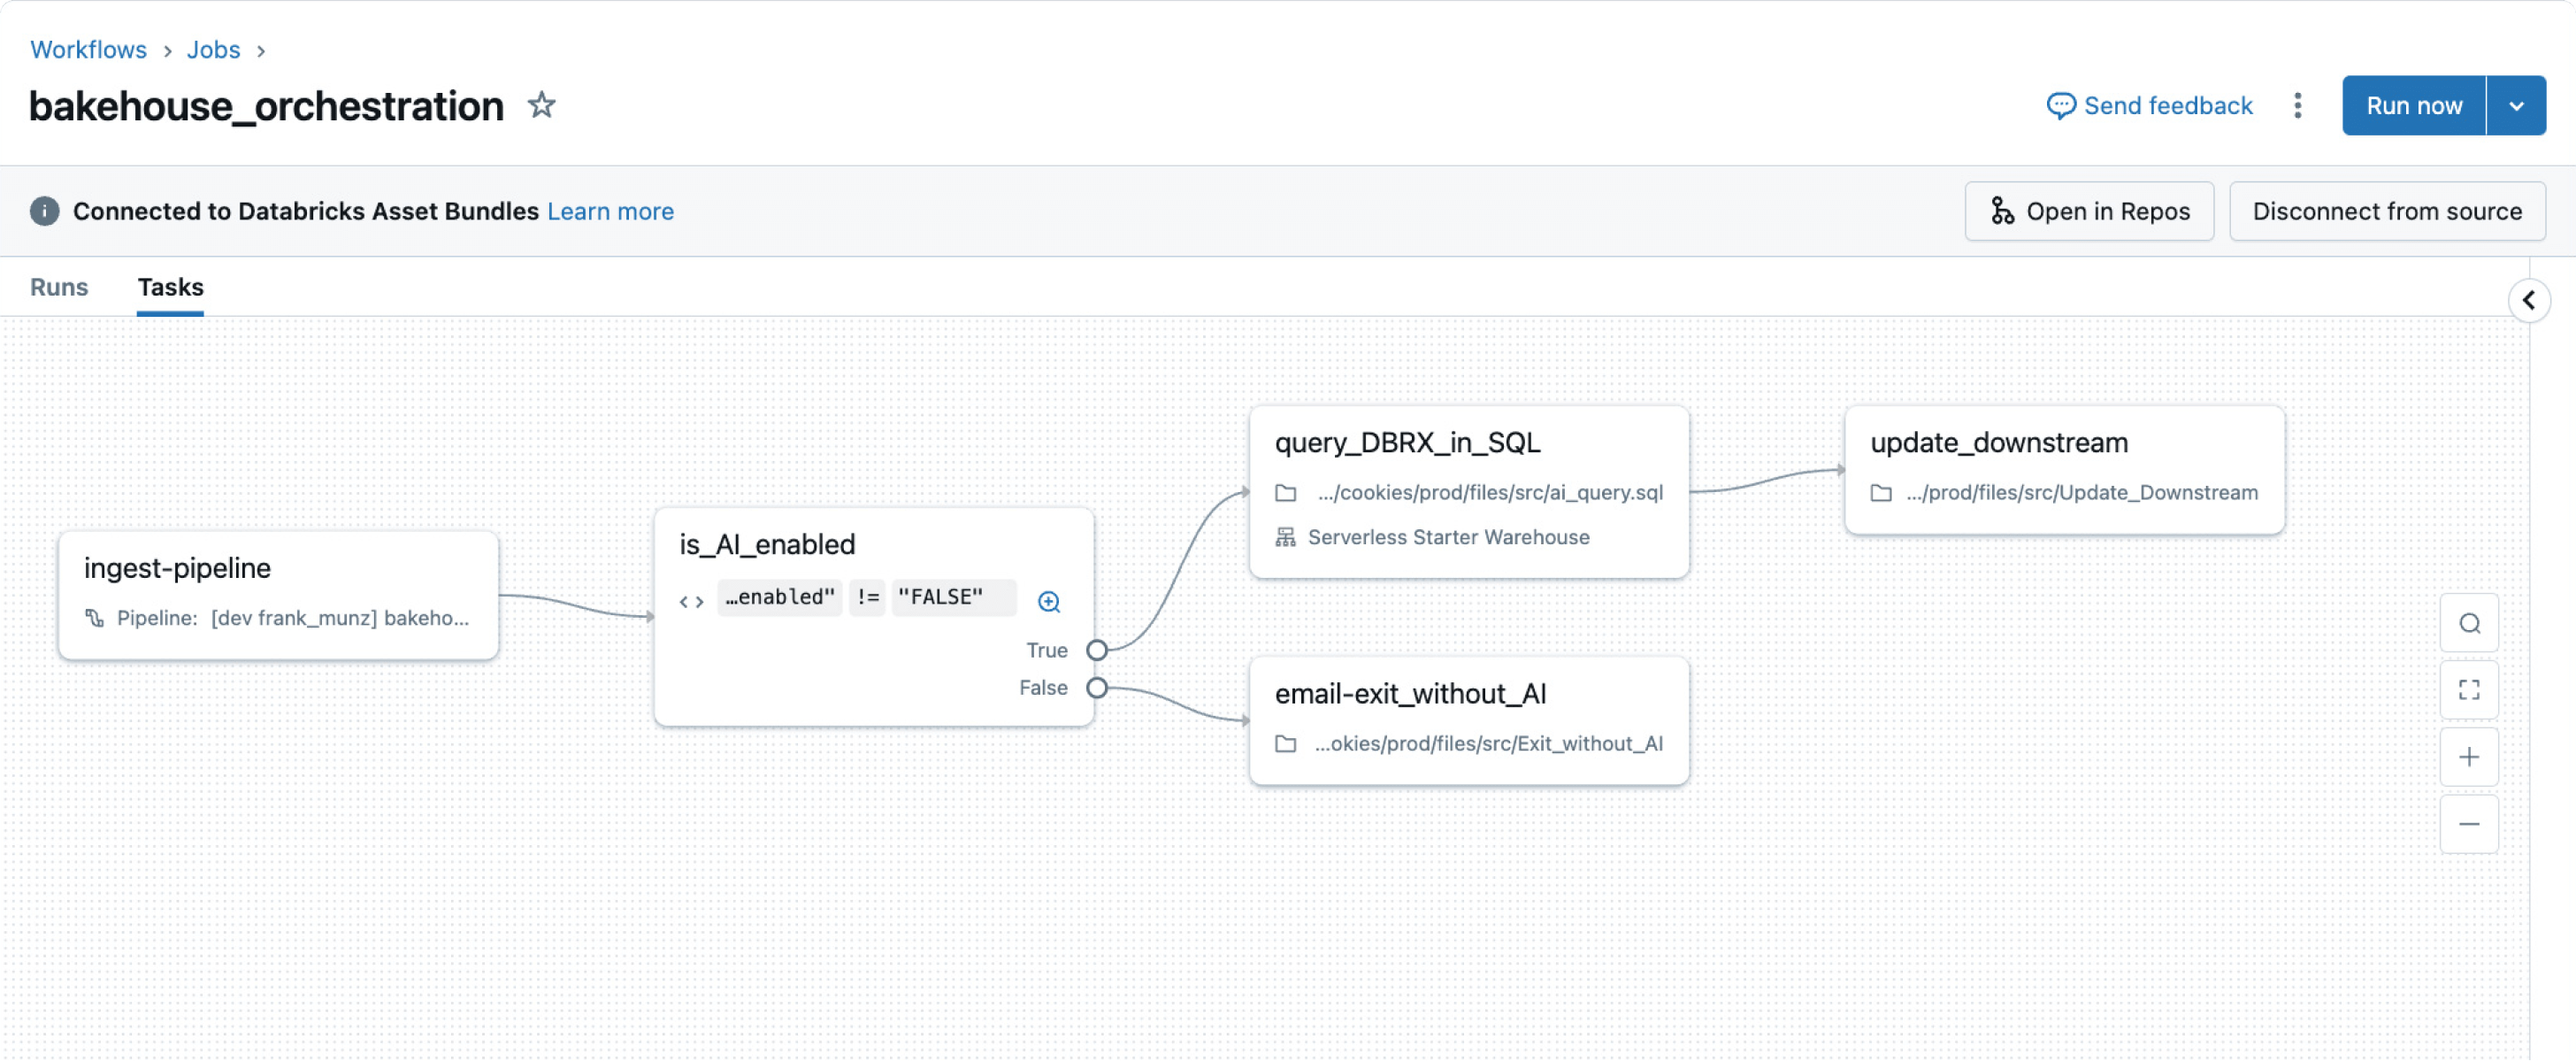
Method 2: dbutils.jobs.taskValues.get() (Legacy)
An older method involves using dbutils.jobs.taskValues.get(taskKey="...", key="...") directly within a downstream notebook. The video briefly demonstrates this approach. While it works, it creates a tight coupling between your tasks. If you rename the upstream task in the Jobs UI, you must also update the code in the downstream task, which is a common source of errors. For this course and any professional development, you should prefer dynamic value references.
Hands-On: Building a Dynamic Pipeline
It's time to put these concepts into practice. You will build a two-task job that simulates a common ETL pattern: one task discovers what to process, and a second task iterates through the work items.
Notebook 1: discover_work
Create a new Python notebook with the following code. This notebook will simulate discovering a list of tables to process and an output path for the data.
# 1. Define a widget to accept an input parameter for the environment
dbutils.widgets.text("environment", "development", "Environment (dev/prod)")


# 2. Get the value from the widget
env = dbutils.widgets.get("environment")


# 3. Generate a dynamic output path and a list of tables based on the environment
if env == "production":
    output_path = "s3://my-prod-bucket/processed_data/"
    tables_to_process = ["sales", "customers", "inventory", "stores"]
else:
    output_path = "s3://my-dev-bucket/processed_data/"
    tables_to_process = ["sales_sample", "customers_sample"]


# 4. Set these generated values as task values
dbutils.jobs.taskValues.set(key="data_path", value=output_path)
dbutils.jobs.taskValues.set(key="table_list", value=tables_to_process)


# 5. Print the values for easy debugging in the logs
print(f"Set data_path to: {output_path}")
print(f"Set table_list to: {tables_to_process}")
Notebook 2: process_table
Create a second Python notebook. This one will receive the path and a single table name to process.
# 1. Define widgets to receive parameters
dbutils.widgets.text("table_name", "", "Table to process")
dbutils.widgets.text("path", "", "Output data path")


# 2. Get values from the widgets
table = dbutils.widgets.get("table_name")
data_path = dbutils.widgets.get("path")


# 3. Simulate processing
print(f"--- Starting processing for table: {table} ---")
print(f"Reading from source and writing transformed data to: {data_path}{table}")
print(f"--- Finished processing for table: {table} ---")
Job Configuration Steps:
-
Create a New Job: Go to Workflows and create a new job. Name it
Dynamic ETL Pipeline. -
Create Task 1 (
discover_work_task):- Name the task
discover_work_task. - Select the
discover_worknotebook. - Select a cluster.
- In the Parameters section, leave the
environmentparameter with its default value ofdevelopment. - Click Create task.
- Name the task
-
Create Task 2 (
process_tables_task):- Click the
+icon below the first task to add a new one. - For the task type, select For each. This task type allows you to loop over a list.
- Name the task
process_tables_task. - In the Iterate over field, enter the dynamic value reference to get the list from the first task:
{{tasks.discover_work_task.values.table_list}}. - Now, configure the task that will run for each item in the list.
- Task type: Notebook.
- Select the
process_tablenotebook. - In the Parameters section for this nested notebook task, add two parameters:
- Key:
path, Value:{{tasks.discover_work_task.values.data_path}}(This passes the path from the first task). - Key:
table_name, Value:{{input}}(The special{{input}}value refers to the current item from theFor eachloop).
- Key:
- Ensure this task Depends on
discover_work_task. - Click Create task.
- Click the
-
Run and Verify:
- Run the job now.
- When the run completes, click on the
process_tables_task. You will see it expanded into two sub-runs, one forsales_sampleand one forcustomers_sample. - Click into each of those sub-runs and inspect the output. You should see the print statements confirming that each table was processed with the correct output path (
s3://my-dev-bucket/processed_data/). - Bonus: Run the job again using Run now with different parameters. Change the
environmentparameter toproductionand observe how theFor eachtask now runs four times, using the production path.
Conclusion
In this lesson, you've unlocked one of the most powerful features of Databricks Workflows: the ability to pass data between tasks. This skill elevates you from building static, linear pipelines to creating dynamic, intelligent, and modular workflows.
Key Takeaways:
- Job Parameters provide top-level configuration, while Task Values enable dynamic data flow within a job run.
- The
dbutils.jobs.taskValues.set(key, value)command is used in a notebook to produce an output. - The
{{tasks.TASK_NAME.values.KEY}}dynamic value reference is the standard, most robust way to consume that output in the UI. - This mechanism is the key to building advanced patterns like conditional logic (
If/elsetask) and dynamic parallelism (For eachtask).
Preview of the Next Lesson:
You've now covered all the core components of building, orchestrating, and monitoring workflows. To prepare these workflows for a true production environment, you need to handle sensitive information like API keys, database passwords, and service account credentials securely. In the next lesson, "Manage secrets using Databricks secret scopes and the Secrets API," you will learn how to store and access secrets without hardcoding them in your notebooks.