Introduction
Welcome to the next lesson in our exploration of modern networking. In our previous discussion, we established the fundamental principles of symmetric and asymmetric encryption and saw how they are combined in a hybrid model to achieve both security and performance. Now, we will see that hybrid model in action.
This lesson directly addresses the learning outcome: Explain the key steps of a TLS/SSL handshake that establish a secure connection. The TLS handshake is the protocol that turns an insecure http:// connection into a secure https:// connection. As an engineering manager, understanding this process is crucial for grasping web security, diagnosing connection issues, and appreciating the performance implications of different protocol versions.
We will first dissect the "classic" TLS 1.2 handshake to build a solid foundation of the mechanics. Then, we will explore the significant improvements in TLS 1.3 that make modern web communication faster and more secure.
The Goals of the TLS Handshake
Before diving into the message-by-message exchange, let's clarify what the handshake process is designed to accomplish. It's a structured negotiation between a client (like your browser) and a server with three primary goals:
- Authentication: The client must verify that it is talking to the correct server and not an impostor. This is achieved using the server's digital certificate, which is issued and signed by a trusted Certificate Authority (CA).
- Key Exchange: The client and server must securely agree upon a shared secret key. This key will be used for fast, symmetric encryption of all application data (like the HTTP requests and responses) for the remainder of the session.
- Integrity: Both parties must ensure that the handshake messages themselves have not been tampered with by an attacker during transit.
The diagram below provides a high-level conceptual overview of this process, showing how the client uses the server's public key and certificate to establish a shared, symmetric session key.

Now, let's examine the specific messages that make this happen.
Dissecting the TLS 1.2 Handshake
To understand the core mechanics, we'll walk through the steps of a TLS 1.2 handshake using the RSA key exchange algorithm. While newer methods exist (which we'll touch on with TLS 1.3), this flow represents the foundational logic.
The following video from Practical Networking provides an exceptionally clear and detailed walkthrough of this entire process. We will go through it step-by-step.
TLS Handshake - EVERYTHING that happens when you visit an HTTPS website
This comprehensive video walks through every message in a TLS 1.2 handshake. It explains the purpose of each field and how the client and server progressively build a shared, secure state.
We will break down the handshake into phases. Please watch the corresponding segments as we proceed.
Phase 1: The "Hello" and Negotiation
The handshake begins with the client and server negotiating the parameters for their secure session.
-
Client Hello: The client initiates the conversation. This message includes:
- The highest TLS version it supports (e.g., TLS 1.2).
- A list of cipher suites it can use, ordered by preference. A cipher suite is a combination of algorithms for key exchange, bulk encryption, and message authentication (e.g.,
TLS_ECDHE_RSA_WITH_AES_128_GCM_SHA256). - A
Client Randomnumber, a 32-byte random value that will be used later in key generation.
-
Server Hello: The server examines the client's offerings and responds. This message includes:
- The TLS version it has chosen from the client's list (the highest version both support).
- The cipher suite it has chosen from the client's list.
- A
Server Randomnumber, another 32-byte random value.
TLS Handshake - EVERYTHING that happens when you visit an HTTPS website
Watch the video from the initial negotiation, which covers the Client Hello and Server Hello messages. Pay attention to how both parties arrive at a shared set of parameters (TLS version and cipher suite) and now possess both the Client and Server random numbers.
At the end of this phase, both client and server have agreed on the "rules" of the session and each has two crucial pieces for the key generation puzzle: the Client Random and the Server Random.
Phase 2: Server Authentication
Next, the server must prove its identity to the client.
-
Certificate: The server sends its SSL/TLS certificate (and often the intermediate certificates chaining up to a root CA). This certificate contains the server's public key and identifying information (like its domain name), all signed by a trusted Certificate Authority.
-
Server Hello Done: A simple, empty message indicating that the server has finished sending its initial set of messages.
Upon receiving the certificate, the client performs a critical validation: it checks the certificate's signature using the public key of the issuing CA (which is pre-installed in the browser's or OS's trust store). This confirms the certificate is authentic.
TLS Handshake - EVERYTHING that happens when you visit an HTTPS website
Now, watch the segment covering the server's certificate message. This explains how the server presents its identity to the client.
Phase 3: Key Exchange and Verification
This is where the hybrid encryption model comes into play. The client now needs to create a shared secret and send it to the server in a way that only the legitimate server can read.
-
Client Key Exchange: The client generates a third random value called the Pre-Master Secret. It then encrypts this Pre-Master Secret using the server's public key (which it extracted from the server's certificate). The resulting encrypted value is sent to the server. Only the server, with its corresponding private key, can decrypt this message and retrieve the Pre-Master Secret. This single step simultaneously establishes the shared secret and proves the server owns the private key for the certificate it presented.
-
Generating Session Keys: Now, both the client and server are in possession of the same three values:
Client Random,Server Random, andPre-Master Secret. They both independently use these three inputs to calculate the Master Secret. From this Master Secret, they derive a set of symmetric Session Keys (e.g., an AES key for encryption and an HMAC key for integrity checks). Since they started with the same inputs, they will arrive at the exact same session keys without ever having transmitted them in the clear.
TLS Handshake - EVERYTHING that happens when you visit an HTTPS website
Continue with the video sections that detail the Client Key Exchange and the subsequent generation of session keys. This is the heart of the handshake, where the asymmetric and symmetric crypto concepts from our last lesson are applied.
- Final Verification: The handshake is almost complete. The final step is for both parties to verify that everything has worked correctly and that no one has tampered with the handshake messages.
- The client sends a
Change Cipher Specmessage, indicating it will now communicate using the newly created session keys. - It immediately follows with an encrypted
Finishedmessage. This message contains a hash of all previous handshake messages. - The server decrypts the
Finishedmessage using its newly computed session key and verifies the hash. If it matches, it proves the client has the correct keys and the handshake was not altered. - The server then does the exact same thing, sending its own
Change Cipher Specand encryptedFinishedmessage to the client.
- The client sends a
Once the client successfully verifies the server's Finished message, the handshake is complete. A secure, encrypted tunnel is now established, and application data (HTTP requests/responses) can begin to flow.
TLS Handshake - EVERYTHING that happens when you visit an HTTPS website
Finally, watch the concluding segments on the verification messages. This explains how the Finished messages confirm that both parties have the correct keys and that the handshake integrity is intact.
Improvements in TLS 1.3
The TLS 1.2 handshake is robust, but it involves two full round-trips of communication before application data can be sent. This introduces latency, which is critical for web performance. TLS 1.3, the modern standard, radically streamlines this process.
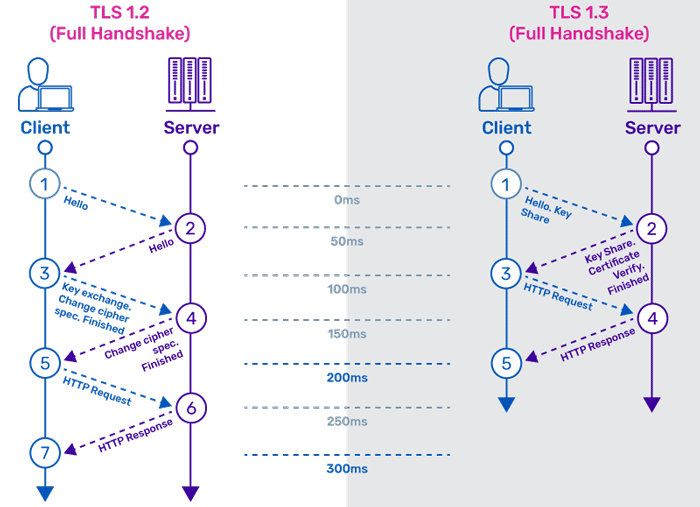
The main changes in TLS 1.3 are centered on speed and security:
- Reduced Latency (1-RTT): The client acts more proactively. In its very first
Client Hellomessage, it not only suggests cipher suites but also speculatively sends its "key share" (its contribution to the key exchange). If the server agrees with the client's preferred method, it can immediately compute the session keys, send its certificate and its own key share, and send itsFinishedmessage all in one go. - Enhanced Security:
- More Encryption: In TLS 1.3, almost all handshake messages after the Server Hello are encrypted, including the server's certificate. This improves privacy by hiding which site is being visited from passive observers.
- Stronger Ciphers: All legacy and insecure algorithms have been removed. TLS 1.3 only permits modern, robust ciphers that provide Perfect Forward Secrecy (PFS) by default. PFS ensures that if a server's long-term private key is ever compromised, past session keys cannot be decrypted.
Let's get a more detailed look at these differences.
TLS Handshake. How the Successor of the SSL ...
This article provides a concise narrative of the handshake process for both TLS 1.2 and 1.3.
Please read the descriptions for The TLS 1.2 Handshake and The TLS 1.3 Handshake. As you read, compare the number of steps and messages required in each version to achieve a secure connection.
To see the practical impact of these changes, the following video explains the performance gains and security enhancements of TLS 1.3.
TLS 1.3 Handshake - many CHANGES from prior versions!
This video from Practical Networking highlights the key differences between the TLS 1.2 and 1.3 handshakes, focusing on the real-world impact.
Watch the segments that compare the TLS 1.2 round trips with the streamlined TLS 1.3 handshake. Then, continue with the section explaining the performance benefits in a typical web page load. Finally, watch the explanation of how more encryption in the TLS 1.3 handshake enhances privacy.
Conclusion
In this lesson, we have demystified the TLS handshake, the critical process that secures modern web communication. You now understand how the theoretical cryptographic concepts from our last lesson are orchestrated in a real-world protocol.
Key Takeaways:
- The TLS handshake achieves server authentication, secure key exchange, and integrity verification.
- It operates on a hybrid model: asymmetric encryption is used to securely establish a shared secret (the pre-master secret), which is then used to derive symmetric session keys for fast data encryption.
- The TLS 1.2 handshake is a multi-step negotiation requiring two round-trips, involving
Hello,Certificate,Key Exchange, andFinishedmessages. - TLS 1.3 is a significant improvement, reducing the handshake to a single round-trip, which lowers latency. It also enhances security by encrypting more of the handshake and mandating modern, secure ciphers.
With a secure connection established, services can begin to communicate. In our next lesson, we will shift our focus up the stack to the application layer and compare two dominant paradigms for API communication: REST and gRPC, exploring their trade-offs in performance, payload size, and use cases.