Introduction
Hello! Welcome back to our module on Optimal Trade Entry and Execution.
In our previous lesson, you learned how to define the Optimal Trade Entry (OTE) zone using the specific ICT Fibonacci levels of 62%, 70.5%, and 79%. You also practiced setting up your Fibonacci tool and drawing it correctly on a price swing.
Today, we move from theory to practice. It's not enough to know what the OTE zone is; you need to know when and where to look for it. This lesson is dedicated to helping you identify complete OTE setups within retracements of impulsive price moves. We'll focus on recognizing the specific market conditions—a strong, directional move followed by a pullback—that create these high-probability opportunities.
By the end of this lesson, you will be able to distinguish a valid impulsive move from random price action and confidently spot an OTE setup as it forms on your chart.
1. The Anatomy of an OTE Setup: Impulse and Correction
An OTE setup is always composed of two distinct phases of price action that you learned about in Module 1:
- An Impulsive Move: A strong, energetic, and directional move that shows clear intent from the market.
- A Corrective Move: A weaker, slower retracement or pullback that happens after the impulsive move concludes.
The fundamental idea of the OTE is to measure the impulsive move and look for a low-risk entry during the corrective move. The first step, therefore, is to correctly identify the difference between these two types of price action.
ICT's Optimal Trade Entry (OTE) Explained
To begin, let's refresh our understanding of the types of price moves we're looking for. This video explains the nature of impulsive and corrective waves, which are the building blocks of an OTE setup.
Watch from the beginning to 02:56. Pay close attention to the description of impulsive waves (strong momentum, large-bodied candles) versus corrective waves (indecision, smaller bodies). This distinction is crucial for identifying which price swings are worth measuring for an OTE.
2. Qualifying the Impulsive Leg
Not every price swing is a valid impulsive move for an OTE. The highest probability setups occur after a specific type of impulse: one that causes a Break of Structure (BOS).
As you'll recall from Module 2, a BOS confirms the market's intention to continue in a particular direction. When an impulsive move is strong enough to break a previous swing high (in an uptrend) or swing low (in a downtrend), it signals that institutional order flow is likely driving the price. These are the moves we want to trade with.
A valid impulsive leg will show displacement—a forceful and rapid move away from a price level. This often leaves inefficiencies like Fair Value Gaps (FVGs) in its wake, a topic we will explore in great detail in the next module. For now, simply look for strong, obvious moves that break market structure.
3. Identifying the Retracement into the OTE Zone
Once you've identified a valid impulsive leg that has broken structure, the next step is to apply your Fibonacci tool and wait patiently.
- Anchor your Fibonacci tool to the impulsive swing, as you learned in the last lesson (low to high for a bullish move; high to low for a bearish move).
- Observe the corrective move that follows. Price should pull back into the range of the impulsive leg.
- Identify the entry zone. The setup becomes valid when the corrective move enters the OTE zone, the area between the 62% and 79% retracement levels.
This video provides a clear, practical demonstration of this process.
Optimal Trade Entry (OTE) - ICT Concepts
The following video shows how to draw the Fibonacci tool on a completed swing and then identify the subsequent retracement into the OTE zone.
Watch from 01:16 to 04:11. The presenter demonstrates drawing the tool on both bearish and bullish swings and then shows price retracing into the OTE zone before continuing in the original direction. This is the classic OTE setup in action.
4. Step-by-Step OTE Setups: Bullish and Bearish Examples
Let's formalize the process into a simple checklist you can use.
OTE Setup Checklist
- Identify Market Direction: Is the higher timeframe structure bullish or bearish?
- Spot an Impulsive Move with a BOS: Find a strong price leg with displacement that breaks a recent swing high/low.
- Draw the Fibonacci Range: Anchor the tool to the start and end of the impulsive move.
- Wait for Retracement to OTE: Patiently wait for price to pull back into the 62% - 79% zone.
The diagram below illustrates this core sequence.
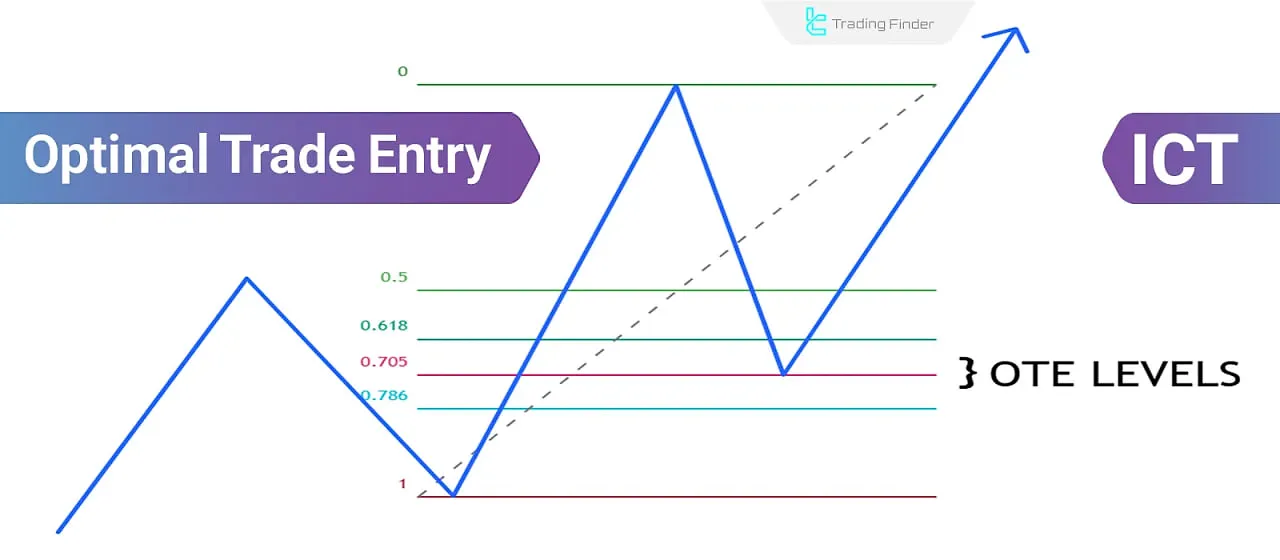
Bullish OTE Setup
In a bullish scenario, we are applying the "buy low, sell high" logic. The OTE helps us define exactly where "low" is.
- Context: Price is in an uptrend (making higher highs and higher lows).
- Action: An impulsive move breaks a previous high (BOS).
- Measurement: We draw our Fibonacci tool from the swing low to the swing high of that move.
- Setup: Price then corrects down into the OTE zone. This zone is in a discount area of the range (below the 50% equilibrium), which is precisely where we want to be buying.

Bearish OTE Setup
In a bearish market, the logic is reversed. We want to sell at a premium price.
- Context: Price is in a downtrend (making lower lows and lower highs).
- Action: An impulsive move breaks a previous low (BOS).
- Measurement: We draw our Fibonacci tool from the swing high to the swing low of that move.
- Setup: Price retraces up into the OTE zone. This zone is in a premium area of the range (above the 50% equilibrium), giving us a high-value area to look for short entries.
The following reading provides a detailed, step-by-step walkthrough that formalizes this entire process.
Comprehensive Guide to OTE Strategy in ICT - [TFlab] | Forex Factory
This guide from the Forex Factory forum provides an excellent summary of the steps required to identify and execute an OTE setup.
Please read the sections titled 'Steps to Execute the OTE Setup' and 'Practical Example of OTE Setup'. This will solidify your understanding of the entire sequence, from high-level analysis down to identifying the entry zone in both uptrends and downtrends.
Conclusion
You have now learned to move beyond simply drawing Fibonacci levels to identifying complete, high-probability OTE setups in the context of market structure. By focusing on impulsive moves that break structure, you filter out noise and position yourself to trade in harmony with institutional order flow.
Key Takeaways:
- A valid OTE setup consists of a clear impulsive move followed by a corrective retracement.
- The highest-probability impulsive moves are those that create a Break of Structure (BOS), as this confirms directional intent.
- The OTE setup is identified by drawing a Fibonacci range on the impulsive leg and waiting for the corrective pullback to enter the 62%-79% zone.
- This pattern allows you to systematically buy at a discount in an uptrend and sell at a premium in a downtrend.
Preview of the Next Lesson:
Identifying the OTE zone is a huge step forward. But can we get even more precise? Yes. In our next lesson, we will explore how to combine the OTE with order blocks and Fair Value Gaps. This powerful combination of concepts, known as confluence, will help you refine your entry points within the OTE zone with remarkable precision.