Introduction
Welcome to the next lesson in our journey through the DMAIC "Improve" phase. In our last session, we used a Pugh matrix to objectively select the most promising solution from a list of alternatives. This was a critical step in ensuring our efforts are focused on the change most likely to succeed based on our project criteria.
However, selecting a solution is only half the battle. Even the best-laid plans can have unintended consequences. Before we invest time and resources into piloting and implementing this solution, we must proactively identify and mitigate any new risks it might introduce. This is a cornerstone of professional project management and a key differentiator in Six Sigma.
Today's lesson is dedicated to exactly that. We will address the learning outcome: Conduct a Failure Mode and Effects Analysis (FMEA) on proposed solutions to proactively manage risks. You will learn to use this powerful, structured tool to "de-risk" your chosen solution, ensuring it is robust, safe, and effective before it ever hits the shop floor.
1. What is Failure Mode and Effects Analysis (FMEA)?
Failure Mode and Effects Analysis (FMEA) is a systematic, team-based activity used to evaluate a process or design to identify all the ways it could potentially fail. More importantly, it helps us understand the consequences of those failures, allowing us to prioritize and address the most critical risks before they occur.
Given your experience with root cause analysis tools like Fishbone diagrams, you can think of FMEA as a proactive version of that. Instead of asking "Why did this problem happen?", FMEA asks "What could possibly go wrong with this new process, and what would be the impact?"
There are different types of FMEA, but for our purposes, the two most relevant are:
- Design FMEA (DFMEA): Focuses on risks associated with a product's design.
- Process FMEA (PFMEA): Focuses on risks associated with a manufacturing or business process.
When we analyze a proposed solution, we are essentially conducting a PFMEA on the new, improved process.
To get a quick overview of FMEA and its role in different industries, let's watch a brief introductory video.
Mastering FMEA | Failure Modes and Effects Analysis Explained | Lean Six Sigma| Anexas | FMEA Guide
This video from Anexas provides a high-level introduction to FMEA, its history, and its different types.
Please watch the first 2 minutes of the video (from 00:00 to 02:03). Focus on understanding the purpose of FMEA and the distinction between DFMEA and PFMEA.
2. The FMEA Process: A Structured Approach
A successful FMEA follows a clear, structured process. This ensures that the analysis is comprehensive and that the team's efforts are efficient. While different organizations may use slightly different templates, the core logic remains the same.
A modern and widely accepted framework is the AIAG & VDA 7-step process.
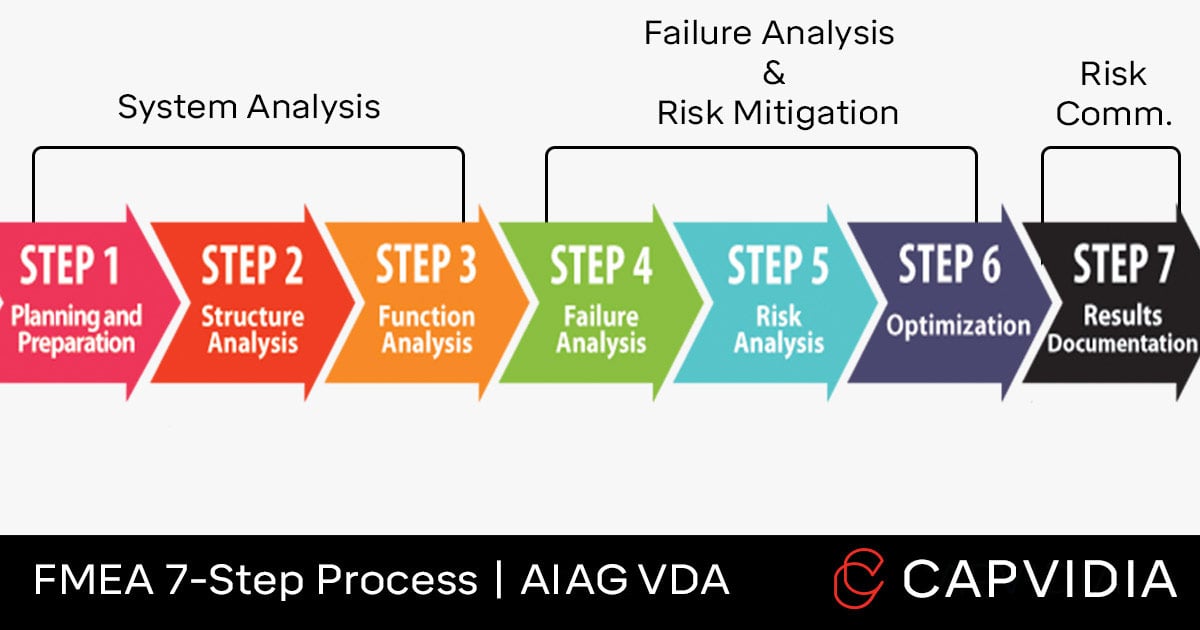
For our lesson, we'll follow a very similar, practical 10-step approach presented in the next video, which aligns perfectly with this framework and is commonly used in industry.
3. Step-by-Step FMEA Execution
We will now walk through the process of building an FMEA. The video below from CQE Academy provides an excellent, detailed walkthrough. We'll break it down into manageable segments.
Part 1: Preparation and Scoping (Steps 0 & 1)
Before the team can even begin analyzing failures, crucial groundwork must be laid. This involves defining the scope of the analysis and, critically, establishing the rating scales for Severity, Occurrence, and Detection. This "Step 0" is what formalizes the FMEA process, moving it from a subjective brainstorm to an objective analysis tool.
FMEA, the 10 Step Process to do an FMEA (PFMEA or DFMEA)
This first segment covers the essential pre-work and scoping for your FMEA.
Watch from 06:45 to 09:31. Pay close attention to: Step 0: Establish Ground Rules: The importance of defining scales, documenting assumptions, and setting the acceptable risk level. Step 1: Define Your System: Using a process flow diagram to scope the FMEA.
To give you a concrete example of what these rating scales look like in a manufacturing context, please review the following tables from a published case study. This is a critical part of formalizing your Six Sigma knowledge.
Failure Mode Effect Analysis-Case Study for Bush Manufacturing
This PDF document, a case study on a bush manufacturing process, contains excellent, detailed rating tables for Occurrence, Severity, and Detection. These are invaluable for standardizing your FMEA approach.
Please open the document and study Table 1 (Occurrence Ranking), Table 2 (Severity Ranking), and Table 3 (Detection Ranking). You don't need to memorize them, but understand how specific, quantitative criteria are used to assign a score from 1 to 10.
Part 2: Identifying Failures, Effects, and Causes (Steps 2, 3, 4)
Now we get to the core of the analysis. The team systematically identifies how the process can fail, what the consequences are, and what the underlying causes might be.
- Failure Mode: The way in which the process step fails to meet its requirement (e.g., "incorrect parameter set").
- Effect of Failure: The consequence of the failure, typically from the customer's perspective (e.g., "part does not fit in assembly"). The effect determines the Severity (S) rating.
- Cause of Failure: The root cause that could lead to the failure mode (e.g., "operator not trained on new procedure"). The cause and its likelihood determine the Occurrence (O) rating.
FMEA, the 10 Step Process to do an FMEA (PFMEA or DFMEA)
This segment explains how to identify failure modes, their effects, and their root causes, which form the foundation of the analysis.
Watch from 09:31 to 16:44. Focus on the relationship between: Failure Mode and Effect: How the effect drives the Severity score. Failure Mode and Cause: How you use tools like 5 Whys and Fishbone diagrams to find the root causes, which then inform the Occurrence score.
Part 3: Controls, Detection, and RPN (Steps 5, 6, 7, 8, 9)
Once we know the causes, we look at what we currently have in place to manage them.
- Current Controls: Existing systems, checks, or procedures meant to either prevent the cause from happening or detect the failure if it does.
- Detection (D): The score assigned based on the effectiveness of the controls at detecting the failure. A low score (e.g., 1) means detection is almost certain (good). A high score (e.g., 10) means we are very unlikely to detect it (bad).
With S, O, and D scores assigned, we can calculate the Risk Priority Number (RPN).
The RPN is a numerical value that helps prioritize which risks to address first. It is not an absolute measure of risk, but an excellent prioritization tool.
FMEA, the 10 Step Process to do an FMEA (PFMEA or DFMEA)
This section explains how to assess your current controls, determine the detection rating, and calculate the RPN to prioritize risks.
Watch from 16:44 to 20:34. This is the most crucial part of the process. Focus on: The link between the Control Plan and the FMEA. How to score Detection (remembering that a high score is bad). How RPN is calculated and used for prioritization. Step 10: Corrective Actions - This is the ultimate purpose of the FMEA.
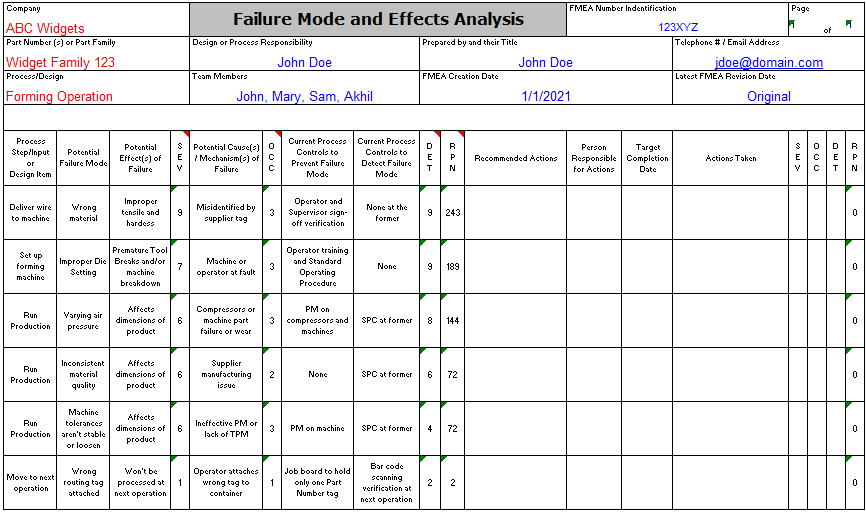
Here is what a completed FMEA table looks like in practice. Notice how the columns logically flow from failure mode to RPN.
4. Application: From Analysis to Action
The goal of an FMEA is not to create a document; it's to drive action to reduce risk. High RPN values (and also high individual Severity scores, regardless of RPN) signal where the team must focus its improvement efforts.
For each high-priority risk, the team should brainstorm Recommended Actions. These actions should aim to:
- Reduce Occurrence: The most desirable approach. Eliminate the cause of the failure (e.g., mistake-proofing the process).
- Improve Detection: If the cause cannot be eliminated, add better controls to ensure the failure is caught before it reaches the customer.
- Reduce Severity: Often the hardest to change, but can sometimes be achieved by adding redundant systems or fail-safes.
After an action is taken, the team should re-score O and D to calculate a new RPN, demonstrating a quantifiable reduction in risk.
To see this entire process applied in a real manufacturing scenario, let's return to the bush manufacturing case study.
Failure Mode Effect Analysis-Case Study for Bush Manufacturing
This is the most important reading. It details the practical application of FMEA to improve a manufacturing process, showing the direct link between identified risks and recommended actions.
Please read from the start of Section 3, APPLICATION, to the end of the large table. Focus on: The context: How they identified the grinding and facing machines as problematic (Section 3.1). The process they followed (Section 3.2). The FMEA table itself (Section 3.3): Look at a few rows. See how they list a Potential Failure Mode (e.g., 'Size Variation OD Plus/Minus'), identify a Potential Cause (e.g., 'Improper Dressing'), and then list a Recommended Action (e.g., 'Prepare Work Instruction & Train Operator'). This is the FMEA process in action.
Conclusion
Today you've learned how to conduct a Failure Mode and Effects Analysis, a critical tool for any process improvement professional. By systematically analyzing the risks associated with your proposed solution before implementation, you can prevent new problems from arising and ensure your project delivers a truly robust and sustainable improvement.
Key Takeaways:
- FMEA is a proactive risk assessment tool used to identify potential failures, their effects, and causes in a process or design.
- The process involves scoring Severity (S), Occurrence (O), and Detection (D) on a 1-10 scale.
- The Risk Priority Number (RPN = S x O x D) is used to prioritize risks for mitigation.
- The ultimate goal of FMEA is not just analysis, but to drive corrective actions that reduce risk.
- After implementing actions, the RPN should be recalculated to verify the risk has been reduced.
Preview of the Next Lesson:
We have now selected our best solution with a Pugh matrix and made it more robust by de-risking it with an FMEA. The next logical step is to test it in the real world, but on a limited and controlled basis. In our next lesson, you will learn how to develop a pilot plan to test improvements on a limited scale before full implementation. This will allow us to validate our solution and gather data on its real-world performance without disrupting the entire production line.