Introduction
In our previous lessons, we've systematically built the foundations of a production-grade automation system. You've architected workflows, enforced data integrity through validation pipelines, modularized logic into sub-workflows, and, most recently, secured all secrets using n8n's credential manager.
This lesson adds the final, critical piece to that foundation. The learning outcome is to use Git for version controlling n8n workflow JSON files to track changes and maintain a history.
For a systems architect, workflows aren't just one-off creations; they are mission-critical assets that evolve over time. Without version control, you're operating without a safety net—no history, no easy rollbacks, and no auditable trail of changes. Given your background in full-stack development, you're already familiar with Git's power. Our focus today will be on applying that discipline to the n8n ecosystem, officially transitioning from simply "building workflows" to a "workflow-as-code" development lifecycle.
The "Workflow as Code" Paradigm
The key insight is that every n8n workflow is, under the hood, a structured JSON file. This file defines the nodes, their settings, their connections, and their positions on the canvas. By treating this JSON as source code, we can apply the same rigorous version control practices used in professional software development.
This approach offers several non-negotiable benefits in a professional context:
- Change History: A complete, auditable log of who changed what, when, and why.
- Disaster Recovery: The ability to instantly restore any previous version of a workflow.
- Collaboration: A structured way for multiple engineers to work on workflows using branches and pull requests.
- Code Review: The
git diffcommand allows for a precise review of changes to a workflow's logic before it's merged into production.
This architectural diagram illustrates a professional GitOps deployment pipeline. Your local development, versioned in Git, becomes the single source of truth for what runs in production.
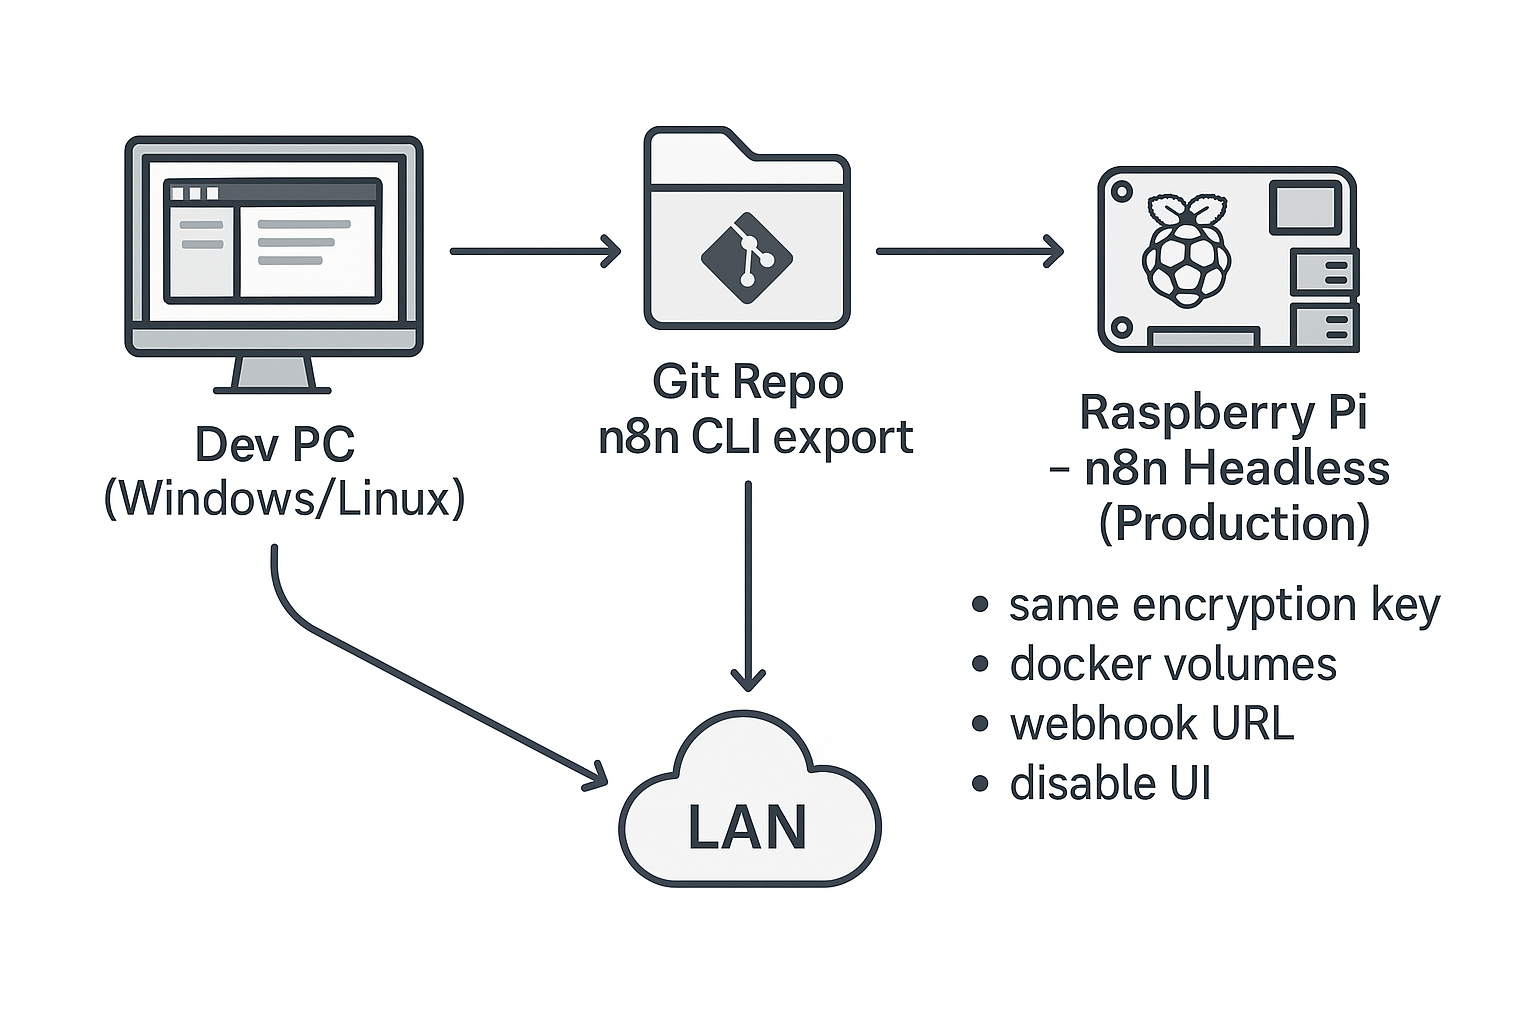
Approach 1: The CLI-Driven Development Cycle
This approach mirrors a standard software development workflow and is the most robust method for active development and team collaboration. We will use a command-line interface (CLI) to bridge the gap between your n8n UI and your local Git repository.
For this, we'll use a purpose-built open-source tool.
A simple n8n cli to sync workflows from Github to n8n using GitOps
This GitHub repository is for a powerful n8n CLI that allows you to sync workflows between your n8n instance and a local directory. We will use this as our primary tool for implementing a Git-based workflow.
Familiarize yourself with the 'Installation' and 'Configuration' sections. You will need to install the CLI and configure it to connect to your n8n instance.
Practical Task: Implement a Git-Based Change Management Process
Scenario: You have completed your initial set of workflows. Now, you need to establish a version-controlled repository as the single source of truth. You will then simulate a client change request, implement it, and use a professional branching strategy to commit the update.
Part 1: Initial Repository Setup
-
Create a Private GitHub Repository:
- Go to GitHub and create a new private repository. Name it something like
n8n-automation-systems. - Do not initialize it with a README.
- Go to GitHub and create a new private repository. Name it something like
-
Install and Configure the n8n-cli:
- Follow the installation instructions from the
n8n-cliREADME to install the tool on your local machine. - Generate a new API key in your n8n instance under
Settings > API. - Create a local directory for your repository and
cdinto it. - Create a
.envfile and add your n8n credentials:N8N_API_KEY=your_n8n_api_key N8N_INSTANCE_URL=https://your-n8n-instance.com - Crucially, create a
.gitignorefile and add.envto it. This prevents you from ever committing your API key.# .gitignore .env
- Follow the installation instructions from the
-
Initialize Git and Perform First Sync:
- In your local repository directory, run the following commands:
git init git add .gitignore git commit -m "Initial commit: Add .gitignore" - Now, use the CLI to pull all your existing workflows from n8n into the current directory. The
--allflag fetches every workflow, and--directory .places them in the current folder.n8n workflows refresh --all --directory . - Commit this initial state to your repository:
git add . git commit -m "[Add] Initial import of all workflows" git branch -M main git remote add origin <your-github-repo-url> git push -u origin main - Your GitHub repository now contains the JSON source for all your workflows.
- In your local repository directory, run the following commands:
Part 2: Managing a Change Request
Now, simulate a development cycle.
-
Create a Feature Branch: Professional developers isolate changes in branches.
git checkout -b feature/intake-form-enhancement -
Modify the Workflow in n8n:
- Open your
WIP_ [Webhook] Lead Intake...workflow in the n8n UI. - Make a small, identifiable change. For example, add a Note node connected to the start node with the text "Pending review for v1.1 enhancement".
- Save the workflow.
- Open your
-
Sync the Change to Your Local Repo:
- Run the refresh command again. It will detect the change you made and overwrite the local JSON file for that workflow.
n8n workflows refresh --directory .
- Run the refresh command again. It will detect the change you made and overwrite the local JSON file for that workflow.
-
Review and Commit the Change:
- This is the "code review" step. Use
git diffto see exactly what changed in the JSON. You will see a new object added for the Note node and a change in theconnectionsobject.git diff - Stage and commit the change with a descriptive message. We'll use a convention for clarity.
git add .
git commit -m "[Update] Add placeholder note to lead intake workflow"
- This is the "code review" step. Use
n8n Workflow Documentation & Best Practices
Using standardized commit messages is a hallmark of a professional developer. This article outlines common conventions.
Review the section 'Commit Message Conventions'. Adopting a format like [Type] Description makes your Git history clean and easy to parse.
- Merge the Feature:
- Push your branch to the remote and merge it. In a team, this would involve a Pull Request.
git push origin feature/intake-form-enhancement


# (In a real scenario, you'd open a PR on GitHub here)
git checkout main
git merge feature/intake-form-enhancement
git push origin main
- Push your branch to the remote and merge it. In a team, this would involve a Pull Request.
Deliverables:
- Link to your private GitHub repository. (You will need to add me as a collaborator so I can review it. My GitHub username is
tutor-ai-bot.) - Screenshot of your
git diffoutput from Part 2, Step 4, showing the JSON changes for the added Note node. - Screenshot of your
git log --oneline --graphoutput showing the branching and merging history.
Evaluation Criteria:
- Repository Setup: Is the repository private and correctly initialized with workflows and a proper
.gitignore? - Version Control Process: Was a feature branch used to isolate the change?
- Commit Quality: Is the commit message clear, concise, and following a professional convention?
- Change Verification: Does the
git diffoutput clearly reflect the change made in the n8n UI?
Approach 2: The Automated Backup Workflow
While the CLI approach is superior for active development, a complementary strategy is to use an n8n workflow to automatically back itself and other workflows up to Git. This is excellent for ensuring daily backups and disaster recovery with minimal effort.
This method typically involves a scheduled workflow that:
- Uses the
n8n APIorn8nnode to get a list of all workflows. - Loops through each workflow.
- Uses the
GitHubnode to check if the workflow file already exists in the repository. - If it exists, it updates the file; if not, it creates it.
How to auto-backup n8n workflows to GitHub
This video from Oskar provides a clear, step-by-step guide to building a workflow that automatically backs up all your other workflows to a GitHub repository. It demonstrates the 'automation engineer's' approach to version control.
Watch the entire video. Pay close attention to how it uses the n8n node to fetch workflows and the GitHub node with conditional logic (checking if a file exists) to either create or update files in the repository. This is an optional but highly valuable pattern to understand.
This automated backup is less about a development lifecycle (branching, PRs) and more about creating a consistent, versioned state of your entire n8n instance.
Conclusion
You have now implemented the final pillar of professional automation architecture. By integrating Git, you've transformed your n8n workflows from isolated configurations into version-controlled, auditable code. You can now confidently track changes, collaborate with a team, and recover from any unintended modifications.
Key Takeaways:
- Workflows are Code: An n8n workflow is a JSON file that can and should be managed with version control.
- Use the Right Tool for the Job:
- The CLI-driven approach is the professional standard for active development, enabling branching, code review, and CI/CD.
- The automated backup workflow is a powerful pattern for ensuring daily, versioned snapshots for disaster recovery.
- Git History is Your System's Logbook: A clean, well-documented Git history is invaluable for debugging and understanding the evolution of your automation systems.
This lesson concludes the Production-Ready Foundations module. You are now equipped with the core principles of designing, building, securing, and managing n8n systems like a professional engineer.
In our next module, Resilient System Patterns, we will begin to tackle the inevitable reality of system failures. The first lesson will focus on implementing robust try-catch blocks for error handling using the Error Trigger node, ensuring your workflows can handle unexpected issues gracefully.