Introduction
In our previous lesson, you mastered handling API pagination, enabling you to design workflows that can retrieve complete datasets of any size. However, fetching hundreds or thousands of records in a rapid, synchronous loop introduces a critical point of failure: API rate limits. A single "429 Too Many Requests" error can halt your entire data pull, rendering the workflow unreliable for production use.
This lesson directly confronts that challenge. Your objective is to implement an asynchronous queue pattern to process API requests in batches while respecting service rate limits. You will learn to decouple the generation of tasks from their execution, moving from a brittle, monolithic loop to a resilient, scalable system. This is a foundational pattern for any serious automation engineer, as it ensures your workflows are both robust and well-behaved citizens of the API ecosystems they interact with.
Part 1: The Architectural Solution: Queueing Systems
When a synchronous process fails, the entire chain breaks. If you're fetching 1,000 records and the 501st call fails due to a rate limit or transient network error, the remaining 499 records are never processed. The professional solution is to not process items in a single, long-running execution. Instead, we break the problem down:
- Producer: A process that generates a list of "jobs" to be done (e.g., a list of 1,000 user IDs to fetch).
- Queue: A message broker (like Redis or RabbitMQ) that holds these jobs.
- Consumer (Worker): One or more separate processes that pull jobs from the queue one by one and execute them.
This asynchronous architecture provides three major advantages:
- Resilience: If a single job fails, it only affects that one item. The other 999 jobs continue processing independently. The failed job can be logged or retried later.
- Scalability: You can add more workers to process the queue in parallel, dramatically increasing throughput.
- Rate Limit Control: The producer can add jobs to the queue at a controlled rate, or the workers can be configured to pull jobs at a pace that respects API limits.
To understand the "gold standard" for this architecture in a production n8n environment, let's review how n8n's built-in Queue Mode works.
Configuring queue mode | n8n Docs
The official n8n documentation provides the definitive overview of its queue-based architecture. This will give you the formal model of how a scalable n8n system is structured.
Read the sections 'How it works', 'Configuring workers', 'Start Redis', 'Running n8n with queues', and 'Configure worker concurrency'. Focus on the roles of the main instance (producer), Redis (queue), and the workers (consumers). Pay close attention to the flow diagram.
The article "n8n Performance Optimization for High-Volume Workflows" further contextualizes why this is critical for high-volume systems.
n8n Performance Optimization for High-Volume Workflows
This article explains the engineering principles behind queueing and its importance for performance.
Read the sections 'Queue architecture and backpressure' and 'Batching versus single-item processing'. Note the concepts of backpressure and how batching relates to throughput and error handling.
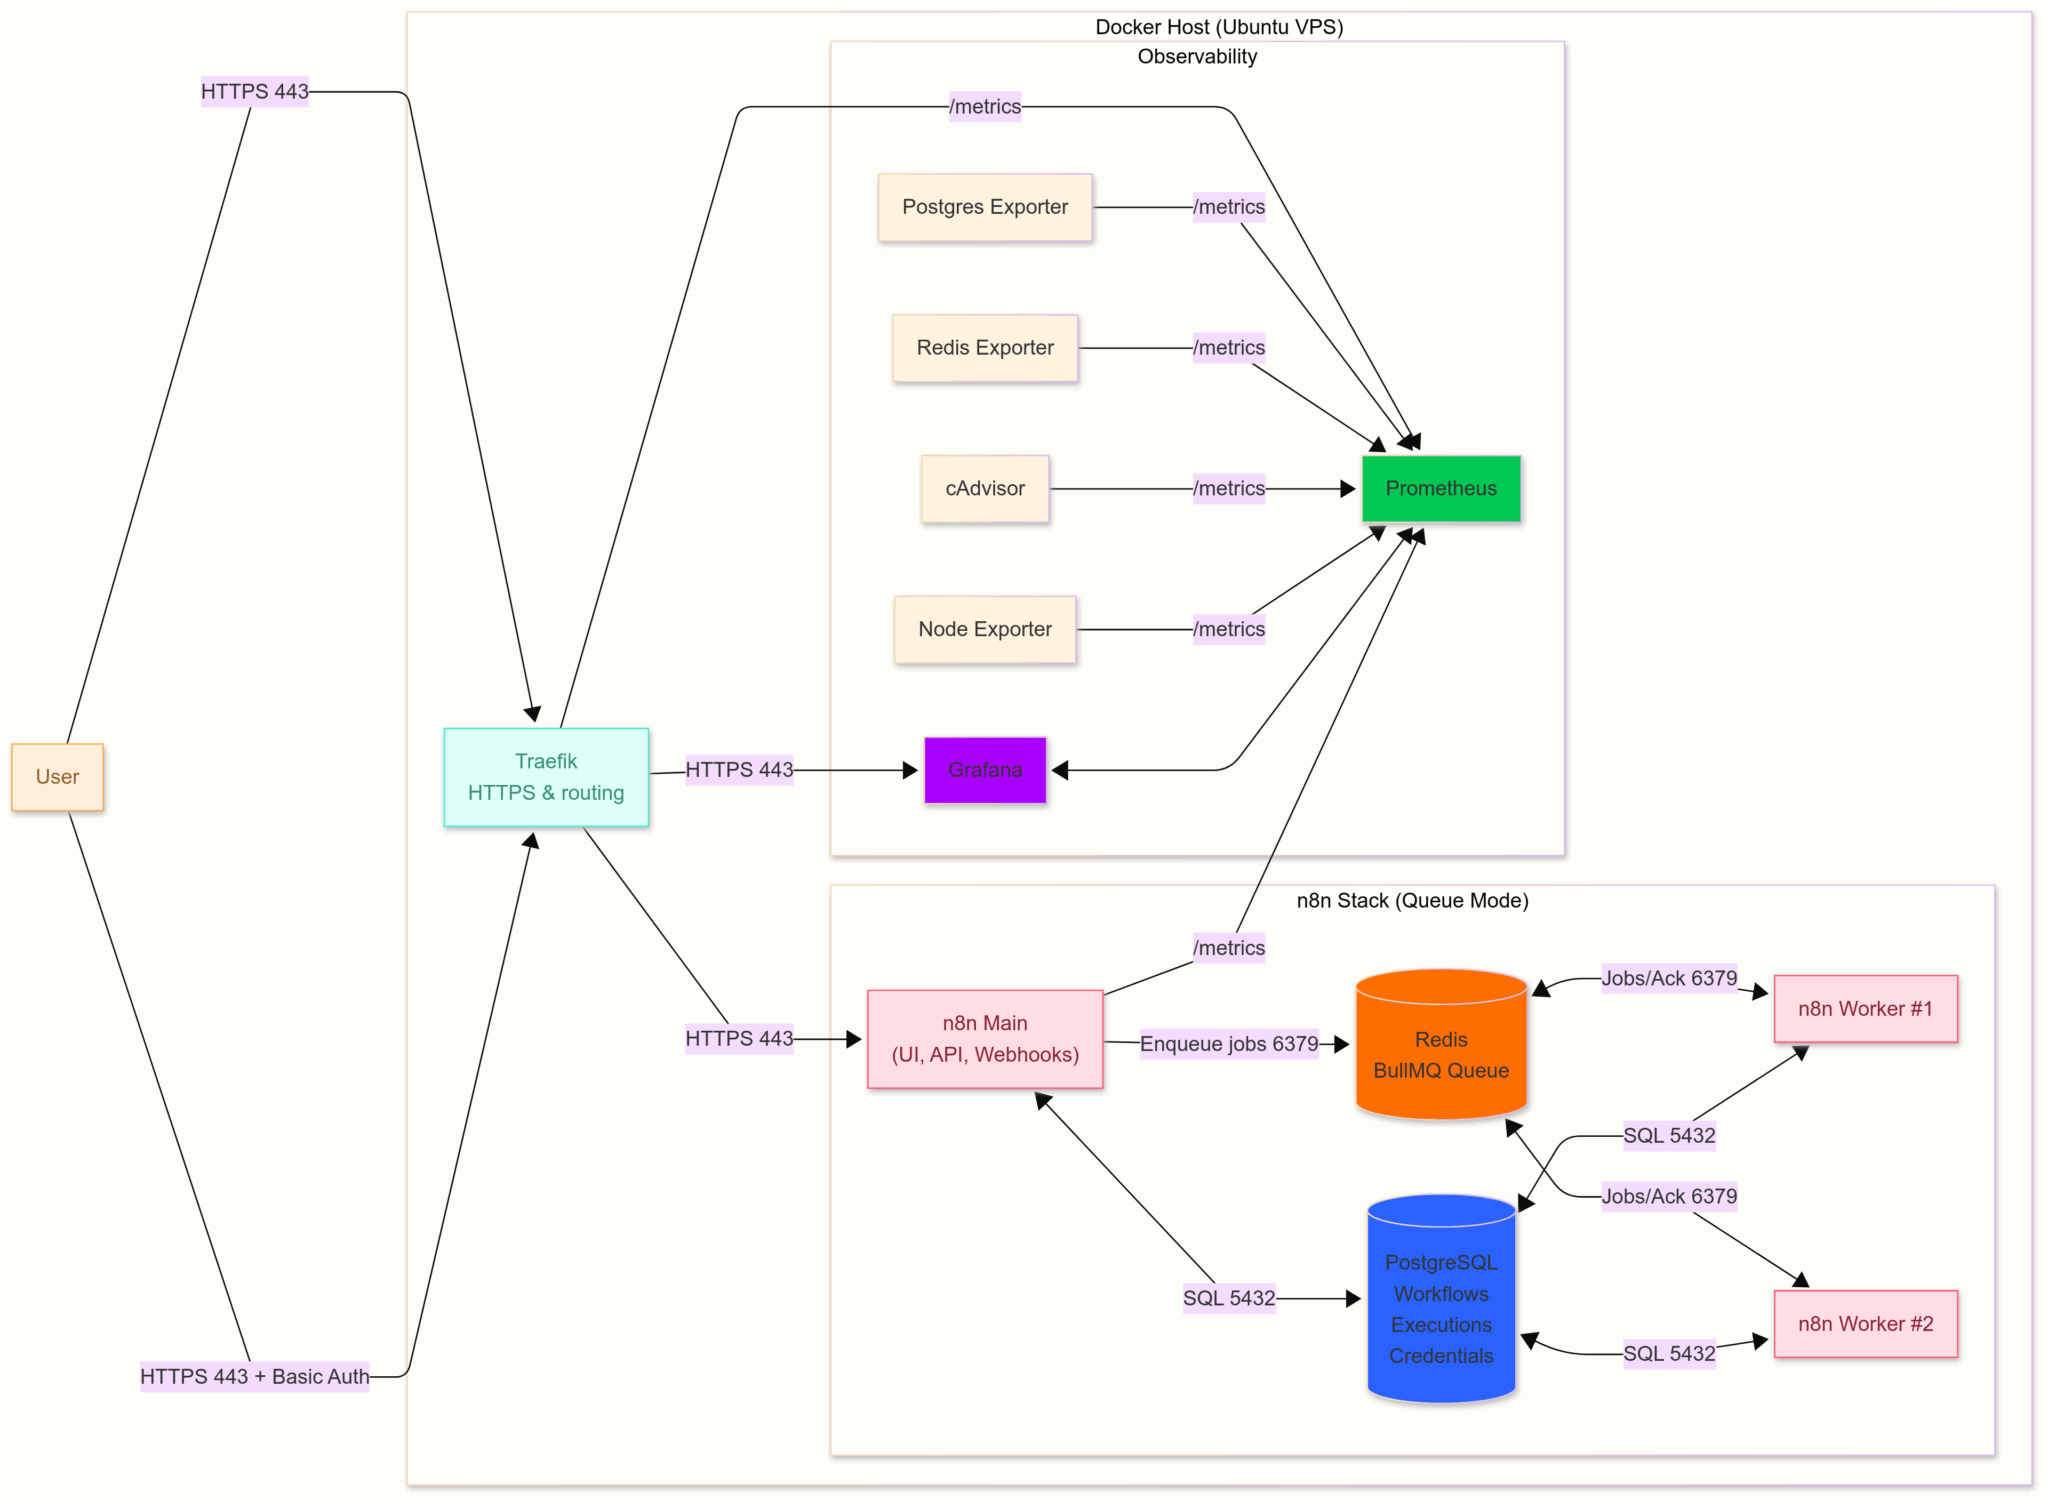
This diagram illustrates the full architecture of a production-ready, scalable n8n deployment. This is the target state for a high-load freelance project.
Part 2: Simulating a Queue on the Free Tier
While a full-scale deployment with dedicated workers and a Redis instance is the ideal, the principles of queueing can be implemented within a standard n8n instance using a webhook-based pattern. This is a highly effective technique for your current setup and a common professional pattern when a full queue mode isn't available or necessary.
The pattern consists of two workflows:
-
Workflow A: The Producer
- Fetches the initial list of items to be processed (e.g., all users from the
reqres.inAPI). - Loops through this list.
- Inside the loop, it does not perform the heavy processing. Instead, it makes an
HTTP Requestto call the webhook of Workflow B, passing the data for a single item (e.g., a user ID). - It includes a
Waitnode in the loop to explicitly throttle the creation of new "jobs," thereby controlling the rate of API calls.
- Fetches the initial list of items to be processed (e.g., all users from the
-
Workflow B: The Consumer
- Is triggered by a
Webhooknode. - Receives the data for one item from Workflow A.
- Performs the actual API call and processing for that single item.
- Saves the result (e.g., to a Google Sheet).
- Is triggered by a
Each call to Workflow B's webhook creates a separate, independent execution in n8n. This effectively simulates a job queue, giving you the resilience and control needed for batch processing.
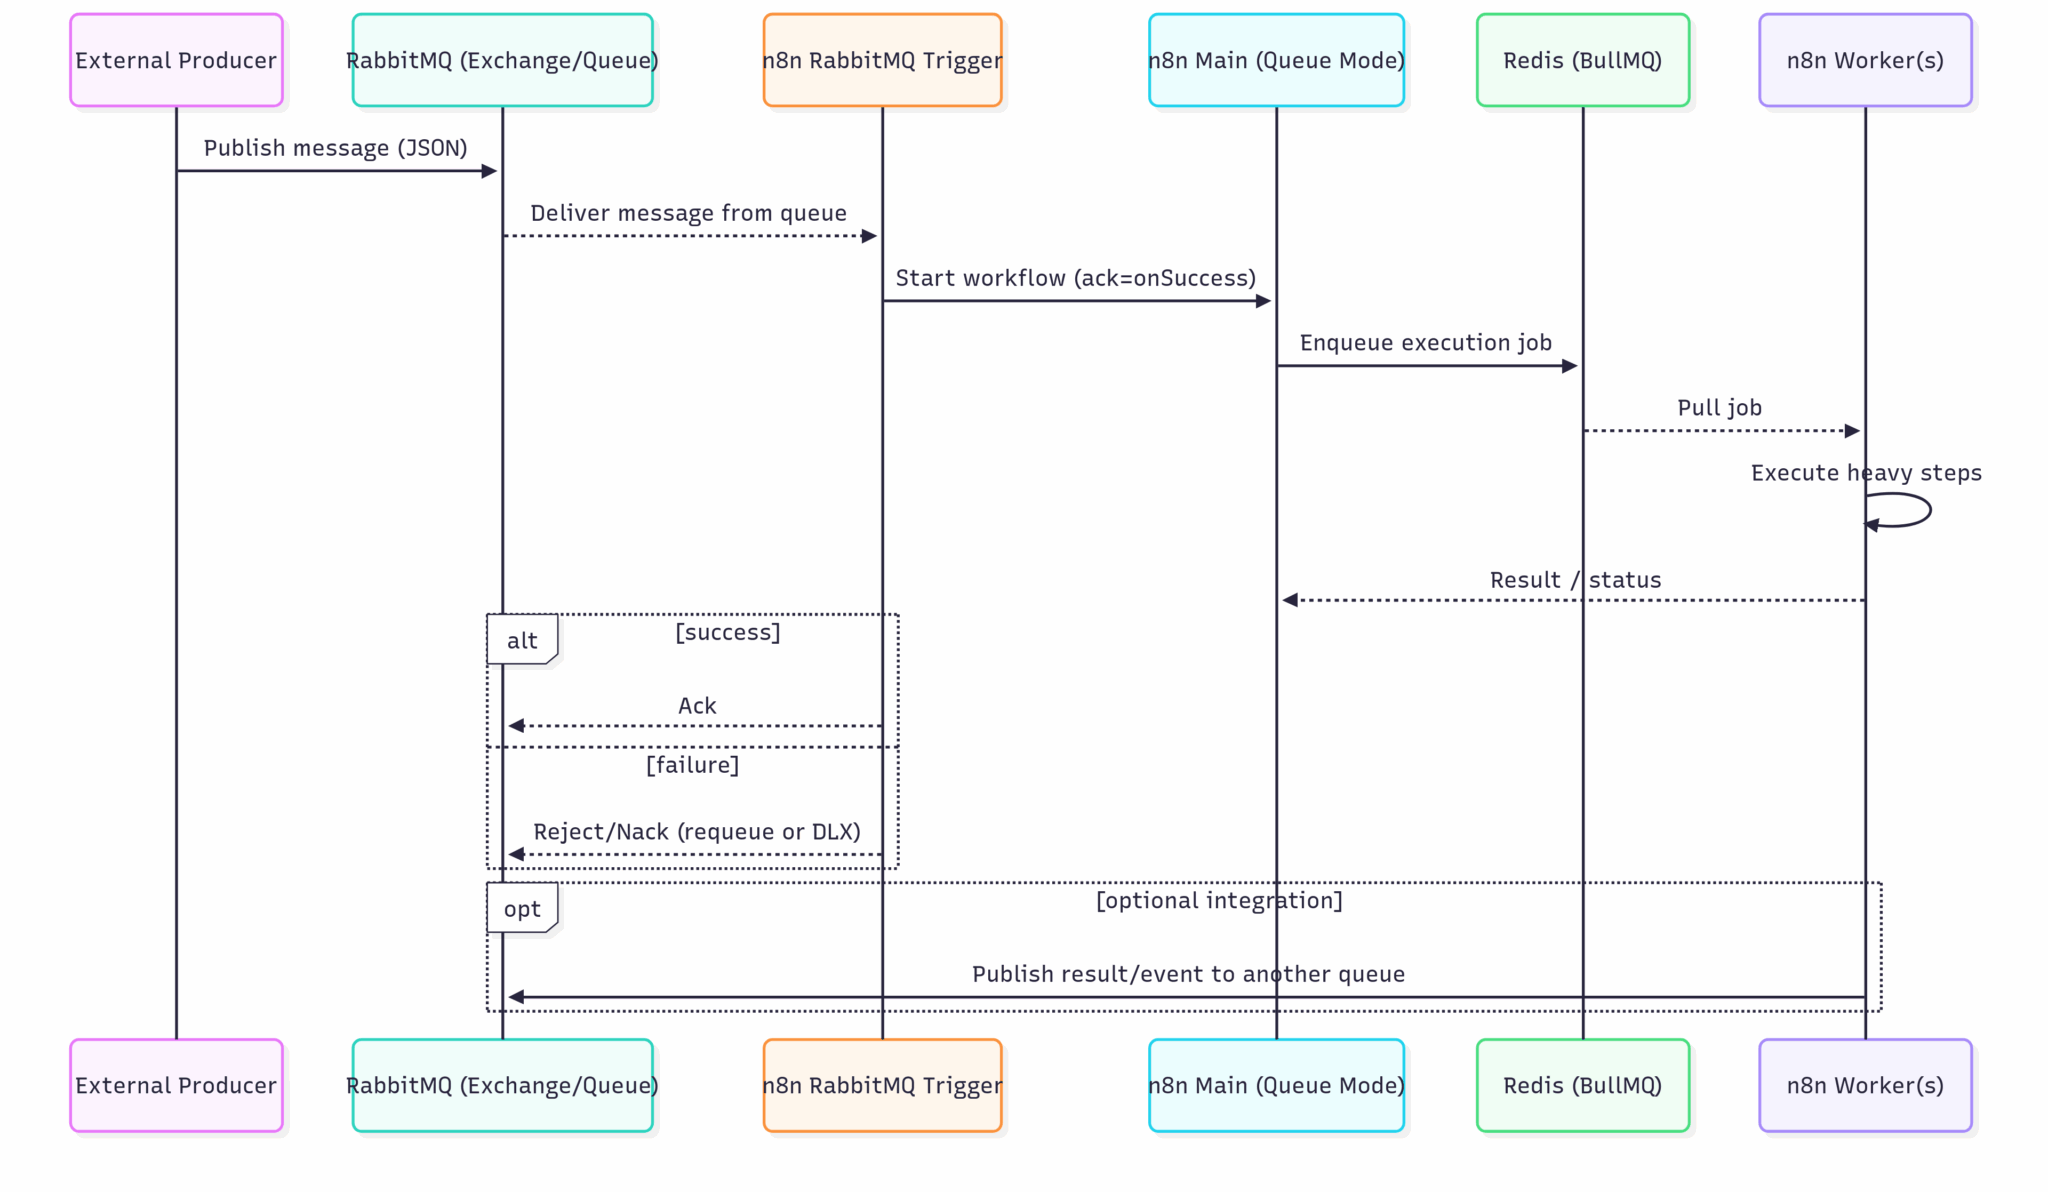
This sequence diagram illustrates the logical flow, where "n8n Main" is your producer workflow and "n8n Worker(s)" are the individual executions of your consumer workflow.
Part 3: Practical Task - Implement the Asynchronous Processor
Scenario: You need to build a system that fetches detailed profiles for a list of users. The source API for user details has a strict rate limit of 5 requests per 10 seconds. You must design a system that can process an arbitrary number of users without being blocked.
Your Task: Using the two-workflow pattern, build an asynchronous batch processor that:
- Retrieves the list of 12 users from
reqres.in. - For each user, calls a separate API endpoint to get their detailed profile.
- Respects the rate limit.
- Logs the results to a Google Sheet.
Execution Steps:
1. Set up the Consumer Workflow (User_Detail_Processor)
- Objective: To process a single user ID, fetch its details, and log the result.
- Create a new workflow and name it
User_Detail_Processor. - Trigger: Add a
Webhooknode. When the dialog appears, copy the Test URL. You will need it for the Producer workflow. Keep this node's settings open for now. - Fetch Details: Add an
HTTP Requestnode.- Set the URL to
https://reqres.in/api/users/{{ $json.body.id }}. This expression will dynamically insert the user ID received by the webhook.
- Set the URL to
- Log to Sheet: Add a
Google Sheetsnode (Append or Update).- Authenticate and select a Sheet and a worksheet (e.g., "User Details").
- Map the columns:
IDfrom{{ $json.body.id }},Emailfrom{{ $node["HTTP Request"].json["data"]["email"] }},FirstNamefrom{{ $node["HTTP Request"].json["data"]["first_name"] }}, etc.
- Test the Consumer:
- Go back to the
Webhooknode and click "Listen for Test Event". - In a separate terminal or API tool (like Postman/Insomnia), send a
POSTrequest to your webhook's Test URL with a JSON body like:{"id": 2}. - Verify the workflow runs successfully and adds user 2's data to your Google Sheet.
- Save and activate this workflow. Copy the Production URL from the webhook node.
- Go back to the
2. Set up the Producer Workflow (Batch_Request_Producer)
- Objective: To get the list of all users and send a "job" for each one to the consumer workflow at a controlled rate.
- Create a new workflow and name it
Batch_Request_Producer. - Trigger: Use a
Manualtrigger. - Get User List: Add an
HTTP Requestnode configured as in the previous lesson to fetch all 12 users fromhttps://reqres.in/api/usersusing pagination. Ensure its JSON/RAW Path for Items is set todata. - Loop through Users: The
HTTP Requestnode will output 12 separate items. The subsequent nodes will now run once for each item. - Call Consumer Webhook: Add a new
HTTP Requestnode after the first one.- Set Method to
POST. - Set URL to the Production URL of your
User_Detail_Processorwebhook. - Under Body Content Type, select
JSON. - In the Body Parameters, add a parameter named
idwith the value{{ $json.id }}. This expression takes theidfrom the current user item in the loop and sends it to the consumer.
- Set Method to
- Throttle the Requests: Add a
Waitnode after the webhook call.- The rate limit is 5 requests per 10 seconds, which means we can make one request every
10 / 5 = 2seconds. - Set Wait Time (seconds) to
2. This ensures you never exceed the rate limit.
- The rate limit is 5 requests per 10 seconds, which means we can make one request every
3. Execute and Verify
- Execute the
Batch_Request_Producerworkflow. - Observe its execution. You should see it loop 12 times, pausing for 2 seconds on each iteration.
- Go to the
User_Detail_Processorworkflow's execution log. You will see 12 separate successful executions. - Check your Google Sheet. It should now be populated with the details for all 12 users.
Deliverables
- System Diagram: Create a simple box-and-arrow diagram illustrating your two-workflow solution. Label "Workflow A (Producer)" and "Workflow B (Consumer)", showing how data flows between them and the external services (
reqres.inAPI, Google Sheets). - Producer Configuration (Screenshot): A screenshot of your
Batch_Request_Producerworkflow showing the four key nodes:HTTP Request(Get List),HTTP Request(Call Webhook), and theWaitnode. - Consumer Execution Log (Screenshot): A screenshot of the
User_Detail_Processor's execution list showing at least 5-10 successful, independent executions triggered by the producer.
Evaluation Criteria
- Architectural Soundness: Your diagram must correctly depict the producer/consumer pattern and data flow.
- Correct Implementation: The producer must correctly loop and call the consumer's webhook, and the consumer must correctly process the data.
- Rate Limit Compliance: The presence and correct configuration of the
Waitnode (2 seconds) is mandatory. - Successful End-to-End Execution: The final Google Sheet must contain the data for all 12 users, proving the system worked as designed.
Conclusion
You have successfully engineered an asynchronous processing system. By separating the producer and consumer logic and introducing a controlled delay, you have built a workflow that is not only resilient to single-point failures but also compliant with external API rate limits. This pattern is a significant step up from simple, linear workflows and is fundamental to building scalable, production-grade automations.
Key Takeaways:
- Decouple to Scale: Separate task generation (producer) from task execution (consumer) to build resilient systems.
- Webhooks as a Queue: A webhook-triggered workflow is an effective way to process jobs asynchronously, with each trigger creating an independent execution.
- Throttle with
Wait: Use theWaitnode to explicitly control the rate of outgoing requests to respect API limits. - Design for Failure: This architecture inherently contains failures. If one consumer execution fails, it doesn't stop the others.
In this lesson, we created a system that spawns many independent executions. What happens when one of them fails? In our next lesson, we will focus on implementing robust try-catch blocks for error handling using the Error Trigger node, giving you the tools to manage and react to these inevitable failures gracefully.