Introduction
In our last lesson, you engineered an asynchronous queue using a webhook-triggered "consumer" workflow. This was a critical step towards building scalable systems. However, that consumer webhook is currently exposed. Anyone who discovers its URL can send requests, potentially corrupting your data, exhausting API quotas, or triggering unwanted actions. This is an unacceptable security risk in any production environment.
Today, we move from scalability to security. Your objective is to implement webhook signature verification to secure your endpoints against unauthorized requests. This is a non-negotiable skill for a professional automation engineer.
The core principle is cryptographic verification. The sending service uses a shared secret key to create a unique signature (a hash) for each request payload. Your workflow will then independently recalculate that signature using the same secret key and payload. If the signature sent in the request header matches your calculated signature, you can be certain the request is authentic (it came from the correct source) and has its integrity intact (it wasn't tampered with in transit).
The Mechanics of Signature Verification
Before implementing, it's essential to understand the process, known as HMAC (Hash-based Message Authentication Code).
- Shared Secret: Both the sending application (e.g., Stripe, GitHub, or in our case, an API client) and your n8n workflow have access to the same secret key. This key is never transmitted.
- Signature Generation: The sender takes the raw request body, combines it with the secret key, and uses a hashing algorithm like HMAC-SHA256 to produce a unique signature string.
- Transmission: The sender sends the original request body, plus the signature in a special HTTP header (e.g.,
X-Signature-256). - Verification: Your n8n webhook receives the request.
- It takes the raw request body. This is a critical detail; any formatting changes will alter the final hash.
- It uses the same shared secret and HMAC-SHA256 algorithm to generate its own signature.
- It compares its calculated signature to the one received in the header.
- Decision: If the signatures match, the workflow proceeds. If not, it rejects the request, logging it as a security event.
This video provides an excellent high-level overview of this concept and demonstrates its implementation in n8n.
n8n Webhook Security: A Deep Dive Into Real Workflow Protection
Watch this section from 'n8n Webhook Security' by Bart Slodyczka to understand the concept of signature verification. The 'secret recipe' analogy is a precise way to visualize the HMAC process.
Watch from 13:59 to 16:12. Focus on the explanation of how a service like Zendesk, Stripe, or GitHub uses a shared secret to create a signature and why your workflow must reconstruct it to verify authenticity.
This verification pattern is a universal standard. The following video about Stripe integration further reinforces the same principles, demonstrating its broad applicability.
Payment Processing with Stripe in n8n: Step-by-Step Guide + Free Template
This video from Manoj Kumar demonstrates the exact same signature verification pattern, this time for Stripe. This reinforces that you are learning a universal security standard, not a tool-specific trick.
Watch the segments from 00:54-01:32 and 11:03-16:58. Pay attention to how the process—using a webhook secret to compute and compare an HMAC signature—is identical to the one described for Zendesk. This confirms the pattern's importance.
Practical Task: Implement and Test Signature Verification
You will now build a secure webhook and test it using an API client (Postman or Insomnia), which is a standard professional workflow for testing integrations. You will act as both the sender and the receiver to master the end-to-end process.
1. The Secured Workflow
Create a new n8n workflow named Webhook_Secure_Receiver. This workflow will only process requests that pass signature validation.
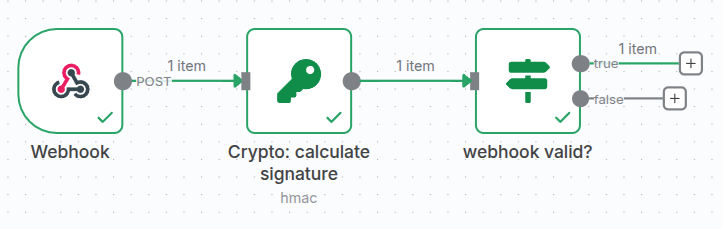
A. Configure the Webhook Trigger:
- Add a
Webhooknode. - In the node's parameters, set HTTP Method to
POST. - Under Webhook URLs, ensure you're using the Test URL for now.
- Expand the Options section. This is critical: set Response Mode to
On Receivedand enable the Raw Body toggle. This gives you access to the exact, unmodified request body needed for the HMAC calculation. - Click "Listen for Test Event".
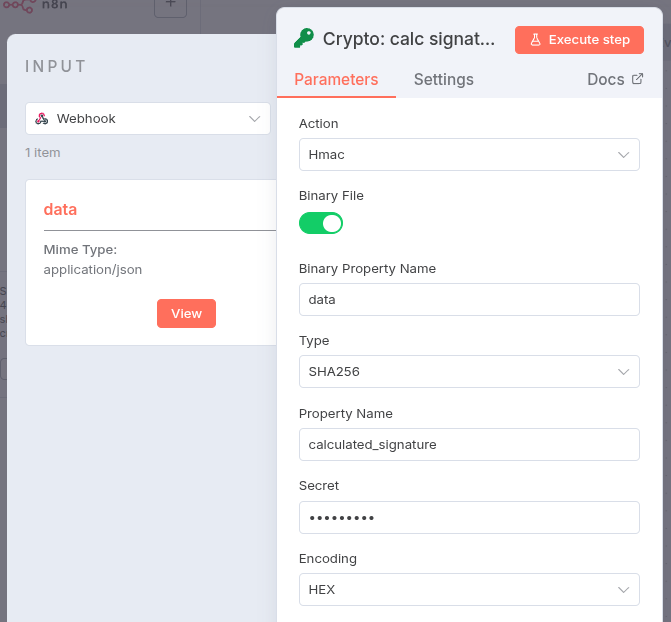
B. Add the Crypto Node:
- Add a
Cryptonode after the Webhook. - Configure its parameters as follows:
- Action:
Hmac - Binary File:
On - Binary Property Name:
data(This is the default property where n8n stores the raw body from the webhook). - Type:
SHA256 - Property Name:
calculatedSignature(This will be the name of the output property). - Secret: Enter a secure, random string. For this exercise, use
YourSuperSecretKey-2024!. This is your shared secret. - Encoding:
Base64
- Action:
C. Add the Validation (If) Node:
- Add an
Ifnode after the Crypto node. - Set up a condition to compare the signature you just calculated with the one you expect to receive in the header.
- First Value: Use an expression to get the signature from the Crypto node:
{{ $node["Crypto"].json.calculatedSignature }} - Operation:
String>Equals - Second Value: Use an expression to get the signature from the incoming header. We'll name our custom header
x-n8n-signature:{{ $json.headers['x-n8n-signature'] }}
- First Value: Use an expression to get the signature from the Crypto node:
D. Create Success and Failure Branches:
- On the
trueoutput of the If node, add aNoOpnode (search for "No Operation") and rename it to✅ SIGNATURE VALID. - On the
falseoutput, add anotherNoOpnode and rename it to❌ SIGNATURE INVALID. In a real system, this branch would trigger an alert or log the security failure.
Your workflow is now ready for testing.
2. The Sender (Postman/Insomnia)
Now, configure your API client to act as the sending service.
-
Create a new
POSTrequest. Set the URL to your webhook's Test URL. -
Go to the Body tab, select raw, and choose JSON. Enter the following payload:
{ "eventId": "evt_12345", "payload": "This is a test event." } -
Go to the Pre-request Script tab. This script will run before the request is sent, calculating the signature and adding it as a header. Your full-stack background will make this familiar.
Paste the following JavaScript code. It uses the built-in
CryptoJSlibrary available in Postman.// This script must match the logic in your n8n Crypto node. // 1. Define the shared secret. MUST be identical to the one in n8n. const sharedSecret = 'YourSuperSecretKey-2024!'; // 2. Get the raw request body. const requestBody = pm.request.body.raw; // 3. Calculate the HMAC-SHA256 hash. const hash = CryptoJS.HmacSHA256(requestBody, sharedSecret); // 4. Encode the hash in Base64. const signature = CryptoJS.enc.Base64.stringify(hash); // 5. Add the signature to a request header. The header name must match the one in the n8n If node. pm.request.headers.add({ key: 'x-n8n-signature', value: signature });This script is a direct implementation of the HMAC process. The community forum post "Webhook HMAC hash cannot be verified" shows similar scripts for different environments, confirming this is a standard, language-agnostic technique.
3. Execute and Verify
Test 1: The Happy Path
- Ensure your n8n workflow is listening for a test event.
- In Postman, click Send.
- Switch back to n8n. The workflow should execute and follow the
truepath to the✅ SIGNATURE VALIDnode. You have successfully verified an authentic request.
Test 2: Integrity Failure (Tampered Payload)
- In Postman, go to the Body tab and change the payload slightly (e.g.,
"payload": "This is a TAMPERED test event."). - Do not re-run the pre-request script. Go directly to the Headers tab. You will see the
x-n8n-signatureis still the one calculated for the original body. - Click Send.
- Check n8n. The workflow will now execute the
falsepath to❌ SIGNATURE INVALID. This proves that your system rejects any data that has been modified in transit.
Test 3: Authenticity Failure (Wrong Secret)
- In Postman, go to the Pre-request Script and change the
sharedSecretto something incorrect (e.g.,WrongSecretKey). - Go back to the Body tab and revert the payload to the original.
- Click Send. Postman will now calculate a new signature with the wrong key.
- Check n8n. The workflow will again execute the
falsepath. This proves that your system only accepts requests from parties who possess the correct shared secret.
Conclusion
You have now implemented a fundamental security pattern for production-grade automations. Open webhooks are a liability; secured webhooks are a professional standard. By verifying signatures, you guarantee both the authenticity and integrity of incoming data.
Key Takeaways:
- Trust Nothing: Treat all incoming webhook requests as untrusted until verified.
- The HMAC Pattern is Universal: The pattern
Webhook (Raw Body)->Crypto (HMAC)->If (Compare Signatures)is the standard implementation for services like Stripe, GitHub, Shopify, and more. - Consistency is Key: The hashing algorithm (SHA256), secret key, and encoding (Base64) must be identical on both the sender and receiver side for verification to succeed.
In this lesson, you verified who sent the request. In our next lesson, we will focus on the next logical step: Designing secure webhook receivers that perform input sanitization and payload validation upon receipt. Now that we trust the source, we need to validate that the content of the message is safe and structured as we expect before processing it further.