Introduction
In our last lesson, we demystified backpropagation, the core algorithm that allows neural networks to learn by calculating the gradients of the cost function. We saw that it's a powerful but mathematically intensive process of propagating error signals backward through the network.
As you might imagine, manually implementing the chain rule for every weight and bias in a large network would be incredibly complex and time-consuming. This is where high-level frameworks come into play. They are the "exosuit" that allows us to build and train complex models with incredible speed and efficiency, handling the calculus for us.
Today's lesson is our first major step from theory into practice. Your learning outcome is to build and compile a sequential model for classification using a high-level framework (e.g., Keras). We will focus on two key actions:
- Building the model: Defining the network's architecture—its layers, the number of neurons, and their activation functions.
- Compiling the model: Configuring the learning process by choosing an optimizer, a loss function, and metrics to monitor.
By the end of this lesson, you will be able to construct a complete neural network blueprint in code, ready to be trained on data.
Introducing Keras: Your AI Prototyping Tool
The framework we'll use is Keras, which is the standard high-level API for TensorFlow, the world's most popular deep learning library. Keras was designed for fast experimentation and user-friendliness. It allows you to express complex neural network architectures in simple, intuitive Python code. This focus on rapid prototyping is essential for the kind of iterative development you're aiming for.
Tutorial: Introduction to Keras
To start, let's get a high-level overview of Keras and its core concepts. This article from Dataquest provides a concise introduction.
Read the first two sections, 'What Is Keras? What Is It for?' and 'Installing Keras'. This will set the context for why we are using this tool. You can install TensorFlow (which includes Keras) by running pip install tensorflow in your terminal.
Step 1: Building the Model Architecture
The most straightforward way to build a model in Keras is using the Sequential API. A sequential model is exactly what it sounds like: a linear stack of layers. You can think of it as building a Lego tower, where you place one block (layer) on top of the next.
For the feedforward networks we've been studying, this is the perfect tool.

The Sequential Model and Dense Layers
A Sequential model is built by adding layers one by one. The most fundamental layer is the Dense layer, which is a standard, fully-connected layer where every neuron is connected to every neuron in the previous layer. This is the layer type we have implicitly been studying so far.
To define a Dense layer, you need to specify a few key things:
units: The number of neurons in the layer.activation: The activation function for the neurons in this layer (e.g.,'relu','sigmoid','softmax').input_shape: This is only required for the very first layer. It tells the model the shape of the input data it should expect. For a flat list of features, it would be(number_of_features,).
Let's see how this works in practice.
Create an Artificial Neural Network with TensorFlow's Keras API
This video from deeplizard provides an excellent, step-by-step demonstration of building a sequential model with dense layers. Watch how the concepts we've discussed translate directly into code.
Watch from 01:13 to 04:42. Focus on: How a Sequential model is initialized as a list of layers. How the first Dense layer is defined, including the units, activation, and input_shape arguments. How subsequent Dense layers are added. Notice they don't need the input_shape parameter, as Keras infers it from the previous layer. The final output layer: notice how its number of units (2) and activation function (softmax) are chosen specifically for a two-class classification problem.
Inspecting Your Model with model.summary()
Once you have defined your model, you can get a clean, readable summary of its architecture using the model.summary() method. This is an incredibly useful command for verifying that your model is structured as you intended. It shows the layers in order, their output shape, and the number of trainable parameters (weights and biases) in each.
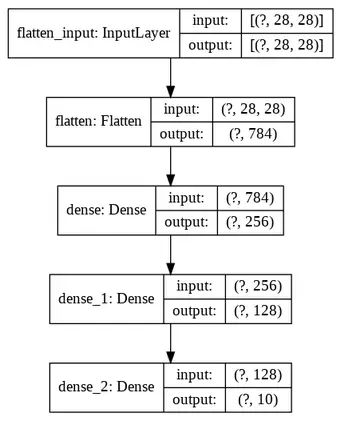
Watch this short clip to see model.summary() in action.
Create an Artificial Neural Network with TensorFlow's Keras API
Let's see how to generate and read the model summary for the network we just saw being built.
Watch from 05:01 to 05:25. Observe how the summary table reflects the layers that were added to the sequential model.
Step 2: Compiling the Model for Learning
Building the model defines its architecture—the what. Compiling the model configures its learning process—the how. This is where you connect the optimizer, loss function, and metrics to your model, making it ready for training. This step essentially tells Keras what algorithm to use for gradient descent and how to measure success.
The model.compile() method takes three crucial arguments:
optimizer: This specifies the optimization algorithm that will use the gradients (calculated via backpropagation) to update the model's weights. A safe and powerful default choice for most problems is'adam'. The optimizer is the engine of gradient descent.loss: This is the loss function the optimizer will try to minimize. The choice depends on your problem type. For a binary (two-class) classification, you'll use'binary_crossentropy'. For multi-class classification, you'll use'categorical_crossentropy'(or'sparse_categorical_crossentropy').metrics: This is a list of metrics you want Keras to report during training so you can monitor the model's performance. It's for human evaluation, not for the training process itself. The most common metric for classification is'accuracy'.
An Introduction to Keras with Binary Classification Task
This article provides a clear breakdown of the components involved in compiling a model. It reinforces the roles of the optimizer and loss function.
Read the sections 'Defining an Optimizer', 'Loss Function', and 'Compiling the Model: Putting Them All Together'. These sections explain the purpose of each argument in model.compile().
Now, let's see the compile step in a video demonstration.
Train an Artificial Neural Network with TensorFlow's Keras API
The next video in the deeplizard series shows exactly how to call model.compile() after the model has been built.
Watch from 00:39 to 01:38. Pay attention to how the optimizer (Adam), loss function (sparse_categorical_crossentropy), and metrics (accuracy) are passed to the compile function.
A Complete Example
Let's put everything together into a single, complete code block that defines and compiles a simple classification model. This template represents the full workflow for this lesson's outcome.
# 1. Import necessary modules from TensorFlow and Keras
import tensorflow as tf
from tensorflow.keras.models import Sequential
from tensorflow.keras.layers import Dense


# Assume we have 10 input features and are classifying into 3 categories.
num_features = 10
num_classes = 3


# 2. Build the model architecture
model = Sequential([


    # Input layer and first hidden layer
    # The input_shape must match the number of features in our data
    Dense(units=64, activation='relu', input_shape=(num_features,)),


    # Second hidden layer
    Dense(units=32, activation='relu'),


    # Output layer
    # The number of units must match the number of classes
    # 'softmax' is used for multi-class classification to output probabilities
    Dense(units=num_classes, activation='softmax')
])


# 3. Print a summary of the model
print("Model Architecture:")
model.summary()


# 4. Compile the model for training
model.compile(
    optimizer='adam',
    loss='categorical_crossentropy', # Use for multi-class classification
    metrics=['accuracy']
)

print("\nModel has been built and compiled successfully!")
This code is now a complete blueprint. It defines the network's structure and prepares the learning machinery. The model is now ready for the final step: training on data.
Conclusion
In this lesson, you have successfully bridged the gap between the theory of neural networks and their practical implementation. You now have the power to define a neural network architecture and configure its learning process using Keras, one of the most important skills in applied AI.
Key Takeaways:
- Keras is a high-level API that simplifies building and training neural networks.
- The
Sequentialmodel is used to create a linear stack of layers, which is ideal for simple feedforward networks. Denselayers are the fully-connected layers that form the building blocks of our network. You define them withunitsand anactivationfunction. The first layer also needs aninput_shape.- Building a model means defining its architecture layer by layer.
model.summary()is your tool for inspecting it. - Compiling a model with
model.compile()configures the learning process by specifying theoptimizer,lossfunction, and evaluationmetrics.
Preview of the Next Lesson:
We have built and compiled our model, but it's still an "empty brain" with random weights. The final step is to train it on data. In the next lesson, "Train a neural network using a framework, monitoring loss and accuracy," we will use the model.fit() function. This is where the magic happens: Keras will automatically execute the forward and backward passes thousands of times, and we will watch our model's accuracy climb and its loss decrease.