Introduction
Welcome back! In our previous lesson, we explored the concept of transfer learning, understanding it as a powerful strategy to leverage knowledge from large, pre-trained models for new tasks. We discussed its benefits, such as faster development and higher performance with less data, and the crucial considerations like transferred bias.
This lesson puts that theory into practice. Our goal is to master today's learning outcome: Apply a pre-trained model to a new task (fine-tuning) for faster development. You will learn the concrete workflow for taking a state-of-the-art model, adapting it to a custom problem, and training it using a high-level deep learning framework. This is a fundamental skill for building the kind of powerful, real-world AI applications you aspire to create.
1. Two Core Strategies: Feature Extraction vs. Fine-Tuning
When you use a pre-trained model, there are two primary strategies you can employ. The previous lesson introduced them as "frozen vs. trainable layers." Let's formalize this distinction.
-
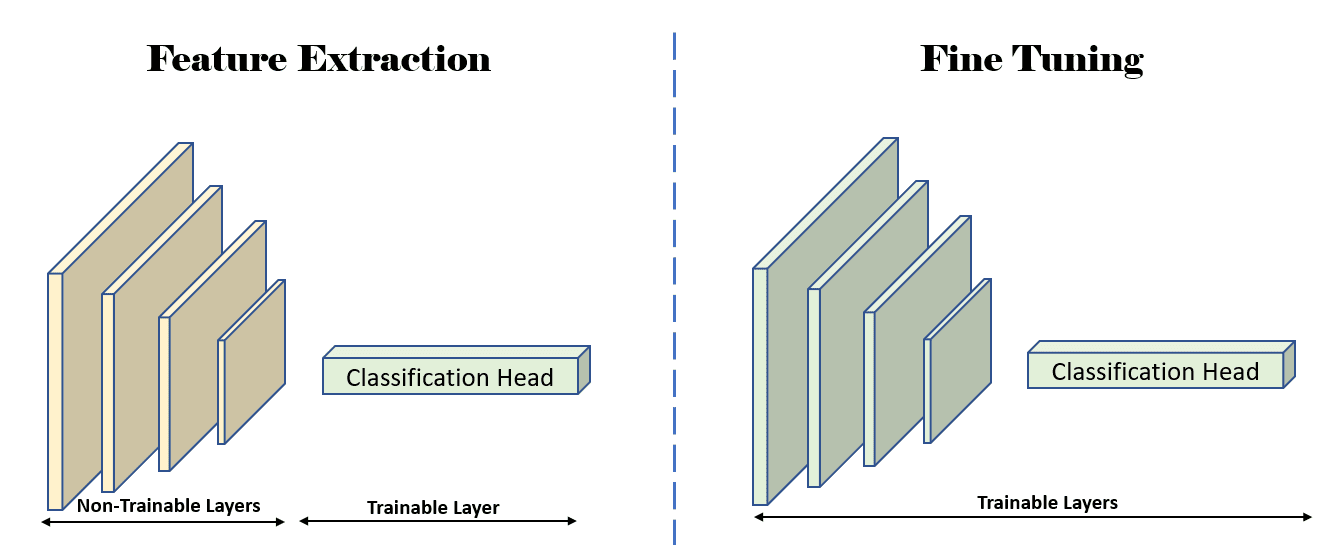
Feature Extraction: In this approach, you treat the pre-trained model's convolutional base (its "body") as a fixed feature extractor. You freeze all its layers so their weights don't change during training. You then add a new classifier (a "head") on top and train only this new head. This is the fastest method and works well when you have a small dataset that is very similar to the original dataset the model was trained on.
-
Fine-Tuning: This approach goes a step further. After initially training the new head with the base model frozen (as in feature extraction), you "unfreeze" some of the top layers of the pre-trained base model. You then continue training the whole setup (the unfrozen base layers + the new head) with a very low learning rate. This allows the model to "fine-tune" its more specialized, high-level features for the specifics of your new task. It's more computationally intensive but can lead to better results.
The following image provides a clear visual distinction between these two powerful techniques.
2. The Fine-Tuning Workflow in Action
Let's walk through a practical example: fine-tuning a powerful, pre-trained image classifier to solve a new problem. Imagine we want to build a model that can tell the difference between a handbag and a shoe, but we only have a small dataset of a few hundred images. Training a deep neural network from scratch would be impossible, but with transfer learning, it's very achievable.
The following video from an MIT Deep Learning course demonstrates this exact process using Keras. It shows how to perform "surgery" on a pre-trained ResNet model, a famous architecture that won the ImageNet competition.
4: Deep Learning for Computer Vision – Transfer Learning and Fine-Tuning; Intro to HuggingFace
Watch how an instructor in an MIT course takes a pre-trained ResNet model and adapts it to classify handbags and shoes. Pay close attention to the code and the concepts of removing the 'top' layer and adding a new one.
Watch from 01:08:17 to 01:13:48. Focus on: The concept of performing 'surgery' on the network by removing the final classification layer (01:08:17). The Keras code used to load ResNet with the include_top=False argument (01:10:55). How a new, small network is created to act as the new classifier, which takes the features from the headless ResNet as input.
As you saw in the video, the results can be remarkable. By leveraging the features learned by ResNet from millions of general images, the new model can achieve extremely high accuracy on a new, specific task with very little data.
3. Fine-Tuning Strategies and Best Practices
The video demonstrated a form of feature extraction. A common and powerful extension is to then fine-tune the model. So, which layers should you fine-tune?
The general intuition is that the early layers of a Convolutional Neural Network (CNN) learn very generic features (like edges, colors, and textures), while later layers learn more complex and task-specific features (like "an eye" or "a wheel").

This leads to a standard best practice for fine-tuning:
- Instantiate a pre-trained base model (e.g., ResNet50) and load its pre-trained weights.
- Freeze all layers in the base model to prevent their weights from being updated.
- Add a new classifier head on top of the frozen base.
- Train only the new classifier head for a few epochs. This allows the new, randomly-initialized head to learn to interpret the stable features from the frozen base without corrupting them.
- Unfreeze some of the top layers of the base model.
- Continue training the entire model (unfrozen base layers + head) with a very low learning rate.
The Importance of a Low Learning Rate
This last point is critical. The pre-trained weights are highly valuable. If you use a large learning rate during the fine-tuning stage, you risk making large, destructive updates that erase all the knowledge learned during pre-training. By using a very small learning rate (e.g., 1e-5), you ensure that you are only making small, careful adjustments to adapt the learned features to your new data.
Deeper Dive into Fine-Tuning Methods
The simple "unfreeze some layers" approach is very effective, but the field has developed even more sophisticated and efficient methods. For a deeper understanding of these techniques, the following article is an excellent resource.
This article from IBM provides a comprehensive overview of fine-tuning, from the basic approach to more advanced, computationally efficient methods.
Read the sections 'How does fine-tuning work?', 'Full fine-tuning', and 'Parameter efficient fine-tuning (PEFT)'. Grasp the core ideas of freezing layers and using a smaller learning rate. In the PEFT section, note the different strategies like only updating a subset of parameters (partial fine-tuning) or adding small new modules (adapters). You don't need to memorize every detail, but understanding these concepts will place you at the forefront of applied AI.
4. A Code-Level Walkthrough
Let's translate the fine-tuning workflow into the concrete steps you would take when writing code. The tutorial below uses PyTorch and the timm library, but the concepts are universal and apply directly to Keras as well. We'll walk through the key stages without needing to run the full notebook.
Step 1: Select and Load the Model
First, you choose a model architecture. Libraries like timm (in PyTorch) or tf.keras.applications (in TensorFlow/Keras) provide dozens of pre-trained models. The key is to load the model with its pre-trained weights but without its final classification layer.
In the Fine-Tuning Image Classifiers tutorial, this is done with:model = timm.create_model(..., pretrained=True, num_classes=len(class_names))
This single line downloads the model, loads the weights, and replaces the head with a new one matching the number of classes in the new dataset.
Step 2: Prepare the Data Correctly
A critical and often overlooked step is to pre-process your new data in the exact same way the original model was pre-trained. This usually involves resizing images to a specific size and normalizing the pixel values using a specific mean and standard deviation. These values are part of the model's metadata.
The tutorial correctly handles this in the "Retrieving Normalization Statistics" section, ensuring the new images are "seen" by the model in a format it expects.
Step 3: Configure and Run the Training Loop
The training loop itself is similar to what you've seen before, but with two key additions for fine-tuning:
- Optimizer and Learning Rate: You'll use an optimizer like
AdamWand, crucially, a learning rate scheduler likeOneCycleLR. This scheduler carefully manages the learning rate, which is especially important when you transition from training just the head to fine-tuning the base layers. - The Loop Logic: The code in the "Fine-tuning the Model" section implements the training process. It iterates over epochs, runs a pass on the training data to update weights, and runs a pass on the validation data to check performance and save the best model.
While we won't go through the PyTorch code line-by-line, I encourage you to skim the "Fine-tuning the Model" section in the resource below to see how these concepts are implemented.
Fine-Tuning Image Classifiers with PyTorch and the timm library
This tutorial provides a complete, well-documented code example of fine-tuning a model for hand gesture recognition. We won't run the code, but reviewing its structure will solidify your understanding of the practical workflow.
Skim through the sections 'Selecting a Model', 'Preparing the Data', and 'Fine-tuning the Model'. You don't need to understand every line of code. Instead, focus on how the code implements the high-level steps we've discussed: Choosing and loading a pre-trained model. Applying the correct normalization. Setting up an optimizer and learning rate scheduler. Executing the training and validation loop over several epochs.
Conclusion
Today, you have bridged the gap between the theory of transfer learning and the practical application of fine-tuning. This technique is a workhorse of modern AI development, enabling you to create highly accurate models quickly and efficiently.
Key Takeaways:
- Workflow: The standard fine-tuning process is to load a pre-trained model without its head, freeze the base, add and train a new head, and then unfreeze some base layers to train further with a low learning rate.
- Implementation: Deep learning frameworks like Keras and PyTorch provide simple APIs to load pre-trained models (e.g.,
include_top=False). - Best Practices: Always use the same data pre-processing as the original model and use a very low learning rate when fine-tuning the base layers to avoid destroying pre-trained knowledge.
- Power: Fine-tuning dramatically reduces the need for massive datasets and computational resources, putting the power of state-of-the-art AI within your reach.
Preview of the Next Lesson:
You now possess a key tool for building advanced AI systems. In our next lesson, "Describe real-world AI applications in various domains (e.g., NLP, computer vision)", we will explore where these techniques are deployed. You'll see how fine-tuning is the engine behind many of the transformative technologies in natural language processing, medical imaging, autonomous systems, and more, giving you a clearer vision of what you can build.