Hello! Welcome to the final lesson in our module on Linked Lists.
In our previous lesson, we saw a practical application of the dummy node technique to create an elegant and efficient solution for merging two sorted lists. That was a great preview of how a simple placeholder node can clean up complex pointer logic.
Today, we're going to formalize that concept. Your learning outcome is to apply the dummy node technique to simplify linked list manipulation problems, particularly those involving node removal. This is a technique you specifically requested, and mastering it is crucial for writing clean, bug-free code in technical interviews. We will explore why it works and apply it to a couple of classic problems.
1. The Power of a Fixed Anchor: What is a Dummy Node?
A dummy node (also known as a sentinel node) is a placeholder node that we place at the very beginning of a linked list. It doesn't store any actual data from the list; its sole purpose is to act as a fixed, unchanging reference point that precedes the "real" head of the list.
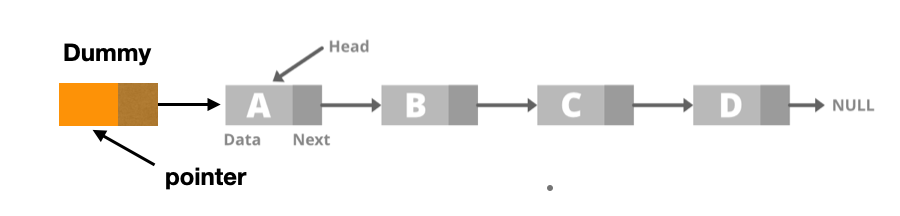
So, why bother with this extra node? The primary reason is to eliminate edge cases related to the list's head.
Consider operations like deleting a node. Without a dummy node, your code must always include special checks:
- "Is the node I'm deleting the head of the list?"
- If yes, you must update the
headpointer itself (head = head.next;). - If no, you find the node's predecessor (
prev) and update its pointer (prev.next = nodeToDelete.next;).
This branching logic makes code more complex and prone to errors. With a dummy node, the original head is just another node in the sequence. Deleting it becomes the exact same process as deleting any other node. The dummy node guarantees that every node, including the original head, has a predecessor.
To see a clear breakdown of how this simplifies various operations, let's turn to a short article.
LINKED LIST PATTERN |SENTINEL NODE|
The article 'LINKED LIST PATTERN |SENTINEL NODE|' explains the scenarios where dummy nodes are most useful and provides clear side-by-side comparisons of operations (like insertion and deletion) with and without a dummy node.
Read from the beginning down to the section titled 'Simplifying Deletions'. Focus on understanding how the 'With Dummy Node' logic is more consistent and requires fewer special checks than the 'Without Dummy Node' logic.
2. Application 1: Removing All Occurrences of a Value
Let's tackle a classic problem that perfectly illustrates the dummy node's utility: Remove Linked List Elements (LeetCode 203).
Problem: Given the head of a linked list and an integer val, remove all nodes of the linked list that have node.val == val.
The tricky part here is when the nodes to be removed are at the beginning of the list. For example, if the list is 6 -> 6 -> 1 -> 2 -> 6 -> 3 and val = 6, the new head of the list should be the node with value 1. Your code has to correctly identify and return this new head.
This is where the dummy node strategy shines. The algorithm is as follows:
- Create a
dummynode and setdummy.next = head. - Initialize two pointers:
prev = dummyandcurr = head. - Iterate through the list with the
currpointer. - If
curr.val == val, we "delete"currby bypassing it:prev.next = curr.next. Notice thatprevdoes not advance in this case, because its newnextnode (curr.next) also needs to be checked. - If
curr.val != val, the current node is fine, so we advanceprevtocurr. - In every iteration, we advance
currto the next node. - Finally, we return
dummy.next. Thisdummy.nextwill point to the correct head of the modified list, whether the original head was removed or not.
The following video from NeetCode provides an excellent visualization and code walkthrough of this exact process.
Remove Linked List Elements - Leetcode 203
This video, 'Remove Linked List Elements', clearly explains the edge cases of the problem and walks through the solution using a dummy node and two pointers.
Please watch the video from the beginning (0:12) up to the end of the code explanation (7:50). Pay close attention to how the prev pointer is handled when a node is deleted versus when it is kept.
A Key Insight on Java References
A common point of confusion is how dummy.next gets updated correctly when we only seem to modify prev.next. Remember how object references work in Java.
- We start with
ListNode prev = sentinel;. At this point,prevandsentinelare two references pointing to the exact sameListNodeobject in memory. - In the first few iterations where we might delete the original head nodes,
previs not advanced. It continues to point to the sentinel object. - When the code executes
prev.next = curr.next;, it is modifying thenextfield of the object thatprevpoints to. - Since
prevandsentinelpoint to the same object, modifyingprev.nextis the same as modifyingsentinel.next.
This is why, at the end, sentinel.next correctly points to the new head of the list.

If you'd like to reinforce this, the following Stack Overflow question captures the exact "aha!" moment a developer had while figuring this out.
Using sentinel nodes in Linked List operations
This Stack Overflow post, 'Using sentinel nodes in Linked List operations', shows a developer's thought process in understanding the 'Remove Linked List Elements' problem. It's a great way to see how others reason about this concept.
Quickly read through the question and the user's edits. The key is in 'EDIT 2', where they realize that since prev and sentinel initially refer to the same object, the update to prev.next correctly adjusts the sentinel's link.
Test your understanding!
You are given a sorted linked list: 1 -> 2 -> 3 -> 3 -> 4 -> 4 -> 5. Your task is to delete all nodes that have duplicate numbers, leaving only distinct numbers. The result should be 1 -> 2 -> 5.
How would you adapt the prev and curr pointer logic with a dummy node to solve this? What's the main difference from the "Remove Linked List Elements" problem?
Show answer
The core idea is still to use a dummy node with prev and curr pointers.
- Initialize
dummy -> head,prev = dummy. - Iterate through the list. When you find that
curris part of a duplicate group (i.e.,curr.next != null && curr.val == curr.next.val), you need to skip over all nodes in that group. - You can use an inner loop to advance
curruntil it points to the last node of the duplicate sequence. - Then, you bypass the entire group by setting
prev.next = curr.next. - If
curris not a duplicate, you simply advanceprevtocurr.
The main difference is that instead of checking for a single value, you're checking for consecutive duplicate values and removing the entire block of them. The dummy node is crucial for handling the case where the list starts with a duplicate group, like 3 -> 3 -> 4 -> 5.
3. Application 2: Removing the Nth Node From the End
Let's look at one more problem where the dummy node elegantly solves an edge case: Remove Nth Node From End of List (LeetCode 19).
Problem: Given the head of a list and an integer n, remove the nth node from the end of the list.
The standard solution uses a two-pointer technique:
- Create two pointers,
fastandslow. - Advance the
fastpointernsteps into the list. - Now, move both
fastandslowone step at a time untilfastreaches the end of the list (fast == null). - At this point, the
slowpointer will be positioned right before the node we want to delete.
The Edge Case: What if we need to remove the first node of the list? (i.e., n is equal to the list's length). In this scenario, when fast reaches the end, slow will still be at the original head. We have no pointer to the node before head to perform the deletion.
The Dummy Node Solution:
We simply initialize slow to a dummy node that points to the head (dummy.next = head). The fast pointer starts at head. Now, when the loop finishes, slow will be exactly where it needs to be—at the node preceding the one to be deleted—even if the target is the original head. The deletion becomes a simple slow.next = slow.next.next;.
Let's watch a video that explains this combined approach.
Remove Nth Node from End of List - Oracle Interview Question - Leetcode 19
The video 'Remove Nth Node from End of List' demonstrates the two-pointer approach and clearly explains why a dummy node is necessary to handle the edge case of removing the head.
Watch from the start to the end of the code walkthrough (0:00 - 6:49). Focus on the part that introduces the dummy node (around 2:43) and how it solves the problem of needing a predecessor for the head node.
Conclusion
You've now completed the Linked Lists module! By mastering the dummy node technique, you've added a powerful tool to your problem-solving arsenal, enabling you to write cleaner and more robust code for a wide range of manipulation tasks.
Key Takeaways:
- A dummy (or sentinel) node is a placeholder placed before the head of a linked list.
- Its primary benefit is eliminating edge cases related to the head, making insertion and deletion logic uniform across the entire list.
- The pattern is simple: create a
dummynode, setdummy.next = head, perform your operations, and finally returndummy.next. - This technique is extremely common in interview problems involving list creation or modification (e.g., merging, removing, reversing sections).
Preview of the next lesson:
We now move on to our next major topic: Stacks, Queues, and Deques. These are fundamental abstract data types with last-in-first-out (LIFO) and first-in-first-out (FIFO) behaviors. In our first lesson, we'll start with the stack and explore how to implement a stack using both an array and a linked list, connecting back to what you've just learned.