Hello! Welcome to the final lesson in our NumPy module.
In our previous lesson, we explored how to generate random data using the numpy.random module. This is a perfect setup for today's topic, as we often need to perform computations on large amounts of data, and doing so efficiently is critical in machine learning.
This lesson addresses a cornerstone of high-performance computing in Python: vectorization. You will learn how to replace slow Python for loops with optimized, whole-array operations in NumPy. Understanding this concept is not just about writing faster code; it's about adopting a new way of thinking about data manipulation that is fundamental to both NumPy and the Pandas library we'll be starting next.
By the end of this lesson, you will be able to optimize the performance of your numerical code by using vectorized operations instead of loops.
1. What is Vectorization and Why is it Faster?
At a high level, vectorization means performing operations on entire arrays of data at once, rather than element by element.
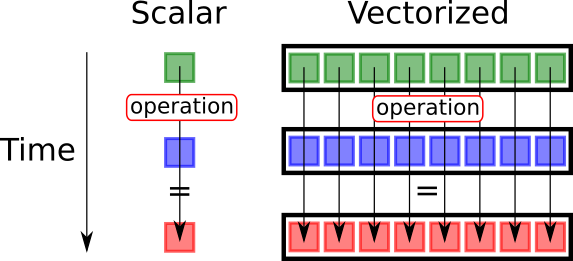
But why is this faster? Since you have a background in computer science, we can dive into the technical reasons. A standard Python for loop is slow for numerical computations due to the language's dynamic nature.
- Dynamic Typing: In a Python list, each element is a full-fledged Python object with its own type information and metadata. When you loop through a list, the Python interpreter has to perform type-checking and other overhead for every single element in every single iteration.
- Interpreted Execution: The loop itself is executed by the Python interpreter, which is inherently slower than compiled code.
NumPy's vectorized operations solve these problems by:
- Using Homogeneous
ndarrays: NumPy arrays contain elements of a single data type (e.g., allint64or allfloat64). This allows NumPy to store them in a dense, contiguous block of memory, just like an array in C. - Pushing Loops to C: A "vectorized" operation like
a * bpushes the looping logic down to highly optimized, pre-compiled C code that can operate directly on the contiguous memory block without any Python interpreter overhead. - Enabling Parallelism: These low-level C implementations can often take advantage of modern CPU features, such as SIMD (Single Instruction, Multiple Data) instructions and multi-core processing, to perform computations in parallel.
This video provides an excellent summary of these core concepts.
Vectorization in Python : Data Science Code
The video 'Vectorization in Python' from ritvikmath clearly explains the three main reasons why vectorization is so much faster than loops: parallel processing, optimized data types, and memory locality.
Watch the first five minutes of the video (from 00:00 to 05:12). Pay close attention to the explanations of how vectorization leverages computer architecture.
2. Vectorization in Action: From Loops to Array Operations
Let's see the performance difference with a concrete example. Imagine we have two large arrays of numbers and we want to compute their element-wise sum.
A "naive" approach would use a for loop:
import numpy as np
import time

# Create two large arrays with 10 million random numbers
a = np.random.rand(10_000_000)
b = np.random.rand(10_000_000)
c = np.zeros(10_000_000)

# --- Using a for loop ---
start_time = time.time()
for i in range(len(a)):
    c[i] = a[i] + b[i]
end_time = time.time()
print(f"Time with for loop: {end_time - start_time:.4f} seconds")
Now, let's perform the same operation using NumPy's vectorized addition:
# --- Using a vectorized operation ---
start_time = time.time()
c = a + b
end_time = time.time()
print(f"Time with vectorization: {end_time - start_time:.4f} seconds")
On a typical machine, you'll see a speedup of 100x or more! This is the power of vectorization. The simple + operator on two NumPy arrays is an example of a universal function, or ufunc, which is NumPy's term for these fast, element-wise functions.
The following resource from the book Python for Data Analysis formalizes this concept and provides another clear performance benchmark.
4 NumPy Basics: Arrays and Vectorized Computation
This chapter from Wes McKinney's authoritative book 'Python for Data Analysis' introduces NumPy arrays and the concept of vectorized computation.
Read the following parts of the text: The short section with the heading 'To give you an idea of the performance difference'. It contains a %timeit benchmark similar to our example above. The section 'Arithmetic with NumPy Arrays'. This formally shows how basic arithmetic operators work element-wise. The section '4.4 Array-Oriented Programming with Arrays' up to the subsection on conditional logic. This defines vectorization and shows how to evaluate a function over a grid of values without loops.
Test your understanding!
In machine learning, a common way to measure the error of a regression model is the Mean Squared Error (MSE). The formula is:
Where are the actual values and are the model's predictions.
Your task: Write a Python function calculate_mse(y_true, y_pred) that computes the MSE using only vectorized NumPy operations. Do not use a for loop.
Show answer
def calculate_mse(y_true, y_pred):
    # The subtraction, squaring, and mean are all vectorized operations
    return np.mean((y_true - y_pred)**2)

# Example usage:
y_true = np.array([1, 2, 3, 4, 5])
y_pred = np.array([1.1, 2.2, 2.8, 4.3, 5.1])

mse = calculate_mse(y_true, y_pred)
print(f"The Mean Squared Error is: {mse:.4f}")
# Expected output: The Mean Squared Error is: 0.0520
This single line of code is not only clean and readable but also highly performant, thanks to vectorization.
3. Vectorizing Conditional Logic
What if your loop contains conditional logic, like if-elif-else statements? This is a very common scenario, and NumPy provides vectorized tools for this as well.
-
For
if/elselogic: Usenumpy.where(condition, x, y).
This function takes a boolean arrayconditionand returns an array with elements fromxwhere the condition isTrue, and elements fromywhere it isFalse.For example, let's replace all negative numbers in an array with 0 (a simplified version of the ReLU activation function used in neural networks).
# Using a loop (slow) data = np.random.randn(10) # random data with negatives result_loop = np.zeros_like(data) for i in range(len(data)): if data[i] < 0: result_loop[i] = 0 else: result_loop[i] = data[i] # Using np.where (fast and concise) result_vectorized = np.where(data < 0, 0, data) print("Original data:", data.round(2)) print("Vectorized result:", result_vectorized.round(2)) -
For
if/elif/elselogic: Usenumpy.select(conditions, choices, default).
This function handles multiple conditions. You provide a list of conditions and a corresponding list of choices.
The following video provides an excellent practical guide on how to replace conditional loops with these powerful functions.
1000x faster data manipulation: vectorizing with Pandas and Numpy
The talk '1000x faster data manipulation' from PyGotham 2019 demonstrates exactly how to vectorize conditional statements, showing the massive performance gains.
Watch the following segments: numpy.where (05:37 - 09:49): This part explains how np.where solves the problem of vectorizing if-else statements. numpy.select (10:58 - 13:52): This part introduces np.select as the solution for more complex if-elif-else structures. Takeaways (25:26 - 26:14): A quick summary of the key strategies.
4. Thinking in Arrays: A Complete Example
The real power of vectorization comes from reframing problems to be solved with array operations. Let's look at simulating a "random walk". A random walk consists of a sequence of random steps.
A pure Python implementation would use a loop to simulate the walk step-by-step.
import random

position = 0
walk = [position]
for i in range(1000):
    step = 1 if random.randint(0, 1) else -1
    position += step
    walk.append(position)
How can we vectorize this? The key insight is that the position at any time t is simply the cumulative sum of all the steps taken up to that point. We can generate all the random steps at once and then use NumPy's vectorized cumsum() method.
rng = np.random.default_rng(seed=42)
n_steps = 1000

# 1. Generate all random steps at once
draws = rng.integers(0, 2, size=n_steps)
steps = np.where(draws == 0, 1, -1) # Vectorized conditional logic!

# 2. Compute the entire walk using a single vectorized operation
walk = steps.cumsum()
This vectorized approach is not only much faster but also allows us to easily simulate many random walks simultaneously by working with 2D arrays. For a deeper look at this powerful example, please read the corresponding section in Python for Data Analysis.
4 NumPy Basics: Arrays and Vectorized Computation
This section provides a detailed walkthrough of the random walk simulation, comparing the pure Python implementation to a fully vectorized NumPy solution.
Read the entire section '4.7 Example: Random Walks'. It's a fantastic example of 'array-oriented programming' that ties together random number generation, conditional vectorization, and aggregate functions.
Conclusion
Congratulations on completing the NumPy module! You've moved from the basics of array creation to the high-performance techniques that make NumPy the foundation of the scientific Python ecosystem.
Key Takeaways:
- Vectorization is the practice of replacing explicit
forloops with array expressions. - The performance gains come from pushing computations to compiled C code, which leverages contiguous memory layout and can execute in parallel.
- You can vectorize not just arithmetic (
+,*) but also conditional logic (np.where,np.select) and statistical aggregations (.sum(),.mean(),.cumsum()). - To effectively use NumPy, you should practice thinking in terms of whole-array operations rather than step-by-step loops.
Preview of the Next Lesson:
We are now ready to move on to the next major library in our course: Pandas. You will see that all the concepts you've learned in NumPy—especially ndarrays, indexing, and vectorization—are directly applicable, as Pandas is built right on top of NumPy. In our first Pandas lesson, we will learn how to create the two core data structures: the Series and the DataFrame.