Hello! Welcome to the third module of our course.
In the last module, we concluded our journey through Object-Oriented Programming by exploring magic methods, which allow custom classes to integrate seamlessly with Python's core functionalities. Now, we pivot from the structure of our code to the data it will process. This marks our first step into the specialized libraries that power machine learning.
This lesson introduces NumPy (Numerical Python), the fundamental package for scientific computing in Python. Its core data structure, the N-dimensional array or ndarray, is the backbone of nearly every data science and machine learning library, including Pandas and Scikit-learn. Your goal for this lesson is to learn how to create and manipulate NumPy arrays of various dimensions.
We will cover:
- Why NumPy arrays are more efficient than standard Python lists.
- How to create 1D, 2D, and multi-dimensional arrays from scratch.
- How to inspect an array's properties, such as its shape, size, and data type.
- How to access, modify, and restructure arrays using indexing, slicing, and reshaping.
Let's begin.
Why NumPy? The Need for Speed
As someone with a background in computer science, you know that the choice of data structure can have a profound impact on performance. While Python lists are flexible, they are not optimized for the large-scale numerical computations required in machine learning. NumPy arrays provide a solution.
The key reasons for NumPy's efficiency are:
- Fixed Data Type: All elements in a NumPy array must be of the same data type (e.g., all 64-bit integers or all 32-bit floats). This eliminates the type-checking overhead present in Python lists.
- Contiguous Memory: NumPy arrays are stored in a single, continuous block of memory. This allows processors to access and manipulate the data very quickly, especially using SIMD (Single Instruction, Multiple Data) vector processing instructions. Python lists, in contrast, store pointers to objects scattered across memory.
To get a more detailed intuition behind these performance benefits, please watch the beginning of the following tutorial.
Complete Python NumPy Tutorial (Creating Arrays, Indexing, Math, Statistics, Reshaping)
This video by Keith Galli starts with an excellent explanation of why NumPy is so much faster than Python lists, touching on concepts like memory layout and fixed types that will be familiar from your computer science studies.
Watch the first 8 minutes and 40 seconds of the video (00:00 - 08:40). Focus on understanding the differences in memory storage between a Python list and a NumPy array.
The ndarray: Anatomy of a NumPy Array
The fundamental object in NumPy is the ndarray, which stands for "N-dimensional array". It's a grid of values, all of the same type, indexed by a tuple of non-negative integers.
Let's look at what these arrays look like.
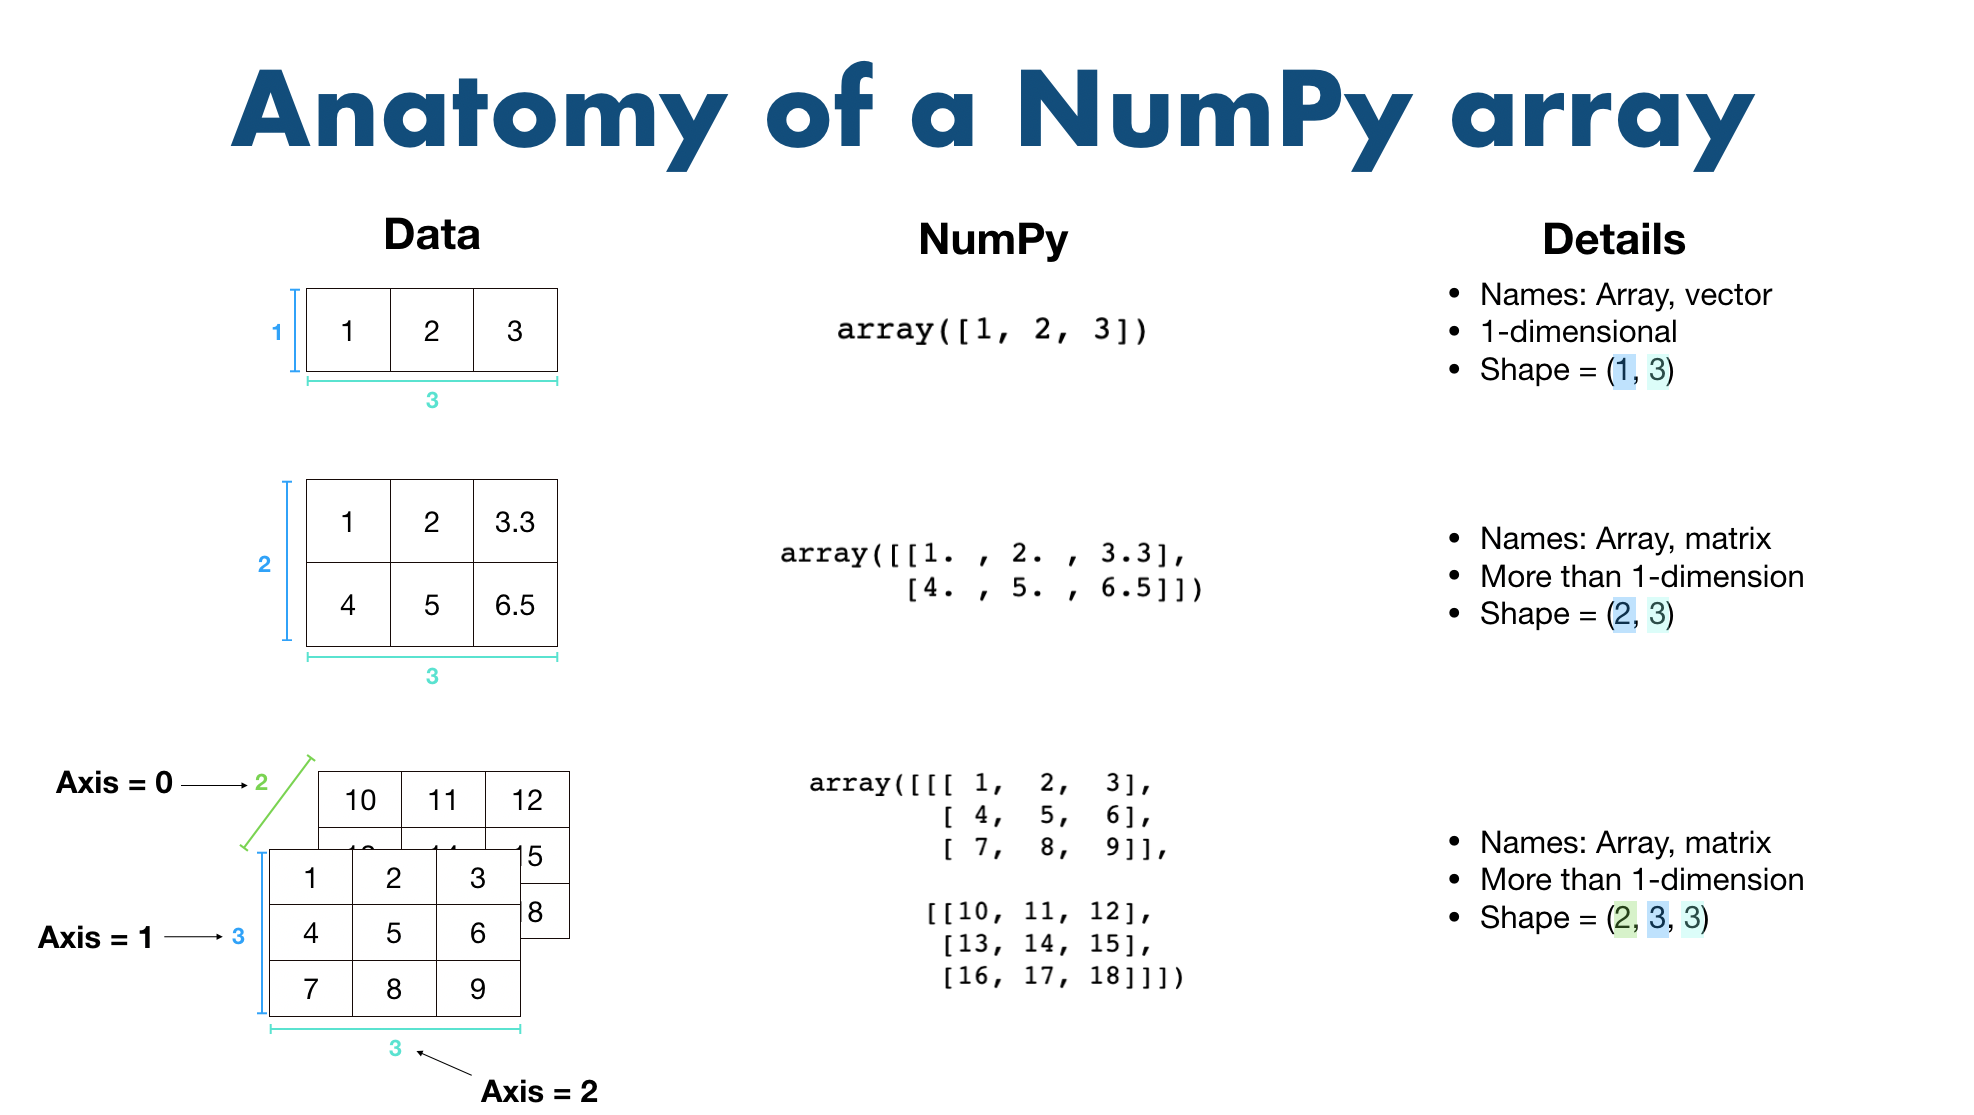
The number of dimensions is known as the rank of the array. The shape of an array is a tuple of integers giving the size of the array along each dimension.
- A 1D array (or vector) has a shape like
(n,). - A 2D array (or matrix) has a shape like
(m, n). - A 3D array (or tensor) has a shape like
(d, m, n).
For a more formal definition of the ndarray and its characteristics, the official NumPy documentation is the best source.
NumPy: the absolute basics for beginners
The official NumPy documentation provides a concise introduction to the ndarray object.
Read the section titled 'What is an “array”?'. It defines the ndarray and explains its core restrictions, such as homogeneity and a fixed, rectangular shape.
Creating NumPy Arrays
Now that you understand what an array is, let's create some. The most common way to get started is by converting a Python list.
Creating Arrays from Lists
You can create an array by passing a list (or a list of lists) to the np.array() function. As a convention, NumPy is almost always imported with the alias np.
import numpy as np

# Create a 1D array (vector)
a1 = np.array([1, 2, 3, 4, 5])
print(f"1D Array:\n{a1}\n")

# Create a 2D array (matrix) from a list of lists
a2 = np.array([[1, 2, 3], [4, 5, 6]])
print(f"2D Array:\n{a2}\n")

# Create a 3D array from nested lists
a3 = np.array([[[1, 2], [3, 4]], [[5, 6], [7, 8]]])
print(f"3D Array:\n{a3}")
Using Array Creation Functions
Manually typing out large arrays is impractical. NumPy provides several functions to create arrays from scratch.
np.zeros(shape): Creates an array of the given shape, filled with zeros.np.ones(shape): Creates an array filled with ones.np.full(shape, fill_value): Creates an array filled with a specific value.np.arange(start, stop, step): Creates an array with a range of evenly spaced values, similar to Python's built-inrange().np.linspace(start, stop, num): Creates an array with a specified number of evenly spaced values over an interval.np.random.rand(d0, d1, ...): Creates an array of a given shape with random values from a uniform distribution over[0, 1).np.random.randint(low, high, size): Creates an array of a given size with random integers from a specified range.
The following video demonstrates these functions in action.
Complete Python NumPy Tutorial (Creating Arrays, Indexing, Math, Statistics, Reshaping)
Let's watch how to use NumPy's built-in functions to initialize different kinds of arrays. This is extremely useful for setting up placeholders for calculations or generating sample data.
Watch from 23:12 to 31:46. This segment covers np.zeros, np.ones, np.full, np.random.rand, and np.random.randint.
Inspecting Your Arrays
Once you have an array, you'll often need to check its properties. The most important attributes are:
.ndim: The number of dimensions (axes)..shape: A tuple representing the dimensions of the array..size: The total number of elements in the array..dtype: The data type of the elements in the array.
# Create a 2x3 array of random integers between 10 and 99
data = np.random.randint(10, 100, size=(2, 3))

print(f"Array:\n{data}\n")
print(f"Number of dimensions (ndim): {data.ndim}")
print(f"Shape of array (shape): {data.shape}")
print(f"Total elements (size): {data.size}")
print(f"Data type (dtype): {data.dtype}")
Test your understanding!
Create a 3x4 NumPy array filled with the floating-point number 7.5. Then, print its shape and data type.
Show answer
import numpy as np

# Using np.full()
my_array = np.full((3, 4), 7.5)

# Alternatively, using np.ones() and multiplication
# my_array = np.ones((3, 4)) * 7.5

print(f"Array:\n{my_array}\n")
print(f"Shape: {my_array.shape}")
print(f"Data type: {my_array.dtype}")
The output should show a shape of (3, 4) and a dtype of float64.
Manipulating Arrays
Creating arrays is just the first step. The real power of NumPy comes from being able to efficiently access and manipulate the data within them.
Indexing and Slicing
Accessing elements works much like Python lists, but extends to multiple dimensions.
- Indexing: For a 2D array, you use
arr[row, column]. - Slicing: You can slice along each dimension using the
start:stop:stepsyntax.arr[0, 1:4]would get the first row and columns 1, 2, and 3. A colon:by itself means "select all elements along this axis."
This video provides a great hands-on demonstration of accessing elements in 2D and 3D arrays.
Complete Python NumPy Tutorial (Creating Arrays, Indexing, Math, Statistics, Reshaping)
Accessing specific parts of your data is a fundamental skill. This part of the video will show you how to index and slice multi-dimensional arrays, which is slightly different from how you would work with nested Python lists.
Watch from 16:08 to 23:12. Pay close attention to the arr[row, col] syntax for 2D arrays and the 'work outside in' strategy for indexing 3D arrays.
A crucial point about slicing: NumPy slices create views, not copies. This means a slice is a view into the original array's data. Modifying the slice will modify the original array. This is done for performance reasons. If you need a separate copy, you must explicitly use the .copy() method.
original = np.array([10, 20, 30, 40, 50])
print(f"Original array: {original}")

# Create a slice (a view)
a_slice = original[1:4] # Elements at index 1, 2, 3 -> [20, 30, 40]
print(f"Slice: {a_slice}")

# Modify an element in the slice
a_slice[0] = 99
print(f"Modified slice: {a_slice}")

# The original array is also changed!
print(f"Original array after modification: {original}")

# To create a copy, use the .copy() method
a_copy = original[1:4].copy()
a_copy[0] = 77
print(f"Original array is unaffected by copy modification: {original}")
Reshaping and Stacking
Often, you'll need to change the shape of your data to fit the requirements of a machine learning model.
arr.reshape(new_shape): Returns a new array with a different shape, without changing the data. The new shape must have the same total number of elements (size).np.vstack((arr1, arr2)): Stacks arrays vertically (row-wise).np.hstack((arr1, arr2)): Stacks arrays horizontally (column-wise).
Complete Python NumPy Tutorial (Creating Arrays, Indexing, Math, Statistics, Reshaping)
Let's see how to reorganize arrays using reshaping and stacking. These are essential operations for preparing data for machine learning algorithms.
Watch from 43:56 to 47:41. This segment covers reshape, vstack, and hstack.
Test your understanding!
Given the following 2D array:
import numpy as np
data = np.arange(1, 13).reshape(3, 4)
print(data)
# [[ 1  2  3  4]
#  [ 5  6  7  8]
#  [ 9 10 11 12]]
- Write a line of code to select the sub-array
[[6, 7], [10, 11]]. - Reshape the original
dataarray into a 1D array of 12 elements.
Show answer
-
Selecting the sub-array:
sub_array = data[1:3, 1:3] # Slices are inclusive of the start index and exclusive of the stop index. # 1:3 for rows selects rows at index 1 and 2. # 1:3 for columns selects columns at index 1 and 2. print(sub_array) # [[ 6 7] # [10 11]] -
Reshaping the array:
reshaped_array = data.reshape(12)
# You could also use data.reshape(-1), where -1 tells NumPy to automatically infer the dimension size.
print(reshaped_array)
# [ 1  2  3  4  5  6  7  8  9 10 11 12]
Conclusion
Congratulations on completing your first lesson on NumPy! You've taken a significant step from general-purpose Python programming into the world of specialized data science tools.
Key Takeaways:
- NumPy's
ndarrayis a powerful and efficient data structure for numerical computation, thanks to its use of contiguous memory and fixed data types. - You can create arrays from Python lists using
np.array()or from scratch with functions likenp.zeros,np.ones,np.arange, andnp.random.randint. - Every array has important attributes like
.shape,.size, and.dtypethat allow you to inspect its structure. - Array manipulation is done through indexing and slicing. Remember that slices create views, not copies, to conserve memory.
- You can change an array's structure with
reshape()and combine arrays withvstack()andhstack().
Preview of the Next Lesson:
Now that you can create and structure arrays, the next logical step is to perform calculations with them. In our next lesson, we will explore element-wise operations and broadcasting. Broadcasting is a powerful mechanism that allows NumPy to perform arithmetic operations on arrays of different shapes, and it is a concept you will use constantly in machine learning.