Hello! Welcome back to our module on NumPy.
In the last lesson, we explored how to perform calculations on NumPy arrays, focusing on element-wise operations and the powerful concept of broadcasting. You learned the rules that allow NumPy to efficiently work with arrays of different shapes.
Today, we shift from calculating with arrays to selecting data from them. This lesson focuses on the essential skills of indexing, slicing, and boolean masking. Mastering these techniques is crucial for nearly every task in data analysis and machine learning, from cleaning data to preparing it for a model. Your goal is to become comfortable with extracting any piece of data you need from a NumPy array, no matter how complex the condition.
1. Basic Indexing and Slicing
Just like with Python lists, you can access and manipulate parts of a NumPy array using index notation. However, NumPy extends this capability in powerful ways for multi-dimensional arrays.
1D Arrays: A Familiar Start
For one-dimensional arrays, indexing and slicing work almost exactly as they do with Python lists.
arr[i]accesses the element at indexi.arr[start:stop]extracts a range of elements.arr[start:stop:step]extracts elements with a specific step.
import numpy as np

arr_1d = np.arange(10) # array([0, 1, 2, 3, 4, 5, 6, 7, 8, 9])

# Access a single element
print(f"Element at index 3: {arr_1d[3]}")

# Slice from index 2 up to (but not including) index 5
print(f"Slice from 2 to 5: {arr_1d[2:5]}")

# Get every other element from the start to the end
print(f"Every other element: {arr_1d[::2]}")
2D Arrays: Rows and Columns
For multi-dimensional arrays, NumPy provides a more intuitive and efficient syntax. Instead of chaining brackets like arr[row][column], you use a single pair of brackets with comma-separated indices: arr[row, column].
arr[row, col]: Access a single element.arr[row, :]: Access an entire row.arr[:, col]: Access an entire column.arr[r_start:r_stop, c_start:c_stop]: Access a sub-array or "sub-matrix".
The following image provides an excellent visual guide to these operations.
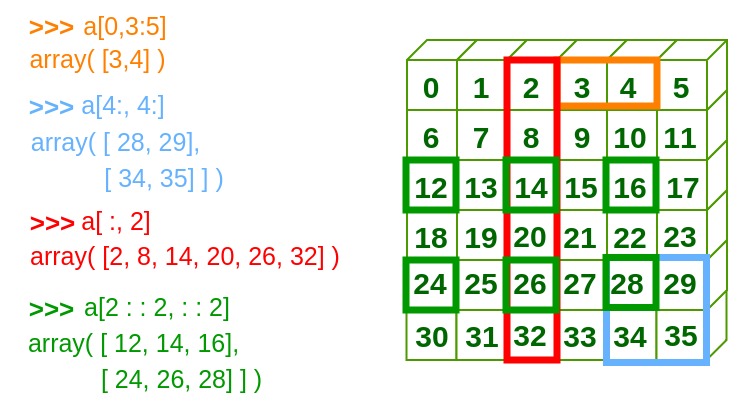
To see these concepts in action and understand how to apply them to arrays with 1, 2, and even 3 dimensions, the following video provides a clear, hands-on demonstration.
Complete Python NumPy Tutorial (Creating Arrays, Indexing, Math, Statistics, Reshaping)
This segment from Keith Galli's comprehensive NumPy tutorial demonstrates the core mechanics of accessing and modifying elements and sections of NumPy arrays.
Watch the video from 16:08 to 23:12. Pay close attention to the [row, column] syntax and how the colon : is used to select entire rows or columns.
2. An Important Distinction: Views vs. Copies
This is a key concept that addresses the "why" behind NumPy's behavior. When you slice an array, does it create a new, independent array in memory, or does it just create a "view" into the original array?
- Basic Slicing creates a view: When you use basic slicing (like
arr[0:5]orarr[:, 1]), NumPy does not create a new array. It gives you a view into the original array's data. This is extremely memory-efficient. The consequence is that if you modify the slice, you also modify the original array. - Advanced or "Fancy" Indexing creates a copy: When you index using a list of integers (e.g.,
arr[[0, 2, 4]]), you are performing "fancy" indexing. This operation always creates a new array with a copy of the data. Modifying this new array will not affect the original.
To understand this crucial difference, let's read a short section from a very well-regarded technical blog.
Scientific Computing in Python: Introduction to NumPy
This article by Sebastian Raschka clearly explains the distinction between memory views and copies in NumPy.
Please read the section titled 'Advanced Indexing – Memory Views and Copies'. Focus on the examples that show how modifying a slice affects the original array, and how using .copy() or fancy indexing prevents this.
Test your understanding!
You have an array data = np.arange(10). You execute the following two lines of code:
subset_a = data[2:5]
subset_a[0] = 99
What will data look like after this? Now, consider this code:
data = np.arange(10) # Reset the array
subset_b = data[[2, 3, 4]]
subset_b[0] = 99
What will data look like this time? Why are the outcomes different?
Show answer
In the first case, subset_a is a view created by basic slicing. Modifying it also modifies the original data array. data will become array([ 0, 1, 99, 3, 4, 5, 6, 7, 8, 9]).
In the second case, subset_b is a copy created by fancy indexing (using a list). Modifying it does not affect the original data array. data will remain unchanged: array([0, 1, 2, 3, 4, 5, 6, 7, 8, 9]).
3. Boolean Masking
Boolean masking is perhaps the most powerful indexing technique for data analysis. It allows you to select elements from an array based on a condition. The process involves two steps:
- Create a boolean mask: This is an array of
True/Falsevalues that has the same shape as your data array. You create it by applying a condition directly to the array. - Apply the mask: Use the boolean mask as the index to your data array. This will return a 1D array containing only the elements where the mask was
True.
data = np.array([[1, 2], [3, 4], [5, 6]])

# 1. Create a boolean mask
mask = data > 3
print("Boolean mask:\n", mask)
# [[False, False],
#  [False,  True],
#  [ True,  True]]

# 2. Apply the mask to the data
print("\nElements where data > 3:", data[mask]) # Output: [4 5 6]
Boolean masking is a form of fancy indexing, so it returns a copy of the data, not a view.
Combining Conditions
You can create more complex masks by combining conditions using bitwise operators:
&for AND|for OR~for NOT
Important: When combining conditions, you must wrap each condition in parentheses due to Python's operator precedence rules. For example: (data > 2) & (data < 5).
The next video segment demonstrates how to use boolean masking and combine multiple conditions to filter your data effectively.
Complete Python NumPy Tutorial (Creating Arrays, Indexing, Math, Statistics, Reshaping)
Let's return to the Keith Galli tutorial to see a practical demonstration of boolean masking.
Watch from 50:10 to 55:50. Note how a conditional expression on an array produces a boolean array, and how that array is then used for indexing. Also, pay attention to the syntax for combining multiple conditions.
You can also use a boolean mask to modify values in the original array. This is a very common pattern for data cleaning.
temps = np.array([22.5, 25.0, -99.0, 23.1, 1000.0, 24.3])

# Create a mask for "impossible" temperatures
outlier_mask = (temps < -50) | (temps > 60)

# Use the mask to replace these values with NaN (Not a Number)
temps[outlier_mask] = np.nan

print(temps)
# Output: [22.5 25.   nan 23.1   nan 24.3]
Conclusion
Today, you've added some of the most essential NumPy skills to your toolkit. Being able to precisely select, filter, and modify data is a prerequisite for any serious data work.
Key Takeaways:
- Basic Indexing & Slicing: Use the
[row, col]syntax for multi-dimensional arrays. Slicing with:lets you grab entire rows, columns, or sub-arrays. - Views vs. Copies: Basic slicing creates memory-efficient views, where changes affect the original array. Fancy indexing (with lists) and boolean masking create independent copies.
- Boolean Masking: This powerful technique allows you to select and modify array elements based on one or more conditions (
arr[condition]). Always use&,|, and()when combining conditions.
Preview of the Next Lesson:
Now that you know how to create, calculate with, and select from arrays, our next lesson will cover how to generate random data using NumPy's random module. This is a fundamental skill for creating sample datasets, initializing machine learning models, and performing statistical simulations.