Recommended resources
The freely available resources this lesson will direct you to.
- 4 Tips of How to Use Transform and Lasso Tool in ibisPaint Xwww.youtube.com
- LAYERS FOR TOTAL BEGINNERS (Alpha lock, Clipping, Selection Layer, etc) 〚ibisPaint X tutorial〗www.youtube.com
- 08. Fine Tuning Using the Lasso tool - How to use ibisPaintibispaint.com
- 185. Transform tool details - How to use ibisPaintibispaint.com
Hello again. Last lesson, you used separate layers to keep colour changes contained and editable. That organization also makes proportion corrections safer: you can adjust a mouth, head, or clothing shape without moving everything else.
In this lesson, you’ll use selection to specify which pixels can change and transform to change their position, size, or angle. The goal is not just to make a correction—it is to keep the surrounding drawing intact and avoid making the adjusted area look softer or rougher than before.
Select the part you mean to correct
Suppose a character’s mouth is well drawn but sits too low. Redrawing it is one option; selecting it and moving it is faster. The important distinction is that a selection defines an area, while the active layer determines which artwork within that area is affected. A lasso around the mouth will not automatically move mouth pixels from every layer in your file.
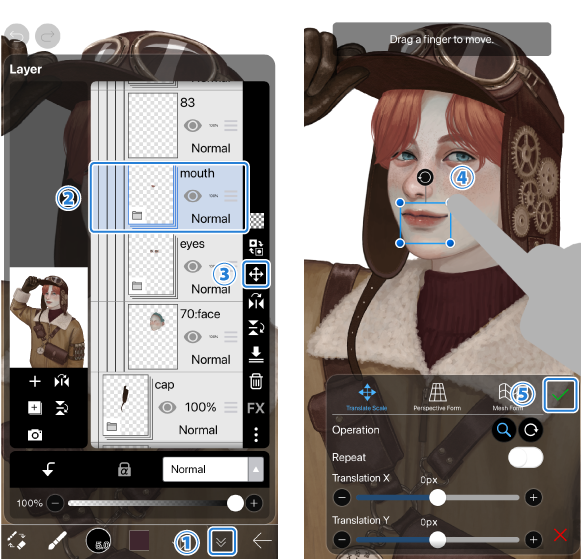
In ibisPaint’s official tutorial Fine Tuning Using the Lasso tool, follow the mouth correction from the first lasso stroke through the completed transform. Notice the difference between drawing a dashed selection boundary and actually changing the artwork.
08. Fine Tuning Using the Lasso tool - How to use ibisPaint
Read ibisPaint’s mouth-adjustment walkthrough to see how a selected area becomes a targeted proportion correction.
In “08. Fine Tuning Using the Lasso tool,” begin with the opening paragraph about adjusting a character’s mouth. Follow the walkthrough through the mouth transform near the end. Pay particular attention to Set, Add, and Subtract; the blue indication in the Selection Layer; and the instruction to clear the selection after tapping Done.
The three lasso modes answer different needs. Set replaces an old selection with a new one. Add extends the selected area if your first stroke missed part of the mouth. Subtract removes an area you included by mistake. Before transforming, check both the dashed boundary on the canvas and, if the result seems uncertain, the blue selected area shown in the Selection Layer.
Leave a little room around the feature so you do not cut through its strokes, but avoid enclosing nearby features that share the active layer. For example, a generous lasso around a mouth on a combined face-sketch layer might also include part of the nose. If the mouth already has its own layer, that separation gives you more freedom to select without catching unrelated pixels.
Transform deliberately, then commit
Once the correct layer and area are active, Translate Scale handles the usual proportion fixes: move a feature, change its size, or rotate it slightly. In the lasso tutorial, one finger drags the selected mouth and a two-finger pinch scales it. Depending on the transform controls visible in your version of ibisPaint, you may also work with a blue frame: drag inside it to move, use a corner control to scale, and use the rotation control to turn the artwork.
Read the relevant controls and gesture descriptions in ibisPaint’s Transform tool details. You do not need Perspective Form or Mesh Form for this lesson; ordinary translation, scaling, and rotation cover the corrections we are making.
185. Transform tool details - How to use ibisPaint
Use ibisPaint’s transform reference to distinguish moving the artwork from moving your view of the canvas, and to find the image-quality setting used when scaling.
Near the start of “185. Transform tool details,” read the Translate Scale control list through Show Frame around Object. Check the Target setting so you understand the difference between the current layer and the entire canvas. Next, read the interpolation descriptions immediately below that list. Finally, in “Using Gestures,” read the frame gestures for scaling, moving, and rotating.
A proportion change should answer a specific observation. If the mouth is too low, move it; do not also enlarge and rotate it without a reason. If a head is slightly oversized, scale it while preserving its overall shape, then check how the jaw meets the neck. View the whole character between adjustments: a mouth can look correctly placed at high zoom yet feel wrong in the face as a whole.
The transform frame also helps prevent a common mix-up. With Show Frame around Object on, touching inside the frame acts on the target, while gestures outside it can change your view of the canvas. Zooming the view does not resize painted pixels. Before tapping Done, check that it is the artwork—not merely the canvas view—that has changed.
Preserve the drawing while correcting it
A transform is convenient, but it is not a promise that raster pixels remain untouched. Moving a feature generally avoids the softness associated with resizing. Scaling or rotating requires ibisPaint to calculate pixels in new positions. That calculation is called interpolation. The transform reference lists Bilinear as the normal image-quality option and several sharper options; Nearest Neighbor is intended for pixel art. For an ordinary painted or sketched character, start with the normal setting, inspect the result, and compare a sharper option if the edge looks too soft. The setting cannot invent detail that was not in a small original feature.
A reliable correction therefore has three safeguards:
- Keep a recoverable original. Duplicate the layer you intend to change and hide the original before editing the duplicate, or work from an earlier saved copy. A duplicate is a backup, not a way to prevent the working copy from being resampled.
- Make one considered transform rather than a chain of tiny committed resizes. Repeatedly enlarging, shrinking, and rotating the same raster area can progressively soften its edges. If an attempt is poor, return to the untouched copy and try a better single adjustment.
- Inspect the surrounding area. Moving selected artwork may expose an empty patch where it used to be, leave stray marks behind, or create an awkward join where the changed feature meets an unchanged one. Repair those spots on the working copy rather than assuming the transform alone finishes the drawing.
Separate layers need particular care. If the mouth line art and lip colour are on different layers, transforming only the line-art layer will misalign them. For a small early-stage fix, correct the sketch before building colour on top. For a later fix, preserve your originals and adjust each affected layer consistently, checking their alignment before you continue. Do not flatten a carefully organized character file merely to make one selection easier.
Make a controlled correction in your file
Allow about 15 minutes for a modest correction—not a full redraw. An early sketch or a feature on its own layer is a good starting point.
First, view the character at a comfortable size and identify one observable issue: perhaps the mouth is low, an eye is slightly misplaced, or a simple head sketch is too large. Select the layer containing that artwork, duplicate it, and hide the original. If you used clipping for colour in the previous lesson, remember that the clipped paint and its base may be on different layers; decide which parts must move together before starting.
Use the lasso to enclose the feature on the working layer. Check for accidentally included marks, using Add or Subtract if needed. Open Transform and make the smallest change that addresses the issue. Before committing, compare the feature with its neighbours and with the character at a smaller viewing size. Then tap Done, clear the selection, and inspect the old location, the transformed edges, and any joins that need a brush or eraser touch-up.
If your brush subsequently seems unable to paint outside one small area, check whether the selection is still active. If an unexpected part of the drawing moved, check the active layer, the selection area, and whether the transform target was set to the current layer or the entire canvas. These checks are usually more useful than repeatedly undoing without knowing what went wrong.
What to carry forward
Selection controls the affected area; the active layer controls which artwork in that area changes. Use Translate Scale for a specific placement or size correction, keep an untouched original, and inspect both the transformed feature and the pixels around it. A clean proportion fix includes repairing any gap or awkward join it leaves behind.
Next, you’ll evaluate drawing drills for wobble, overshooting, and hesitation. Transform is valuable for correcting an established drawing; that next lesson focuses on recognizing which marks you can improve at the moment you draw them.