
Hello! Welcome to the next lesson in our journey to becoming a published author.
In the last module, you meticulously refined your manuscript's content—improving its flow, infusing your authorial voice, and rigorously fact-checking every claim. Your text is now complete, credible, and polished.
Today, we transition from editing the content to preparing the presentation. This lesson addresses the learning outcome: Format dialogue and prose correctly according to standard publishing conventions. Proper formatting is not just about aesthetics; it is a fundamental signal of professionalism that directly impacts reader experience and is essential for successfully publishing on platforms like Amazon KDP. We will cover the two main pillars of manuscript presentation: the rules for dialogue and the standards for overall prose and chapter structure.
1. The Art of Invisible Dialogue
Well-formatted dialogue should be invisible to the reader. It allows them to become immersed in the conversation without being distracted by confusing punctuation or unclear speaker attribution. Getting this right is one of the fastest ways to make your writing look professional.
To start, let's watch a comprehensive video that covers all the essential rules for formatting dialogue in fiction and narrative non-fiction.
How to Write and Format Dialogue in a Novel / Fiction
This video, 'How to Write and Format Dialogue in a Novel / Fiction' from Brandon Cornett, is a clear and practical guide to the fundamental rules of dialogue punctuation, attribution, and flow.
Please watch the entire video (about 8 minutes). It will walk you through the core components: using quotation marks, adding speaker tags, and integrating action beats to make your dialogue dynamic and clear.
The video you just watched provides an excellent foundation. Let's crystallize the most important rules:
-
Rule #1: New Speaker, New Paragraph. This is the most crucial rule. Every time the speaker changes, you must start a new, indented paragraph. This is the primary visual cue readers use to follow a conversation.
-
Quotation Marks: In the US publishing standard, all spoken words are enclosed in double quotation marks (
" "). -
Punctuation Goes Inside: All commas, periods, question marks, and exclamation points that belong to the spoken sentence go inside the closing quotation mark.
- Correct:
"I have to go," she said. - Incorrect:
"I have to go", she said.
- Correct:
-
Dialogue Tags vs. Action Beats:
- Dialogue Tags (
he said,she asked) identify the speaker. If a tag follows the dialogue, the dialogue ends with a comma, and the tag starts with a lowercase letter."I don't think that's a good idea," he whispered.
- Action Beats describe a character's action before, during, or after they speak. They are complete sentences. The dialogue ends with a period (or
?/!), and the action beat is its own sentence."I don't think that's a good idea." He looked away.
- Dialogue Tags (
This image provides a great visual summary of these core principles.

Test your understanding!
Here is a poorly formatted block of dialogue. Rewrite it to follow standard publishing conventions.
"What time is it? he asked. I think we're late". She checked her watch. "It's almost seven. We need to leave now." "Okay, I'm ready," he replied.
Show answer
Here is the corrected version:
"What time is it?" he asked. "I think we're late."
She checked her watch. "It's almost seven. We need to leave now."
"Okay, I'm ready," he replied.
Notice the key changes: question mark inside the quotes, new paragraph for the new speaker (she), a period to end his first line of dialogue before the action beat, and each change of speaker is on a new line.
2. Standard Manuscript Formatting for Prose
Now that the dialogue within your text is correct, let's zoom out and format the entire manuscript. Adhering to standard formatting makes your book easy to read and, critically, easy to convert into various publishing formats like EPUB (for ebooks) and PDF (for print).
We'll focus on using Google Docs, a powerful free tool that suits your preferences. The key principle here is to use styles to automate your formatting. Think of it like using CSS for a webpage; instead of formatting each paragraph manually (the equivalent of inline styles), you define a "style" once and apply it everywhere for consistency.
This video provides a great walkthrough of setting up a manuscript in Google Docs.
How to format your book manuscript in Google Docs
The tutorial 'How to format your book manuscript in Google Docs' by Kat Clay demonstrates the practical steps for applying standard formatting, from font and spacing to chapter headings and page numbers.
Watch the video until 08:07. Pay close attention to how she uses the 'Paragraph styles' menu to set up 'Normal text' and 'Headings'. This is the most important technique for creating a clean, consistent manuscript.
Building on the video and official KDP guidelines, here is your checklist for creating a professional manuscript in Google Docs.
Body Text Formatting (The "Normal" Style)
These rules apply to the main paragraphs of your book. Set them once in your "Normal text" style.
- Font: Times New Roman, 12pt is the traditional standard.
- Line Spacing: Set to Single. While double-spacing is used for submitting to agents, for direct-to-KDP publishing, single spacing provides a cleaner base for conversion.
- Paragraph Indentation: Set the First line indent to
0.2"or0.3". Never use the Tab key or spacebar to indent paragraphs. Using the style setting ensures every paragraph is consistent and will convert correctly. - Alignment: Use Left alignment. While "Justified" (aligned to both left and right margins) is common in print books, it can create awkward spacing in reflowable ebooks. Left alignment is the safer, more universal choice.
eBook Manuscript Formatting Guide - Kindle Direct Publishing
To understand why these settings are important for eBooks, let's look at the official KDP guidelines. This resource explains how to set up paragraph styles for optimal Kindle display.
Read the section titled 'Set paragraph indentations and line spacing'. Note Amazon's specific recommendation for a first-line indent and single line spacing.
Structural Formatting
- Chapter Titles: Type your chapter title (e.g., "Chapter 1: The Beginning"), center it, and apply the Heading 1 style. This is critical. KDP and other systems use the Heading 1 style to automatically generate your book's Table of Contents.
- Page Breaks: To start a new chapter, insert a page break (
Insert > Break > Page Break). Never hit the Enter key repeatedly to move to the next page. This creates "empty" paragraphs that cause major formatting errors in the final ebook. - Scene Breaks: For a break within a chapter, press Enter once, type three asterisks (
***), center them, and press Enter again to continue your text.
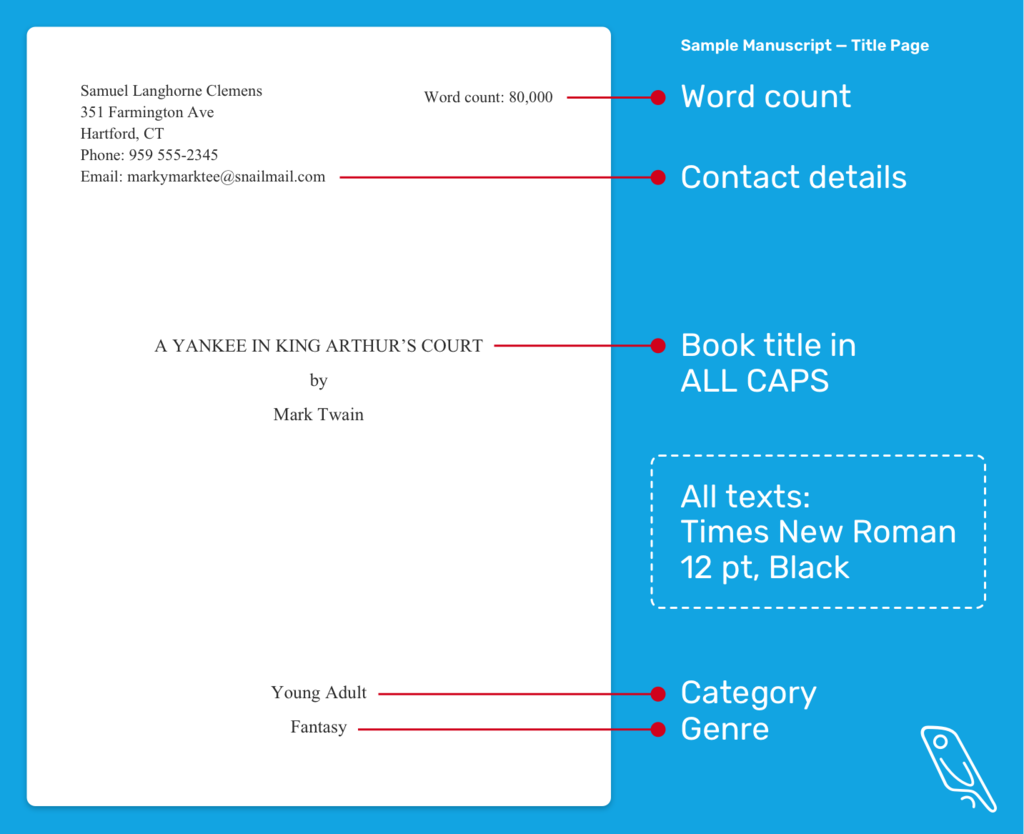
Front Matter
The "front matter" includes everything before your first chapter. At a minimum, you need a Title Page.
Test your understanding!
You've just finished writing Chapter 3. You want to start Chapter 4 on a fresh page. What is the correct method to do this in Google Docs, and why is the alternative method a bad idea?
Show answer
The correct method is to go to the Insert menu, select Break, and then Page Break.
The wrong method is to press the Enter key until your cursor moves to the top of the next page. This is bad because it creates dozens of empty paragraph markers. When you convert the file to a reflowable ebook format like EPUB, these empty paragraphs can cause large, ugly white spaces or even entire blank pages to appear in your book, creating a poor reader experience. A page break is a clean, structural command that avoids this issue.
Conclusion
Congratulations on completing this essential lesson! You now have the knowledge to transform a plain text file into a professionally formatted manuscript, ready for the production stage.
Key Takeaways:
- Dialogue: The "new speaker, new paragraph" rule is non-negotiable. Always place punctuation inside the quotation marks.
- Prose: Use Styles in your word processor to control formatting. Set your "Normal text" style for paragraphs (first-line indent, single spacing) and use the "Heading 1" style for all chapter titles.
- Structure: Use
Page Breaksto start new chapters. Never use theEnterkey to create vertical space.
Preview of the Next Lesson:
Your Google Doc is now perfectly structured. It is the "master file" from which you will generate your final book. In our next lesson, we will begin the "Book Formatting and Production" module by taking this master file and converting it. You will learn to create a properly structured and navigable ebook in EPUB format using a free tool like Calibre or the Reedsy Book Editor. This will be the actual file you upload for sale on Amazon and other platforms.