Hello! Welcome to our next lesson.
In our previous session, you learned the essentials of creating a print-ready PDF for a text-focused book. We covered critical concepts like trim size, margins, and the all-important gutter, creating a fixed-layout blueprint ready for a printer.
Today, we'll adapt those principles for a different and exciting challenge: the children's picture book. In this format, images and text are equal partners in telling the story. Your layout decisions directly shape the reader's experience.
Our goal for this lesson is to learn how to lay out a picture book or children's book, ensuring proper placement of text and images. We'll move from the theoretical structure of a picture book to the practical steps of assembling one using free, accessible tools.
Part 1: The Blueprint - Planning Your Picture Book's Structure
Before you place a single image or word, you need a plan. In publishing, this plan is often called a "book map" or a "dummy book." It's a page-by-page outline that ensures your story flows correctly and your page count meets printing requirements. Given your IT background, you can think of this as the architectural diagram for your book's structure.
Let's explore the key theoretical components you need to understand to build this map.
A Template for Children's Book Layout, Pagination & Design
The article 'A Template for Children's Book Layout, Pagination & Design' from Brooke Vitale's blog provides an excellent, in-depth explanation of the industry standards and structural rules for picture books. It's the 'why' behind the layout decisions we'll make.
Please read the sections titled 'Picture book page count' and 'Picture book layout' (specifically the subsections 'What is a book signature?' and 'Book page numbering'). Focus on these three core concepts: Standard Page Count: Note the industry standard of 32 pages and the requirements for Print-on-Demand (POD) services like Amazon KDP (minimum 24 pages, divisible by 4). Book Signatures: Understand that pages are printed on large sheets that get folded and cut, which is why page counts must be divisible by certain numbers. Page Numbering (Recto/Verso): This is the most critical rule. Pay close attention to the fact that page 1 is always on the right, odd-numbered pages are on the right (recto), and even-numbered pages are on the left (verso).
To summarize the key rules for your book map:
- Page Count: Aim for a 32-page book. This is the industry standard and works perfectly for Amazon KDP's "divisible by 4" rule.
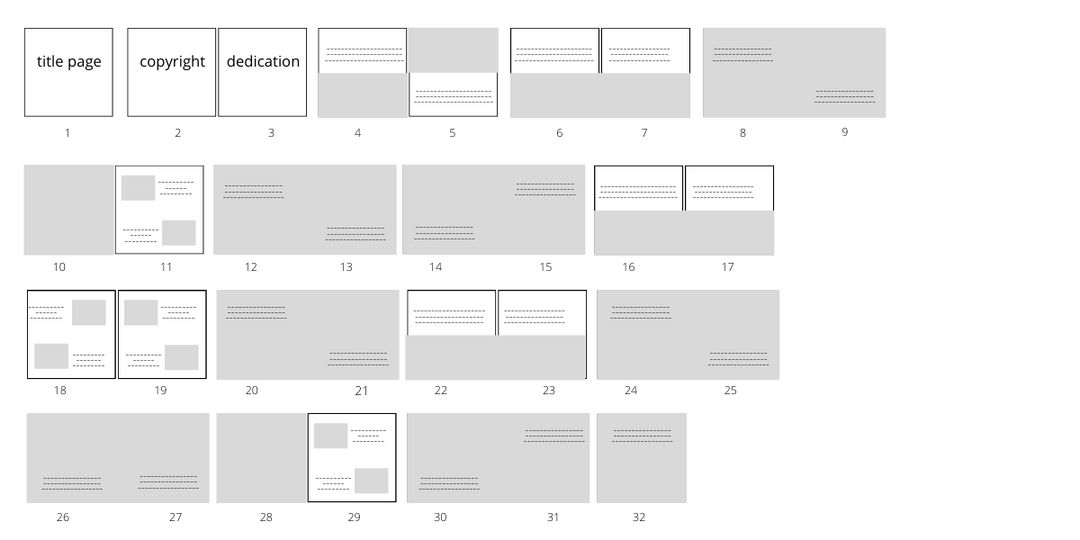
- The Golden Rule: Page 1 is on the right. Odd pages are on the right. Even pages are on the left. An open book displays a left-hand page (even) and a right-hand page (odd) together, forming a spread (e.g., pages 2-3, 4-5, etc.).
- Front Matter: These are the pages before your story begins (title page, copyright, dedication). Their placement determines where your story starts. For example, a common layout is:
- Page 1: Title Page
- Page 2: Copyright & Dedication
- Page 3: Story begins on a single, right-hand page.
Here is a visual representation of a book map, showing how the entire 32-page structure is planned out in advance.
Part 2: Designing the Reader's View - Layout Variations
A great picture book uses a variety of layouts to keep the reader engaged. Placing text and images in the same spot on every page can feel monotonous. By varying your page design, you control the story's rhythm and emotional impact.
Let's dive back into the Brooke Vitale article to learn about the common layout patterns.
A Template for Children's Book Layout, Pagination & Design
Now we'll look at the specific design patterns you can use on each spread. This is about visual storytelling.
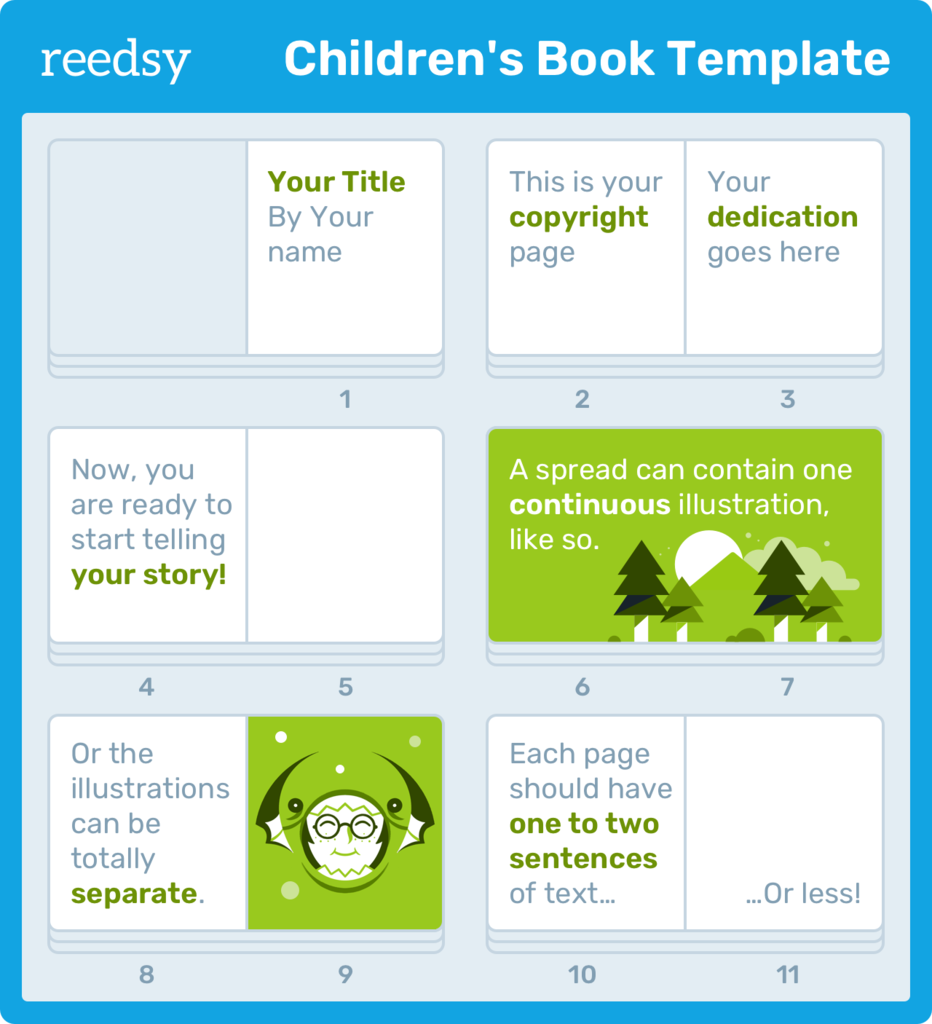
Please find and read the subsection titled '7. Decide on page layout'. It's within the larger 'How to write a children's book template' section. Focus on understanding the definitions and visual differences between: Full-bleed spread: A single illustration extending across two pages. Two full-bleed pages: Two separate illustrations on facing pages. Full-bleed page and vignette: Combining a full-page image with a smaller, cut-out image. Full-bleed page with spot art: Using smaller, distinct illustrations on one page.
This image provides a helpful visual summary of how these different layouts can look in practice.
Part 3: Hands-On - Assembling Your Picture Book in Canva
Now that we have the theory, let's put it into practice. You've expressed a preference for free tools and avoiding complex image editing software. Canva is an excellent choice for this task. It's a free, browser-based design tool that is perfect for laying out a picture book for KDP.
The following video provides a comprehensive, step-by-step walkthrough. We'll focus on the most critical stages of the process.
FORMAT your Childrens Book in Canva - QUICK & EASY | Eevi Jones
Eevi Jones's video 'FORMAT your Childrens Book in Canva' is a fantastic practical guide. It walks through the exact process of setting up your file and placing your content for KDP.
Please watch the video from the beginning to 16:15. It's packed with crucial information. As you watch, pay close attention to these key workflows: Preparation (01:26): Note the importance of having your illustrations already created at the correct trim size, with bleed, and at 300 DPI. Project Setup (03:05): See how to create a custom-sized project in Canva using single pages, not spreads, to comply with KDP's requirements. Page Layout and Numbering (06:24): This is the core of the lesson. Observe how the odd (right) and even (left) page rule is applied within Canva. The instructor's method of labeling pages (e.g., 'title page - right') is a great practical tip. Handling Double Spreads (12:25): This is a brilliant trick. Watch carefully how she takes a single double-page illustration and uses Canva's cropping tool to split it correctly across a left-hand page and a right-hand page. Adding Text (16:15 is the start of this section, but you've watched up to it): Notice how text boxes are added over the illustrations, positioned in areas with clear space to ensure readability.
Test your understanding!
You have a beautiful double-page spread illustration that needs to go on pages 4 and 5 of your book. In Canva, you've set up your project with single pages. According to the video, what are the steps to correctly place this illustration?
Show answer
- Go to page 4 (the left-hand page). Add the full double-spread illustration and set it as the background.
- Double-click the image to enter crop mode. Drag the image to the right until only the left half is visible on the page.
- Go to page 5 (the right-hand page). Add the same full double-spread illustration and set it as the background.
- Double-click the image to enter crop mode. Drag the image to the left until only the right half is visible on the page.
Part 4: Finalizing and Exporting
Once your pages are laid out, the process is nearly complete. The final steps involve a thorough review and exporting your file in the correct format.
- Review Your Work: As the video (LINK) mentions starting at timestamp
22:37, it's vital to do multiple review passes. Check for spelling/grammar, ensure your odd/even pages are correct, and verify that your full-bleed images extend to the edges with no white gaps. - Export as a Print-Ready PDF: In Canva, this is straightforward. As shown at
24:16in the video, you will use theShare > Downloadoption.- File Type: Select PDF Print. This is essential as it creates a high-resolution file suitable for printing.
- Color Profile: The video notes that Canva's free version exports in RGB, while the paid version offers CMYK (which is standard for print). For KDP, RGB is generally acceptable, as their systems will perform the necessary conversion.
- Select Pages: Make sure you're downloading all pages of your book.
This process gives you the final, fixed-layout PDF file that you can upload directly to Amazon KDP for your paperback version.
Conclusion
Congratulations! You have now bridged the gap between formatting a text-based novel and laying out a visually rich children's book. This is a crucial skill for achieving your goal of publishing across multiple genres.
Key Takeaways:
- Plan First: Always start with a book map to define your 32-page structure, front matter, and story flow.
- Master the Rule: Even pages are on the left; odd pages are on the right. This governs every placement decision.
- Vary Your Layouts: Use a mix of full-bleed spreads, vignettes, and spot art to keep your book visually engaging.
- Use the Right Tools: A free tool like Canva is perfectly capable of producing a professional, print-ready PDF for KDP, including handling complex tasks like splitting double-page spreads.
- Export for Print: Always export your final file as a PDF Print to ensure high quality.
Preview of the Next Lesson:
We're going to continue our journey into visual storytelling. In the next lesson, we will tackle the unique layout challenges of a different format: comics. You will learn how to compose generated panels into a final comic book page using a free design tool, adding gutters and dialogue bubbles.