Hello! Welcome to our next lesson in visual storytelling.
In our previous session, you learned how to generate the individual, stylized panels that form the building blocks of a comic. We focused on prompting techniques to create consistent characters and scenes one frame at a time. Now, it's time to assemble those raw materials into a coherent narrative page.
Today's lesson focuses on a crucial production step: composing your generated panels into a final comic book page using a free design tool, adding the essential gutters and dialogue bubbles. This is where individual images transform into a story. We'll build directly on your experience with Canva from our children's book lesson, applying similar principles to this unique format.
Part 1: The Anatomy of a Comic Page
Before we start building, let's define the key components. A comic page isn't just a collection of pictures; it's a structured layout designed to guide the reader's eye and control the story's pacing. Given your IT background, you can think of these as the fundamental structural elements of the page's "architecture."
Comic Connoisseur: Making Comics in Canva
To understand the terminology, we'll consult a brief guide from the Frisco Public Library, 'Comic Connoisseur: Making Comics in Canva'. It clearly defines the core building blocks of a comic strip.
Please read the short section at the beginning of the document titled 'Elements of a Comic Strip'. Focus on understanding the definitions for: Panel: The individual frame containing a drawing. Gutter: The space between the panels. Speech Bubbles: The containers for character dialogue.
Here is a practical example. Notice the clear separation between the two frames.
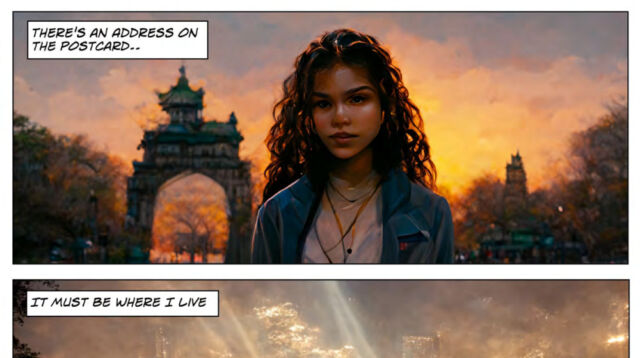
The gutter is more than just empty space; it's a critical storytelling device. It separates moments in time, giving the reader's brain a fraction of a second to process what happened in one panel before moving to the next.
Part 2: Assembling Your Page in Canva
You're already familiar with Canva from our picture book lesson. It's an excellent free tool for this task because it gives you full manual control over the layout. The process involves creating a grid, adding your generated panels, and then layering text elements on top.
Let's watch a short video from Canva's official channel that demonstrates this workflow.
The video 'How to Create Comic Strips' shows the exact functions we need inside Canva. We'll focus on the sections for building the layout and adding dialogue.
Please watch the following two segments: Creating the Panel Grid (01:36 - 01:59): Pay attention to how they use 'Grids' from the 'Elements' tab to create a structured layout. This is the skeleton of your comic page. The space you leave between the grid elements will become your gutters. Adding Dialogue (03:36 - 04:37): Observe how to search for 'speech bubble' in the 'Elements' tab and how to add and style text using comic-appropriate fonts. This is how you'll bring your characters' voices to the page.
Your Workflow in Canva:
- Create a New Design: Start with a custom-sized canvas (e.g., a standard 8.5 x 11-inch page).
- Build the Grid: Go to
Elements > Grids. Instead of a full-page grid, add multiple single-frame grids (like squares or rectangles). Arrange them on the page, leaving intentional gaps between them. These gaps are your gutters. - Upload and Place Panels: Upload your AI-generated panel images and simply drag-and-drop each one into a grid frame. Canva will automatically crop the image to fit the frame.
- Add Speech Bubbles and Text:
- Go to
Elementsand search for "speech bubble." - Choose a style that fits your scene's mood and place it over your panel. You can change its color and size.
- Add text inside the bubble using a legible, comic-style font (the video suggests searching for "comic" in the fonts menu).
- Go to
The Language of Bubbles
The shape of a speech bubble isn't just decorative; it conveys how something is said. A standard oval is for normal speech, a cloud-like bubble is for thoughts, and a spiky or "blast" bubble is for shouting. Using the right bubble adds an emotional layer to your dialogue.

Test your understanding!
You have generated a panel where a character is surprised and yells "What?!". In Canva, what steps would you take to add this dialogue effectively?
Show answer
- Go to the
Elementstab and search for "speech bubble" or "blast bubble". - Select a spiky, explosive-looking bubble to visually represent a shout.
- Place the bubble on the panel, pointing the tail towards the character's mouth.
- Add a text box with the word "What?!".
- Choose a bold, impactful font and consider making the text larger or italicized to emphasize the shout.
Part 3: An Alternative - The All-in-One Tool
While Canva offers great manual control, there are also specialized free tools designed specifically for creating comics with AI. These can offer a more streamlined, integrated workflow. One such tool is ComicsMaker.ai.
This tool aims to combine character design, scene generation, and page layout into a single platform.
Let's look at the homepage for 'Comics Maker AI' to understand how this alternative workflow functions. We'll focus on its page design capabilities and free plan.
Please review the website, focusing on three areas: Under 'SUPER POWERS', read the description for the 'Page Designer' feature. Notice it mentions precise control over panel size and spacing. Look at the 'HOW IT WORKS' section. This shows the entire integrated workflow, where 'Design Pages' (step 3) includes adding layouts and dialogue. Scroll down to the 'PRICING' section and review the 'Free' plan. Confirm that it includes the 'Page Designer', making it a viable free tool for our purposes.
Workflow Comparison:
| Feature | Manual (Canva) | Integrated (ComicsMaker.ai) |
|---|---|---|
| Panel Layout | Manually arrange grids to create panels and gutters. | Use pre-built layouts or a dedicated page designer tool. |
| Dialogue | Manually add speech bubble graphics and text boxes. | Integrated tools for adding and placing dialogue. |
| Best For | Full creative control; leveraging skills you already have. | Speed and a streamlined, comic-specific workflow. |
| Learning Curve | Low, since you already know Canva. | A new tool to learn, but built for one specific purpose. |
For your goal of rapidly creating books in various genres, having both methods in your toolkit is valuable. You can use Canva when you need fine-grained control and ComicsMaker.ai when you want to test an idea quickly.
Conclusion
You have now learned how to take your raw, AI-generated images and professionally assemble them into a final comic book page. This is the moment where art, layout, and text converge to tell a story.
Key Takeaways:
- A comic page is a structured design of panels (frames) and gutters (spaces). Gutters are essential for narrative flow.
- Canva is a powerful free tool for this process. You can use its Grid element to create your panel layout and its library of graphics to add speech bubbles.
- The shape of a speech bubble communicates emotion and the nature of the dialogue (e.g., thought vs. shout).
- Specialized tools like ComicsMaker.ai offer a free, integrated alternative that combines panel generation and page layout into a single, faster workflow.
Preview of the Next Lesson:
Whether it's a children's book, a comic, or a business guide, every book needs something to grab a potential reader's attention: a great cover. In our next lesson, we will shift our focus to the outside of the book and describe the key principles of effective book cover design, including typography, imagery, and genre conventions.