Recommended resources
The freely available resources this lesson will direct you to.
Hello Alex,
Welcome back. In our previous lesson, we established how Full Disk Encryption (FDE) protects your data "at rest," addressing the threat of physical device compromise. We concluded that before we can install our secure operating system, we must first be absolutely certain that the installation file itself is genuine and untampered with.
This lesson provides the theoretical foundation for that critical verification step. Our learning outcome is to explain the roles of cryptographic hashes and digital signatures in verifying software authenticity and integrity. We will explore how these two cryptographic tools work together to create a verifiable chain of trust, allowing us to confirm that the software we download is precisely what the developers created, with no malicious or accidental modifications.
This knowledge is the direct prerequisite for the next practical step in our project: downloading the Qubes OS ISO and using these principles to confirm it is safe to use.
Estimated time to complete: 60 minutes.
Recap from the Previous Lesson
- Full Disk Encryption (FDE) protects data "at rest" by encrypting an entire storage volume, making it unreadable without a key.
- We will use LUKS, the Linux standard, with a strong passphrase for Pre-Boot Authentication.
- This choice is based on the principle of minimizing the Trusted Computing Base (TCB), as it avoids reliance on proprietary hardware like the TPM, which can have its own vulnerabilities.
1. The Core Problem: Trusting a File from the Internet
When you download a critical piece of software like the Qubes OS installer (an ISO file), you face two fundamental questions:
- Integrity: Has the file been altered? This could be unintentional (e.g., a glitch during download causing data corruption) or malicious (e.g., a "man-in-the-middle" attacker injecting malware into the file as it travels across the network).
- Authenticity: Is the file genuinely from the claimed source? An adversary could create a fake website or compromise a legitimate download mirror, offering a backdoored version of the software that looks identical to the real thing.
Answering these two questions—"Is this the right file?" and "Is it from the right people?"—is paramount. Cryptographic hashes and digital signatures are the tools we use to do this.
2. Cryptographic Hashes: Verifying Data Integrity (The "What")
A cryptographic hash function is a mathematical algorithm that takes an input (like the entire Qubes OS ISO file) and produces a fixed-size string of characters, known as a hash, digest, or digital fingerprint.
The key idea is that this fingerprint is unique to the input file. Even the tiniest change to the file—flipping a single bit—will result in a completely different hash. This property is often called the "avalanche effect."
Let's start with a video that demonstrates this concept and its direct application to verifying downloaded software.
Viewing time: ~4 minutes.
As you watch, focus on:
- The definition of a hash as a "fingerprint" for data.
- The demonstration of how a tiny change to the input text drastically changes the output hash (01:10).
- The concept of a "collision" and why the MD5 algorithm is no longer considered secure (02:18).
- The practical example of using hashes to verify a Linux distribution download (03:23).
The Properties of a Cryptographic Hash
The video gives you the intuition. Now, let's formalize it, which I know you'll appreciate given your background. For a hash function to be cryptographically secure, it must satisfy several key properties.
Reading time: ~10 minutes.
Cryptographic hash function (Introduction to Cryptographic Hash Functions; Properties of Cryptographic Hash Functions)
As you read, focus on these formal definitions:
- Pre-image resistance: Given a hash
h, it should be computationally infeasible to find a messagemsuch thathash(m) = h. This makes it a one-way function. - Second pre-image resistance: Given a message
m1, it should be infeasible to find a different messagem2such thathash(m1) = hash(m2). This prevents an attacker from swapping a valid file for a malicious one with the same hash. - Collision resistance: It should be infeasible to find any two distinct messages,
m1andm2, such thathash(m1) = hash(m2). This is a stronger condition and is crucial for preventing sophisticated attacks.
The discovery of practical collision attacks against algorithms like MD5 and SHA-1 is why they are now deprecated for security purposes. For our project, we will rely on modern, secure algorithms from the SHA-2 family (like SHA-256 or SHA-512) or newer standards.
In summary: A hash verifies integrity. By calculating the hash of your downloaded file and comparing it to the hash published by the developer, you can be confident that your file is an exact, bit-for-bit copy.
However, this raises a new question: what if an attacker who replaced the file also replaced the published hash?
3. Digital Signatures: Verifying Authenticity (The "Who")
This is where digital signatures come in. A digital signature uses asymmetric cryptography (public/private key pairs) to prove the origin of the hash itself. It solves the authenticity problem.
You've encountered asymmetric cryptography in your Multi-Agent AI course; the principles are the same here. A key pair consists of:
- A private key, which is kept absolutely secret by the owner.
- A public key, which is distributed widely for anyone to use.
Data encrypted with one key can only be decrypted with the other. This relationship allows for two functions:
- Confidentiality: Encrypting with a public key ensures only the private key holder can decrypt.
- Authentication: "Encrypting" (or more accurately, signing) with a private key proves the data came from the private key holder, as anyone can verify it with the public key.
Digital signatures use the second function. Instead of signing the entire (potentially huge) ISO file, we sign its small, fixed-size hash.
This next video provides an excellent conceptual overview, clearly distinguishing between integrity and authenticity.
Viewing time: ~5.5 minutes.
Key concepts to grasp:
- The refresher on public/private key pairs.
- The clear and vital distinction: Integrity is the "what" (is the data correct?), and Authenticity is the "who" (did it come from the right person?).
- The explanation of why you sign the hash, not the data itself.
The Signing and Verification Process
Now let's walk through the exact steps. The process is a sequence of operations performed first by the sender (the software developer) and then by the receiver (you).
Reading time: ~5 minutes.
Cryptography - Hash Functions & Digital Signatures (Digital Signatures Explained; Key Usage in Public-Key Cryptography and Digital Signatures)
Focus on the step-by-step process described for Alice and Bob, and the "Key Confusion" summary.
Here is a visual representation of that entire flow:
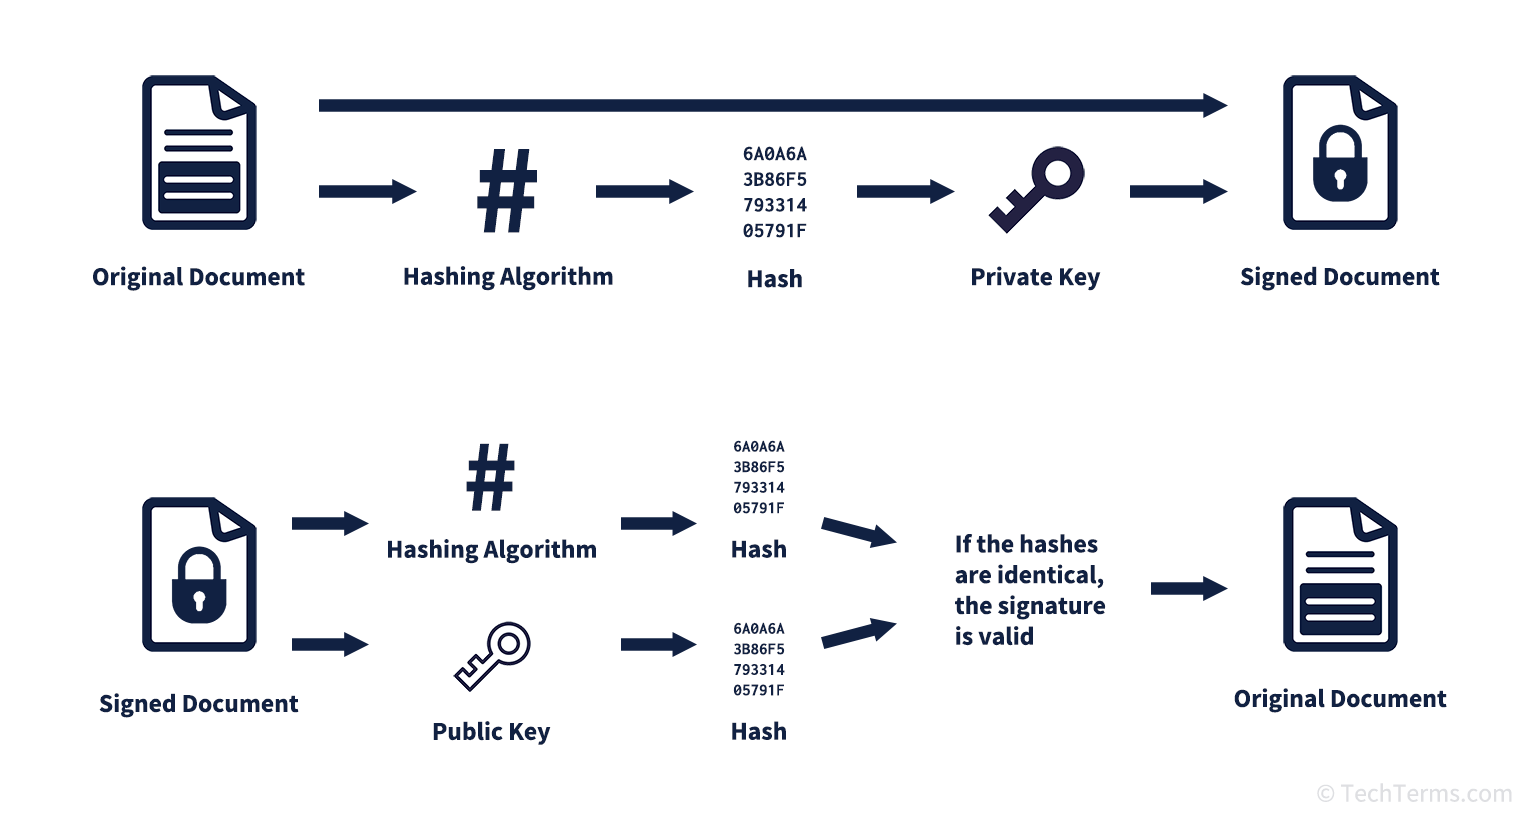
This diagram shows the complete process. Top (Signing): The Qubes developers take their original ISO file, hash it, and then encrypt that hash with their private key to create the signature. Bottom (Verifying): You will take the downloaded ISO and the signature. You use the Qubes developers' public key to decrypt the signature, revealing the original, official hash. You then compute your own hash from the downloaded ISO. If your hash matches the official one, the signature is valid.
4. Synthesis: A Verifiable Chain of Trust
Let's tie this all together in the context of our Qubes OS installation.
The Qubes OS Team's Process (Signing):
- They produce the final
Qubes-R4.x.x-x86_64.isofile. - They compute its SHA-256 hash. This hash is the file's unique "fingerprint" (ensuring integrity).
- They use their secret Qubes Master Signing Key (private key) to sign this SHA-256 hash. This creates a small digital signature file.
- They publish the ISO file, the plaintext hash, and the signature file on their website. They also ensure their public key is available from multiple trusted sources.
Our Process (Verifying):
- We will download the ISO file, the hash file, and the signature file.
- We will import the Qubes OS team's public key into our GPG (GNU Privacy Guard) keychain.
- We will use GPG to instruct it to use the public key to verify the signature file. GPG performs two actions:
a. It decrypts the signature using the public key to reveal the "official" hash that the developers originally signed. This confirms authenticity—only the holder of the private key could have created a signature that this public key can decrypt.
b. It automatically computes the SHA-256 hash of the ISO file we downloaded. - GPG then compares the two hashes. If they match, it reports a "Good signature," confirming both authenticity (it's from the Qubes team) and integrity (the file has not changed).
If an attacker had replaced the ISO on the server, the hash we compute in step 3b would not match the official hash from the signature, and the verification would fail. If the attacker also tried to create a new signature, they couldn't, because they don't have the Qubes Master Signing Key. This robust, two-factor check is what allows us to trust the software we are about to give complete control over our hardware.
Conclusion
You now understand the cryptographic principles that underpin modern software verification. By combining the "what" (integrity, from hashes) with the "who" (authenticity, from digital signatures), we can establish a strong chain of trust from the developer to our machine.
Key Takeaways:
- Cryptographic Hashes (e.g., SHA-256) act as a unique digital fingerprint to verify that data has not been altered (integrity).
- Digital Signatures use a private key to sign a hash, and a public key to verify that signature. This proves the origin of the data (authenticity) and protects the integrity of the hash itself.
- The process for verifying software involves using the developer's public key to check the signature of a downloaded file. This confirms the developer's identity and ensures the file is an exact match to the one they created.
Preview of the Next Lesson
With this theoretical foundation firmly in place, we are ready to get our hands dirty. In the next lesson, we will move on to the practical steps of creating a bootable Qubes OS installation USB drive. This will involve downloading the necessary files and, crucially, performing the GPG signature verification we have just discussed to ensure we are starting our secure build from a trusted source.