Recommended resources
The freely available resources this lesson will direct you to.
- A-Level Biology - Magnification & Resolution - Object & Image | Calculations (2027/28 exams)www.youtube.com
- AS Biology - Using scale bars to calculate magnificationwww.youtube.com
- What is microscopy, size and magnification in GCSE Biology? - BBC Bitesizewww.bbc.co.uk
- microscopy-skills-resource.pdfwww.wjec.co.uk
Hello! In the previous lesson, you used visible features to infer what specialised cells do. Now the same kinds of images become measurements. A cell may occupy several centimetres on a screen or page while measuring only a few micrometres in reality.
This lesson will help you calculate magnification and actual size, whether an image gives you a magnification value or a scale bar. The key to reliable eAssessment answers is to identify the length you are using, convert units before dividing, and report the result clearly. Allow about 35–40 minutes, including the videos and reading.
Three quantities, one relationship
Image size is the length of a feature as measured on the displayed or printed image. Actual size is its real length. Magnification tells you how many times larger the image measurement is than the real measurement.
The two lengths must refer to the same feature, measured in the same direction and expressed in the same unit. Because the units cancel, magnification has no unit; write a result such as , not .
Watch Cognito’s Magnification & Resolution for the equation, the unit conversions, and a worked cell-size calculation. You only need the selected portion; the broader resolution content is not needed here.
A-Level Biology - Magnification & Resolution - Object & Image | Calculations (2027/28 exams)
Cognito’s Magnification & Resolution shows how to turn the size relationship into an actual-size calculation.
Watch units and formula, focusing on why image and actual lengths need matching units. Continue with the worked example; notice that the image length is converted into micrometres before division.
The conversions worth keeping beside your working are:
For example, . Going the other way, . A quick sense-check helps: a length expressed in micrometres should have a larger number than the same length expressed in millimetres.
Finding actual size or magnification
If magnification is given, rearrange the relationship to find actual size:
The image below shows this calculation with a image length at magnification.

The calculation is short, but the final conversion matters:
If instead you know the actual size, use the original relationship to find magnification. Suppose a cell measures in an image and in reality. Convert to , then calculate:
Notice the difference between the answers: actual size needs a length unit; magnification does not. If an assessment instead asks for image size, multiply actual size by magnification. For instance, a feature shown at would have an image length of , or .
When the image has a scale bar
A scale bar gives you a length whose actual size is already known. If its label says , that label describes the distance in the specimen represented by the bar—not the length you should expect to measure on the page.
Watch Jo Phillips A Level Biology’s Using scale bars to calculate magnification. The useful distinction is between measuring the bar on the image and reading its labelled actual length.
AS Biology - Using scale bars to calculate magnification
Jo Phillips A Level Biology’s Using scale bars to calculate magnification explains what a scale bar represents, then uses one to calculate an image’s magnification.
Watch the scale-bar idea, focusing on why the bar enlarges along with the specimen. Then watch the calculation: the measured bar length supplies the image size, while its label supplies the actual size.
For magnification, use the scale bar as the feature in the familiar equation. If a bar measures on an image and is labelled , then:
Do not measure a cell instead of the bar for this calculation unless the cell’s actual size is also supplied. The bar is useful precisely because you know what its measured image length represents in reality.
Once you have a scale bar, you can find a cell’s actual size without first calculating magnification. Compare the cell’s measured image length with the bar’s measured image length. If the cell measures and the bar measures , the cell is three bar-lengths wide in the image. Its actual width is therefore:
This length-ratio method and the magnification method give the same result. The ratio is often quicker when an image supplies a scale bar and asks only for a feature’s actual size.
For another presentation of both methods, read the first two pages of the following resource. Stop before its practice questions and later microscope-calibration material.
microscopy-skills-resource.pdf
Read the opening of WJEC’s Magnification, Actual Size and Microscopy to compare calculations from a stated magnification with calculations from a scale bar.
On pages 1–2, find “MAGNIFICATION and ACTUAL SIZE”, followed by “Using the scale bar”. Read the worked methods. Focus on which image length is measured in each example; in the scale-bar actual-size example, notice the comparison between the feature’s length and the bar’s length.
Reading an image carefully
The onion-cell diagram below includes an indicated image length and a ruler illustration whose position is labelled .
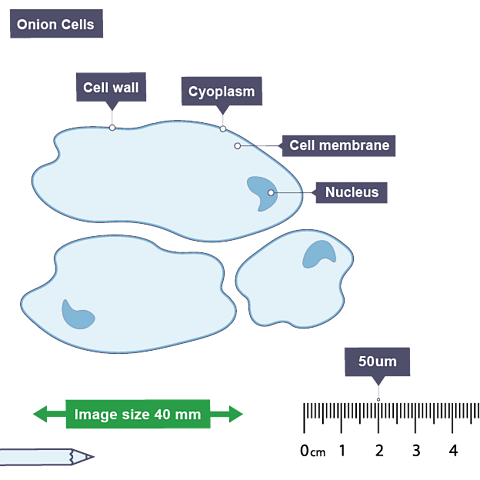
Using the indicated span as the image length corresponding to :
At that scale, an indicated image span represents:
Be precise about what span you have calculated. The green arrow does not trace the boundary of one entire onion cell, so is the actual length corresponding to that indicated span—not automatically the width of a particular cell.
There is a further caution with digital images: a picture can be resized on a screen. A scale bar remains useful because it resizes with the specimen, but measuring centimetres directly on your screen may not reproduce a length stated for a printed version. In an eAssessment, use supplied measurements when given, and use a ruler on an image only when the task asks you to measure that displayed or printed image.
Keeping your working assessment-ready
A clear calculation usually has four parts: identify the requested quantity; record the relevant image and actual lengths; make the units consistent; then substitute and give a labelled answer. For a scale-bar question, decide first whether you need the bar alone to find magnification or the feature-to-bar length ratio to find actual size.
Two checks catch many errors. First, inspect the conversion: is , not . Second, inspect the result’s meaning: if an enlarged cell measures millimetres in an image, its actual size should generally be smaller, not larger. Keep extra digits during the calculation and round at the end if the question specifies a precision.
Key takeaways
Magnification compares an image length with the actual length of the same span. Convert the lengths to matching units before calculating. When a scale bar is present, its measured image length and labelled actual length can give magnification; comparing a feature’s image length with the bar’s can give that feature’s actual size directly. Always state whether your answer is a unitless magnification or a length in units such as .
Next, you’ll return to cells as living systems and examine how mitotic division supports growth and tissue repair.