Recommended resources
The freely available resources this lesson will direct you to.
Welcome to the final lesson of our course on intentional lead sound design. In the last session, you mastered the art of critical evaluation. You now have a process for analyzing your work-in-progress sound against a professional reference, pinpointing its shortcomings, and articulating a specific list of improvements.
This lesson closes the loop. We will take that list of improvements and act on it. You will learn how to systematically iterate on your sound, making controlled, purposeful adjustments that transform your initial patch into a polished, finished lead. This is the final, practical step in the intentional sound design workflow. We will focus on adjusting one parameter domain at a time—timbre, then modulation, then effects—to build complexity without creating chaos.
This structured, iterative approach may feel familiar. It mirrors the discipline of software development, where you might refactor one module at a time to improve a system while maintaining stability and control. By isolating changes, you can clearly assess their impact and build towards your goal with confidence.
1. The Principle of Systematic Iteration
Randomly tweaking knobs is a recipe for frustration. A more effective method is to group parameters into logical "domains" and focus your adjustments on one domain at a time. This allows you to solve specific problems without accidentally breaking what already works.
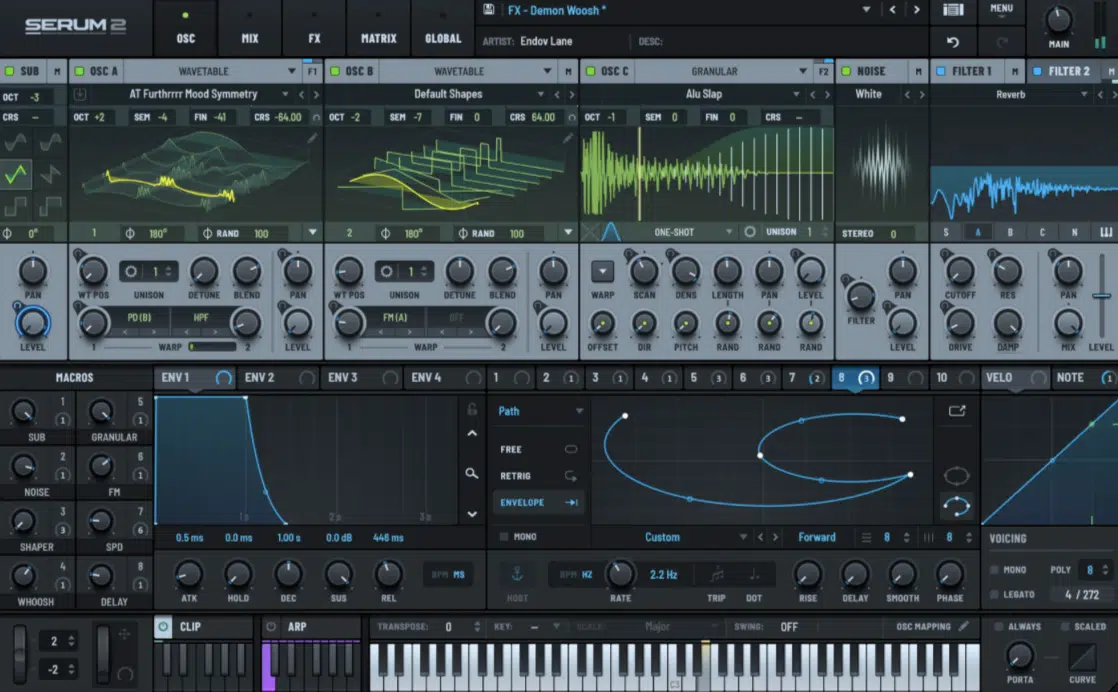
For our purposes, we can organize Serum's controls into four primary domains:
- Core Timbre (Oscillators): The raw sound source. This includes wavetable selection, wavetable position, and timbral shaping via warp modes, FM, AM, or RM.
- Shaping & Character (Filter & Unison): How the raw timbre is sculpted. This covers the filter type, cutoff, resonance, and drive, as well as the unison settings that determine width and thickness.
- Dynamics & Movement (Modulation): How the sound evolves over time. This domain includes envelopes (for one-shot changes) and LFOs (for cyclic changes).
- Polish & Space (FX): The final processing stage. This involves Serum's internal effects rack, including distortion, compression, EQ, delay, and reverb.
The following article offers a high-level view of these fundamental building blocks. It reinforces the idea that understanding these separate components is the key to intentional control.
Why Production Matters Less Than You Think It Does - Pheek's
This reading from Pheek's AudioServices Studio blog breaks synthesis down into its essential principles. It will help solidify the mental model of organizing a synthesizer into distinct functional domains.
Read the section "Five Core Principles of Sound Synthesis." Notice how these principles—Oscillators, Harmonics, Filters, Envelopes, and Modulation—map directly to the parameter domains we'll be iterating through.
The image below shows how these domains are laid out in the Serum interface. Having a clear mental map of where to find each control group is the first step in a systematic workflow.
2. A Staged Approach to Iteration in Practice
Let's now apply this systematic approach. A highly effective workflow used by many producers is to work in stages: first, sculpt the core sound within the synth engine, aiming to get it about 60-80% of the way there. Then, use internal and external effects for the final polish.
The following video by OSCO Music is an excellent case study of this staged, iterative process. Although he is designing a Neurofunk bass, the methodology is universal and perfectly demonstrates the learning outcome for this lesson. We will focus on his process, not the specific sound.
Stage 1: Iterating on Timbre and Modulation (The First 60%)
You start with the list of improvements from your analysis in the previous lesson. Let's say your lead sounds "too thin and static." You'd begin by iterating in the Timbre and Modulation domains.
- To address "thin": You might add a second oscillator, experiment with FM or a different warp mode, or increase unison voices.
- To address "static": You would assign a slow LFO to the wavetable position or the warp amount to create subtle movement.
Watch how the producer in this video builds the initial character of his sound by making deliberate choices in the oscillator, modulation, and filter sections before adding heavy effects.
Dangerous DnB Bass in Serum [Sound Design Tutorial]
In this clip from "Dangerous DnB Bass in Serum," OSCO builds the core of his sound. Observe how he systematically makes decisions about oscillators (saw + AM), modulation (pitch and noise envelopes), and basic filtering to establish the fundamental character.
Watch the section from building the patch. Notice his intentional choices, like setting oscillator phase randomization to zero for consistency—a perfect example of making a decision for a specific reason ("we want it to be consistent"). He iterates on the timbre with AM synthesis and then on the dynamics and movement with envelopes and LFOs.
Stage 2: Iterating on Internal Effects
Once the core timbre and movement are established, you can move to the FX domain to add aggression, polish, and initial space. This is where you might add distortion to bring out harmonics, use the multiband compressor (OTT) to control dynamics and add presence, or add a preliminary filter. The order of effects is critical here, as distortion before a filter sounds very different from distortion after.
This video from "In The Mix" clearly explains the importance of effect order.
Advanced Sound Design and Synths Tutorial
This clip from "Advanced Sound Design and Synths Tutorial" demonstrates how adding effects like distortion and reverb dramatically changes a sound, and crucially, how their order matters.
Watch from the effects section. Pay attention to the discussion around effect order. The article "25 Essential Serum Sound Design Tips" also has a great point on this in tip #25, "Mix Up Your Effects Chain," which you can find in the resource c46ea.
Now, let's see this applied in our case study. OSCO adds the first layer of distortion and filtering within Serum's FX rack.
Dangerous DnB Bass in Serum [Sound Design Tutorial]
Here, OSCO adds the first layer of processing inside Serum's FX rack. He's iterating on the sound's aggression and shape using the Distortion and Filter modules.
Watch this short segment from internal effects. He uses tube distortion to add harmonics and then a filter to tame the resulting "buzzy" top end, shaping the sound further.
Stage 3: Iterating with External Processing (The Final 40%)
With the in-synth sound being solid, the final stage is to use external plugins (or more effects in your DAW's chain) for final shaping, EQ, and advanced spatial processing. This is where you fit the sound into the context of a mix. This stage often involves:
- More advanced distortion/saturation: Using multiple stages or types of distortion.
- Corrective and creative EQ: Carving out space for other instruments and boosting character frequencies.
- Stereo imaging and spatial effects: Using dedicated plugins to create width and depth while maintaining mono compatibility.
OSCO's video provides a masterclass in this, demonstrating a multi-stage external effects chain.
Dangerous DnB Bass in Serum [Sound Design Tutorial]
This is the final stage of iteration. OSCO uses a chain of external plugins to take his solid synth patch to a finished, professional level.
First, watch how he uses multiple distortion plugins (iZotope Trash and Black Box) with careful gain staging to add layers of harmonic complexity. Then, see how he uses EQ and stereo effects to bring back the low-end lost during distortion and add controlled stereo width to the higher frequencies. This is a perfect example of systematic, problem-solving iteration.
3. The Complete Iterative Workflow
You've now seen all the pieces of the puzzle. The entire intentional sound design process, from the start of this module to the end, can be summarized as a clear, repeatable algorithm.
- Formulate Goal: Define the target sound using descriptive words (e.g., "bright, wide, plucky dancefloor lead").
- Build Foundation: Create an initial patch in Serum by selecting the wavetable, filter type, and envelope shapes that best match your goal.
- Analyze vs. Reference: A/B test your patch against a level-matched reference track.
- Articulate Gaps: Use a structured framework (Timbre, Dynamics, Width, etc.) to identify and write down specific shortcomings (e.g., "lacks presence in the 3-5kHz range," "sustained portion is static").
- Iterate Systematically: Work through your list of gaps by making targeted adjustments in one parameter domain at a time. A common and effective order is:
- a. Core Timbre (Oscillators, Warp, FM)
- b. Shaping (Filter, Unison)
- c. Movement (Envelopes, LFOs)
- d. Internal FX (Distortion, Compression, etc.)
- e. External FX (Post-processing in your DAW)
- Re-evaluate: After each significant change, quickly A/B against your reference to ensure you're moving closer to, not further from, your goal.
This systematic process is the core philosophy that separates amateur tweaking from professional sound design. The producer in our case study summarizes this staged approach perfectly.
Dangerous DnB Bass in Serum [Sound Design Tutorial]
In this final clip, OSCO reflects on the overall philosophy: create the sound in stages (filter, noise, distortion) and use multiple layers with micro-control to build a complex, morphing result.
Listen to his summary from the key takeaway. His advice to "create original sound, filter, noise, and distortion...in stages" is the essence of today's lesson.
Conclusion and Course Wrap-Up
Congratulations on completing the course! Today, you learned the final and most crucial part of the intentional sound design workflow: how to systematically iterate on a patch to turn a good idea into a great sound. You've moved beyond simply knowing what the knobs do and have established a robust process for using them with purpose.
Key Takeaways:
- Systematic iteration is about making controlled changes within distinct parameter domains (Timbre, Filter, Modulation, FX) to solve specific problems.
- A powerful professional workflow involves a staged approach: first shaping the core sound within the synthesizer, then using internal and external effects for polish and integration.
- Constantly A/B testing against your reference after each iteration step keeps you on track and ensures your changes are genuine improvements.
You now possess a complete, end-to-end workflow for creating DnB leads:
Formulate -> Build -> Analyze -> Iterate.
This marks the end of our journey together, but it's the beginning of yours as a more intentional sound designer. The next step is practice. Take the concepts from this course and apply them. Deconstruct leads from your favorite artists using this framework. Start new patches with a clear sonic goal. With each sound you design, this systematic process will become more intuitive, faster, and more powerful.