Recommended resources
The freely available resources this lesson will direct you to.
- TECHY DNB Sound Design Like SOFA SOUNDS/DISPATCH RECORDINGS | Serum Tutorialwww.youtube.com
- How To Learn SOUND DESIGN Like DLR | BREAK | ULTERIOR MOTIVE | MOLECULAR | Sound Design Tutorialwww.youtube.com
- All The Essentials On Using Reference Tracks in Music Production ...magneticmag.com
- Producer's ear 3.0: the guide to using reference tracks to achieve a ...ohxalarecords.com
Welcome to the third lesson in our final module on intentional sound design. In our previous sessions, you learned how to formulate a descriptive sonic blueprint and then translate that blueprint into the foundational settings of a Serum patch—selecting the initial wavetable, filter, and envelopes. You now have a work-in-progress sound that reflects your initial goal.
Today, we'll focus on the crucial next step: closing the gap between your initial patch and a professional, polished sound. This lesson is all about critical evaluation. You will learn how to use reference tracks not as a tool for copying, but as a benchmark for training your ear, analyzing your sound, and, most importantly, articulating specific areas for improvement. This skill is the bridge between a good idea and a great execution.
1. The Foundation: Professional Referencing
Before you can evaluate your sound, you need an objective standard of comparison. This is the role of a reference track. Without it, you're working in a vacuum, where your ears can quickly become fatigued and lose perspective.
An article from Magnetic Magazine, "All The Essentials On Using Reference Tracks," provides an excellent overview of the "why" and "how."
All The Essentials On Using Reference Tracks in Music Production ...
This reading covers two foundational steps for effective referencing. It will guide you on how to select a small, highly relevant set of reference tracks and how to set them up in your DAW to ensure your comparisons are honest and unbiased.
Read the sections titled "Choosing the Right Reference Tracks Before You Touch a Fader" and "Setting Up Your Session So Reference Tracks Stay Honest." Focus on the principles of selecting 1-3 tracks with clear purposes and the technical setup for routing them directly to your output, bypassing any master bus processing.
The Single Most Important Rule: Level Matching
Our brains are hardwired to perceive louder sounds as better—fuller, clearer, and more powerful. This psychoacoustic bias is the biggest pitfall when using reference tracks. If the reference is even slightly louder than your patch, you will be chasing a phantom sense of quality that is really just a difference in volume. You must eliminate this variable before making any judgments.
The same article explains this critical step in detail.
All The Essentials On Using Reference Tracks in Music Production ...
This section explains why level matching is non-negotiable and how to do it effectively.
Please read the section "Level Matching First So Loudness Stops Lying to You." The key takeaway is to match by perceived loudness, not by peak meter values. Loop a section of your track and the reference, and adjust the reference track's volume until switching between them feels seamless in terms of loudness.
2. A Framework for Critical Listening
With your reference track chosen and level-matched, the next step is to analyze the differences between it and your sound. To do this effectively, you need a structured approach and a precise vocabulary. Trying to compare "everything" at once is overwhelming and leads to vague conclusions. Instead, we break the sound down into its core attributes.
The table below provides a framework for this analysis. When comparing your lead to the reference, go through these categories one by one.
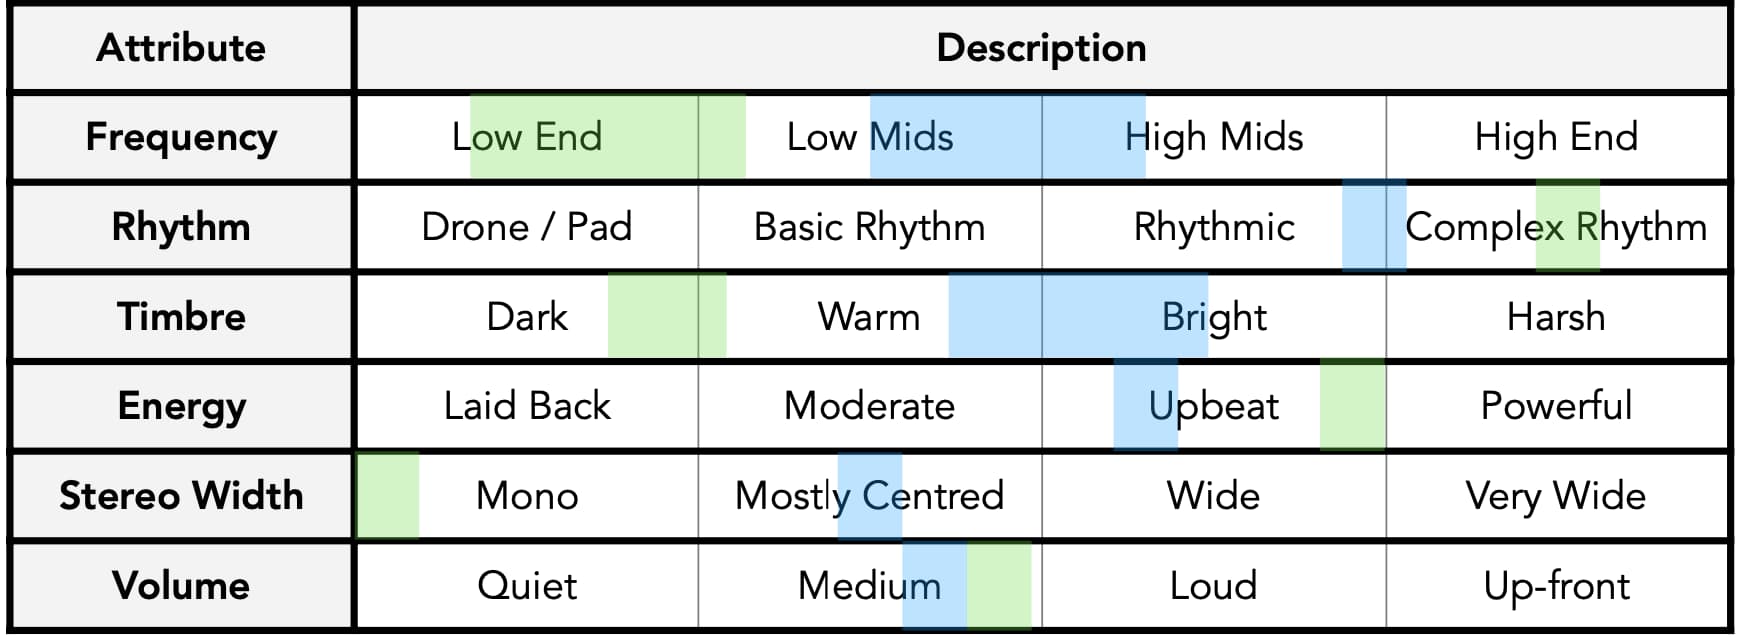
To articulate your findings, you need a shared vocabulary that connects descriptive words to the physical properties of sound. The following chart is an invaluable tool for this, mapping common production terms to their corresponding frequency ranges.

The following reading reinforces this idea of focused A/B testing and extends it from mixing to sound design itself.
Producer's ear 3.0: the guide to using reference tracks to achieve a ...
The article from Ohxala Records provides a concise guide to the practical steps of A/B testing and how to apply this thinking directly to your sound design choices.
Read the sections "Day 2: The process – A/B testing with purpose" and "Day 3: Going beyond the mix – referencing for arrangement and sound design." Pay close attention to the idea of listening in short loops, focusing on one element at a time, and mentally deconstructing the sounds in your reference track.
3. Practical Deconstruction: Learning by Disassembly
One of the most effective ways to understand what makes a sound work—whether it's from a professional preset or your own patch—is to systematically deconstruct it. This process involves isolating each component of the signal chain to hear its specific contribution.
This "reverse engineering" approach is demonstrated in the following video. The presenter analyzes a complex DnB bass sound, but the method is universally applicable to any sound, including your leads.
TECHY DNB Sound Design Like SOFA SOUNDS/DISPATCH RECORDINGS | Serum Tutorial
In "TECHY DNB Sound Design," the DNB Academy channel shows how to reverse engineer a patch by working backward from the effects. This method helps you identify the role of each module in the final sound.
Watch from the introduction of the method at the approach, through the deconstruction of the FX chain, and finally the analysis of the filter section. Focus not on the specific sound being made, but on the process of bypassing modules and articulating what each one does (e.g., "The EQ is cleaning a resonant frequency," "The filter drive is adding distortion").
This deconstruction process is a core skill. You can apply it to a professional preset to learn new techniques, or you can apply it to your own work-in-progress sound to confirm that each element is doing what you intended.
Here is another example of the same deconstruction technique applied to a different sound, reinforcing its versatility.
How To Learn SOUND DESIGN Like DLR | BREAK | ULTERIOR MOTIVE | MOLECULAR | Sound Design Tutorial
This video, "How To Learn SOUND DESIGN Like DLR," provides another example of a systematic deconstruction of a Serum preset.
Watch the section from deconstructing the patch. Notice the repeatable pattern: turn off effects, then oscillators, then examine modulations one by one to understand their impact.
4. Application: The Evaluation Loop in Action
Let's tie this all together with a practical example. Imagine we're working on the Dancefloor DnB lead from our previous lessons.
- Sonic Goal: "Bright, rich, wide, plucky, decaying."
- Initial Patch: We started with a detuned saw wave, an LP filter with a fast envelope on the cutoff, and a plucky amplitude envelope.
- Reference Track: Let's use a track by Grafix. After level-matching, we A/B test our lead against his. Our lead sounds decent, but lacks the professional polish, energy, and presence of the reference.
Now, we use our framework to move from that vague feeling to specific, actionable points.
| Attribute | Reference (Grafix) | Our WIP Sound | Articulated Gap & Area for Improvement |
|---|---|---|---|
| Frequency | Full-bodied, cuts through the mix with clear presence. Not harsh. | A bit thin, gets slightly lost. Lacks weight in the low-mids. | Gap: "My lead is deficient in the 200-500Hz 'body' region and lacks energy in the 2-5kHz 'presence' region." |
| Timbre | The timbre is rich and subtly evolving, with a layer of harmonic grit. | The saw timbre is rich but static. It sounds a bit too "clean." | Gap: "The core timbre needs more movement and texture. It's too static and lacks saturation or distortion." |
| Dynamics | The lead has a strong initial punch, but also a subtle rhythmic "pulse" on sustained notes. | The lead has a good initial pluck, but the sustained part is flat and lifeless. | Gap: "The sound needs rhythmic modulation after the initial transient to maintain interest." |
| Stereo Width | The sound is very wide, but the width feels dynamic and alive, moving with the sound. | Our unison makes the sound wide, but it's a constant, static width. | Gap: "The stereo image is wide but not dynamic. It could benefit from modulation to make the width 'breathe'." |
By following this process, we've transformed "it doesn't sound as good" into a concrete to-do list:
- Boost low-mids and presence with EQ or saturation.
- Add timbral movement, perhaps with an LFO on the wavetable position or by adding FM/distortion.
- Introduce rhythmic modulation, maybe with a tempo-synced LFO on the filter cutoff or volume.
- Modulate a width-related parameter (like Unison Detune or Pan) with an LFO or envelope.
You have now successfully evaluated your sound and articulated exactly what needs to be done.
Conclusion
In this lesson, you've learned the critical skill of evaluating a work-in-progress sound against a professional benchmark. This process is the heart of intentional sound design, enabling you to close the loop between your initial idea and a finished, polished result.
Key Takeaways:
- Reference tracks provide an objective anchor for your hearing. Level matching is the most crucial step to ensure your comparisons are valid.
- A structured evaluation process, focusing on one sonic attribute at a time (Frequency, Timbre, Dynamics, Width), prevents you from being overwhelmed.
- Using a precise vocabulary (e.g., "presence" instead of "brightness") allows you to articulate specific problems, which is the first step toward solving them.
- Deconstructing sounds by bypassing modules is a powerful technique for understanding the function of each element in a patch.
You've now formulated a goal, built a foundational patch, and articulated how it needs to improve. In our final lesson, we will focus on the last step of the workflow: systematically iterating on your sound to address the very points you've just identified, turning your analysis into a finished lead.