Recommended resources
The freely available resources this lesson will direct you to.
Hello Alex,
Welcome back to the course. In our last session, we focused on the foundational technique of swapping basslines using the Low EQ knobs. This taught you how to surgically manage low-frequency energy to create clean, powerful transitions.
Today, we'll build on that concept of frequency control by exploring a more dynamic tool: the filter. This lesson addresses the learning outcome: Identify the 'Sound Color FX' section and use the HPF/LPF (Filter) to create a smooth transition.
Where EQ adjustments are often set and held, filters allow you to sweep through the frequency spectrum in real-time, creating a sense of movement and energy. For a software engineer like yourself, you can think of the EQ swap as a state change, while using a filter is more like applying a dynamic function over time to the audio signal.
1. The Sound Color FX Section
On the Pioneer DJM-900NXS2 mixer, there are two main effects systems. The one we're focusing on today is the Sound Color FX. These are a set of four effects that can be applied individually to any channel using a dedicated knob.
To understand the distinction, let's read a quick overview.
The article 'DJM Beat FX vs colour FX' from Club Ready DJ School provides a concise explanation of the two main effect types on a club mixer.
Please read the first three paragraphs, starting from 'So firstly what are the main FX...' to '...a great starting point for DJs.' This will clarify the role of Sound Color FX and how they are activated.
As the article mentions, the key characteristic of Sound Color FX is their simplicity and directness: select an effect, and then use the large knob on the relevant channel to apply it.
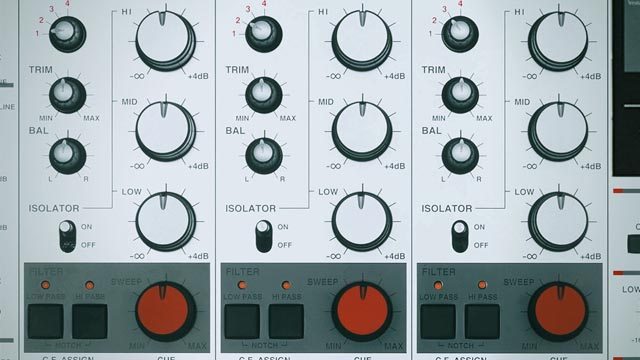
On the DJM-900NXS2, you'll find a section with buttons for Space, Dub Echo, Noise, and Filter. Below the EQ section on each channel, there is a large knob, usually labeled 'COLOR'. This is the control for the selected Sound Color FX.
2. High-Pass and Low-Pass Filters (HPF/LPF)
The most essential and widely used Sound Color FX is the Filter. It's actually two filters in one, controlled by that single 'COLOR' knob:
- Turn Right (Clockwise): Activates a High-Pass Filter (HPF). It cuts out low frequencies and lets high frequencies pass through. The further you turn it, the more bass is removed.
- Turn Left (Counter-clockwise): Activates a Low-Pass Filter (LPF). It cuts out high frequencies and lets low frequencies pass through. The further you turn it, the more treble and mids are removed, resulting in a muffled sound.
- 12 o'clock Position: The filter is off; the sound is unaffected.
To solidify your understanding of what these filters are doing to the audio, let's consult a guide that explains them from a signal processing perspective.
A Practical Guide To Using High And Low Pass DJ Filters Like ...
The article 'A Practical Guide To Using High And Low Pass DJ Filters' offers clear definitions and analogies for HPF and LPF.
Please read the following sections: 'What do DJ Filters do exactly?', 'High Pass Filters', 'Low Pass Filters', and 'What are the main parameters for filters?'. This will give you a solid theoretical foundation for what's happening when you turn the filter knob.
As you read, you'll notice the concepts of Cutoff Frequency and Resonance. On the DJM mixer, the 'COLOR' knob primarily controls the cutoff frequency—the point at which the filter starts working. The resonance (the little sonic "boost" at the cutoff point that gives the filter its characteristic sound) is fixed by Pioneer to be musically effective.
3. Technique: The Filter Transition
Now, let's apply this to mixing. Filters are excellent for creating space, much like our EQ bassline swap, but with a more noticeable, sweeping effect that can build or release tension.
The most common and useful filter transition in DnB involves using the HPF to introduce a new track.
A Practical Guide To Using High And Low Pass DJ Filters Like ...
Let's revisit the 'Practical Guide' to see how this theory is put into practice for transitions.
Please read the section 'Creating Space for Transitions'. It describes exactly how a filter can be used to blend tracks smoothly.
This "HPF wash-in" technique allows you to layer the percussive and melodic elements of the new track over the old one without the basslines clashing. Then, you can perform a clean hand-off of the low-frequency energy.
4. Practical Exercise: The HPF Wash-In (30 minutes)
Time to put theory into practice. Select two DnB tracks that you know have compatible phrasing.
Setup:
- Load Track A onto Deck 1 and Track B onto Deck 2.
- In the Sound Color FX section of the mixer, ensure the 'FILTER' button is illuminated.
Execution:
- Play Track A. Let it play through its intro and into a main section.
- In your headphones, cue up and beatmatch Track B to Track A.
- On Channel 2 (Track B), turn the COLOR knob to the right, to about the 3 o'clock position. This applies a significant high-pass filter.
- At the beginning of a major phrase (e.g., a 16 or 32-beat section), start Track B and bring its channel fader all the way up. You'll hear its hi-hats, snares, and maybe some synth leads, but no kick or sub-bass. The two tracks are now layered.
- Over the next 8 or 16 bars, slowly and smoothly turn the Channel 2 COLOR knob back to the 12 o'clock position. Time it so that the knob reaches 12 o'clock precisely on the first beat of the next major phrase. You will hear the bassline of Track B gradually "wash in."
- As the filter on Track B is fully opened (at 12 o'clock), the basslines will momentarily clash. At this exact moment, you have two options to complete the transition:
- Option A (EQ Swap): Perform the bassline swap you learned in the last lesson. Simultaneously turn the Low EQ on Track A down and the Low EQ on Track B to 12 o'clock.
- Option B (LPF Out): On Channel 1 (Track A), slowly turn the COLOR knob to the left (applying the LPF) over 4 or 8 beats, muffling it before you fade it out with the channel fader.
- Let Track B play on its own. The transition is complete.
Practice Goals:
- Perform this HPF wash-in transition at least 5 times.
- Experiment with how much filter you apply initially (e.g., 2 o'clock vs. 4 o'clock).
- Focus on the smoothness of your knob turn. It should be a single, continuous motion that spans the entire phrase. The goal is to make the effect feel like it's part of the music.
- Try both Option A and Option B for completing the mix to see which you prefer.
5. Conclusion
You've now added another powerful and expressive transition technique to your arsenal. By mastering the filter, you can create smoother, more dynamic, and more interesting blends.
Key Takeaways:
- The Sound Color FX are per-channel effects, with the Filter being the most fundamental.
- The filter knob controls a High-Pass Filter (HPF) when turned clockwise and a Low-Pass Filter (LPF) when turned counter-clockwise.
- Using the HPF on an incoming track is an effective way to layer it into the mix without its bassline clashing.
- The key to a good filter transition is smooth, gradual movement that is timed perfectly with the musical phrases of your tracks.
In our next lesson, we will round out our knowledge of this section by exploring the other three Sound Color FX: Space, Dub Echo, and Noise. These are used less for transitions and more for adding momentary texture and flair to your mix.