Recommended resources
The freely available resources this lesson will direct you to.
Hello. In the previous lesson, you used Maven to make a Java project reproducible and to run a reliable pre-push check with clean verify. Now we move from validating code locally to proposing it professionally in a shared repository.
This lesson covers the standard GitHub workflow for one small backend change: start from an up-to-date main branch, create an isolated feature branch, make and verify a focused change, commit exactly the intended files, push the branch, and open a pull request (PR). This is the workflow you should use for your job-tracker portfolio project as well as team assignments and junior developer work.
Why work on a feature branch?
A branch is an independent line of development within the same repository. The shared main branch represents the codebase that the team currently accepts as stable. A feature branch holds one proposed change until it has been reviewed and merged.
For example, instead of directly changing main, create a branch such as:
feature/validate-application-status
That branch might contain only:
- status-validation logic in a Spring service;
- tests that demonstrate valid and invalid status values;
- perhaps a small documentation update if the behavior is part of the API contract.
It should not also contain an unrelated controller redesign, database migration, and dependency upgrade. A focused branch gives reviewers a clear question: “Is this particular change correct and ready to merge?”
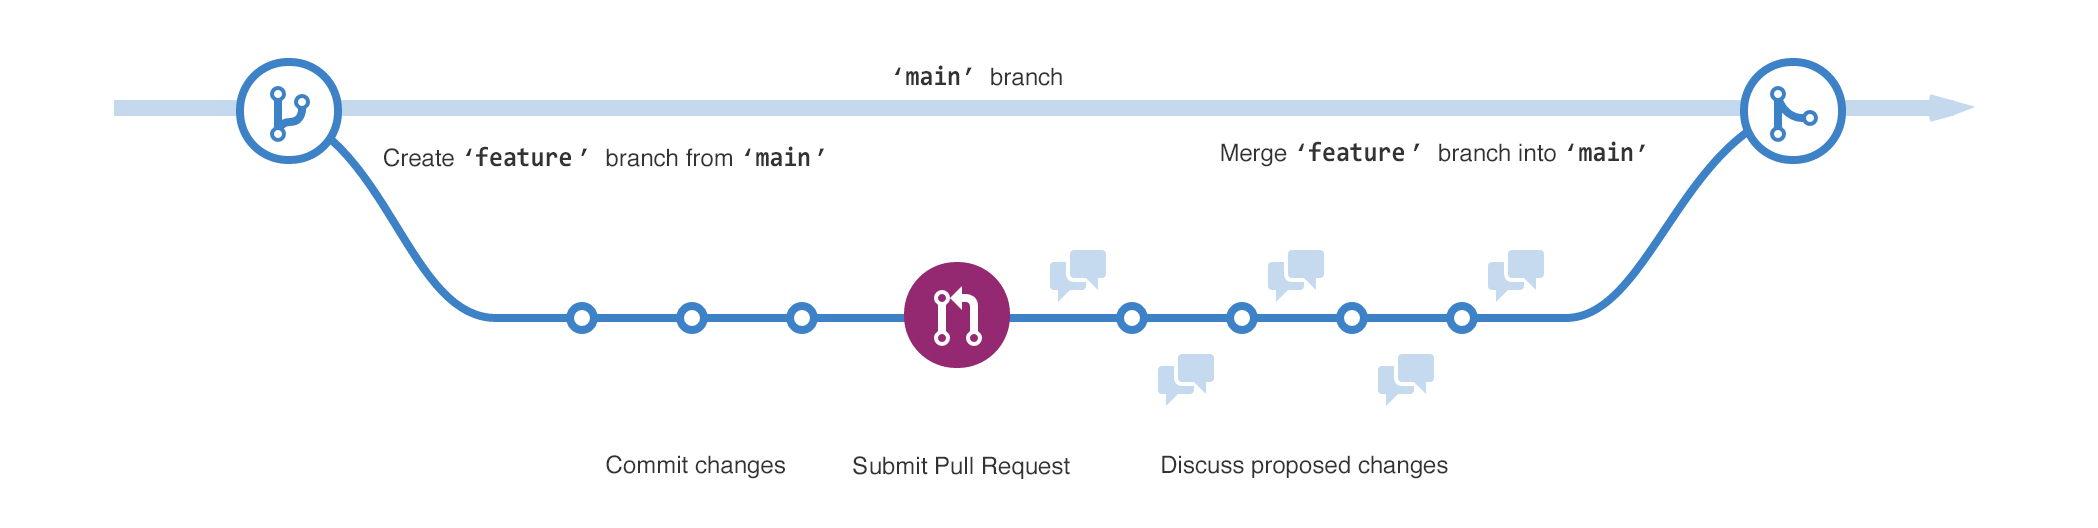
A branch is lightweight: it does not duplicate the whole project. It is a named reference to a particular line of commits. The files in your working directory change when you switch branches because Git checks out the versions associated with the chosen branch.
The lifecycle has several distinct locations:
| Location | What it contains | Typical command or action |
|---|---|---|
| Working directory | Files you are currently editing | Edit Java source or tests |
| Staging area | Exact changes intended for the next commit | git add |
| Local repository | Commits saved on your machine | git commit |
| GitHub remote | Branch and commits shared online | git push |
| Pull request | A proposed comparison of feature branch against main |
GitHub web interface |
The staging area is especially important. Git does not automatically commit every modified file. A commit contains only what you explicitly stage. That allows you to avoid accidentally committing generated Maven output, local configuration, debug files, or unrelated edits.
Read Atlassian’s overview of the feature-branch workflow to connect the command-line steps with the collaboration purpose behind them.
In “How it works,” focus on the branch purpose: descriptive names communicate one bounded task. Then read “Start with the main branch,” “Create a new-branch,” and “Push feature branch to remote.” Pay particular attention to the remote backup. Finally, read the “Pull requests” section through its discussion of review and conversation; note that an early pull request can be useful even before work is finished. The article shows git reset --hard origin/main as one way to synchronize a local branch. Do not run reset --hard casually: it discards uncommitted work. For normal day-to-day feature work, use the safer update routine below.
Start from a clean, current main
Before making a branch, first confirm where you are and whether you have uncommitted changes:
git status -sb
The -sb form gives a compact report. You might see output resembling:
## main...origin/main
That means you are currently on main, which tracks GitHub’s origin/main. If Git reports modified or untracked files that belong to another task, do not carry them into the new feature branch. Commit them on their correct branch, stash them deliberately, or discard them only if you are certain they are not needed.
Then update main:
git switch main
git pull --ff-only origin main
git switch main selects the local main branch. The pull command obtains the latest remote commits and updates your local branch. The --ff-only option refuses to create an unexpected merge commit; if Git cannot update cleanly, stop and understand why rather than forcing a result.
Now create and select the new branch:
git switch -c feature/validate-application-status
The -c means “create.” From this point onward, new commits belong to feature/validate-application-status, not main.
Older tutorials often use the equivalent command:
git checkout -b feature/validate-application-status
Both forms work. Prefer git switch -c when available because it makes the intent clearer: switching branches is separate from checking out individual files.
Choose names that communicate intent
Use names that describe the outcome, not your temporary thought process.
| Better branch name | Why it works |
|---|---|
feature/add-job-application-endpoint |
States the delivered capability |
feature/validate-application-status |
Identifies one business behavior |
fix/reject-blank-company-name |
Identifies a bug and expected behavior |
docs/improve-api-setup-guide |
Makes the non-code scope clear |
Avoid vague names such as changes, final, newbranch, or testing. In a real repository with many remote branches, a useful name reduces confusion immediately.
Confirm your branch before editing:
git branch --show-current
Expected output:
feature/validate-application-status
Make one coherent change and verify it
A focused commit is not necessarily a one-file commit. It is a commit whose files belong to one logical purpose.
Suppose the feature is validating application status changes. A focused change could include:
- Updating the service method that accepts a new status.
- Adding or updating the service test for invalid status input.
- Updating an API description only if it documents this same behavior.
It should not include an unrelated formatting sweep across the project.
Before staging anything, inspect your working changes:
git status
git diff
git status tells you which files are modified, untracked, or already staged. git diff shows the unstaged line-by-line changes. Read the diff as if you were reviewing someone else’s work:
- Did you change only files relevant to the branch’s purpose?
- Did you leave debugging output such as
System.out.println(...)? - Did you accidentally modify
application.propertieswith local credentials? - Did Maven create a
target/directory that should remain ignored? - Does the code behave as your tests claim?
Run the project’s verification command before committing. For the Maven backend project:
./mvnw clean verify
On Windows PowerShell:
.\mvnw.cmd clean verify
A green build does not prove that every design choice is good, but it gives the PR a clear baseline: the code compiles, tests pass, packaging succeeds, and configured verification checks have run.
Stage deliberately
Prefer staging named paths over using a broad command by habit:
git add <path-to-production-file> <path-to-test-file>
For example, stage both the service and its test because they form one change. If a file contains both relevant and unrelated edits, separate them before committing, or use Git’s interactive staging later when you are comfortable with it.
Now inspect the staged snapshot:
git diff --cached
This is the most useful final check before committing. git diff showed what was modified in your working directory; git diff --cached shows what will actually enter project history.
Create a concise, action-oriented commit message:
git commit -m "Validate job application status"
Good commit messages describe the outcome:
Add pagination to application list
Reject blank company names
Document local PostgreSQL setup
Avoid messages such as:
changes
done
fix
final version
After committing, check the result:
git status
git log --oneline --decorate -5
A clean working tree and a new commit on your feature branch indicate that the local part of the workflow is complete.
Push the branch to GitHub
A local branch is visible only on your computer. Push it to GitHub with:
git push -u origin feature/validate-application-status
Here:
originis normally the nickname for the GitHub repository from which you cloned.feature/validate-application-statusis your local branch name.-usets the upstream tracking branch.
Tracking matters because subsequent updates become simpler:
git push
Git then knows that your current local branch corresponds to the same-named branch on origin.
You can verify the relationship with:
git branch -vv
You should see your feature branch associated with origin/feature/validate-application-status.
If GitHub prompts for authentication, use the method configured for your account and repository, commonly SSH or a browser-based credential flow. GitHub does not accept an account password as a command-line Git password.
Two rules matter here:
- Push your feature branch, not direct commits to
main. - Do not use
git push --forceas a routine fix. It can replace remote history and disrupt teammates. If a normal push is rejected, inspect the message and update your local understanding of the remote state.
Open a pull request that a reviewer can understand
A pull request is not the merge itself. It is a proposal to merge a source branch into a target branch, plus a place to review diffs, discuss decisions, and run automated checks.
For this lesson, the source is:
feature/validate-application-status
The target, or base branch, is:
main
After the first push, open the repository on GitHub. GitHub will often show a Compare & pull request button for the recently pushed branch. If that banner is absent:
- Open the Pull requests tab.
- Select New pull request.
- Set the base branch to
main. - Set the compare branch to your feature branch.
- Review the displayed commits and changed files.
- Enter a title and description.
- Select Create pull request.
Before creating it, verify the branch direction carefully. You want to propose your feature branch into main, not the other way around.
How to create a pull request in 4 min | GitHub for Beginners
Watch GitHub’s “How to create a pull request in 4 min | GitHub for Beginners” for a short visual walkthrough of the GitHub interface and the information a useful PR should contain.
Watch the PR concept to distinguish a pull request from a merge and to understand the source and destination branches. Then watch the creation steps, focusing on the base and compare branch selectors, title, description, and draft option. Finish with the PR tips: keep the change small, review your own diff, and provide enough context for another developer to verify it.
A useful PR title is specific and outcome-oriented:
Validate job application status changes
A useful description helps a reviewer understand the purpose without reconstructing it from code. For a backend change, use a compact structure such as:
## What changed
- Added validation for job application status updates.
- Added tests for accepted and rejected status values.

## Why
- Prevents invalid statuses from being persisted.

## Verification
- Ran ./mvnw clean verify
Before submitting, use GitHub’s Files changed tab to review the PR yourself. Check for accidental generated files, incomplete tests, unrelated formatting changes, and misleading commit messages. Treat this as the last review pass before asking someone else to spend time on it.
Once the PR exists, any later commits pushed to the same feature branch automatically appear in that PR. You do not need to create a new pull request for every correction.
For now, open the PR but do not merge it. The next lesson covers what happens when changes overlap and Git needs help resolving a merge conflict safely.
A repeatable workflow card
Use this sequence whenever you begin a small task in a shared repository:
git status -sb
git switch main
git pull --ff-only origin main
git switch -c feature/descriptive-change-name

# Edit code and tests

./mvnw clean verify
git status
git diff

git add <intentional-file-paths>
git diff --cached
git commit -m "Describe the completed change"

git push -u origin feature/descriptive-change-name
Then on GitHub:
- Create a pull request from the feature branch into
main. - Review the complete diff yourself.
- Write a title that states the outcome.
- Explain the change and how you verified it.
- Leave the PR open for review rather than merging immediately.
Key takeaways
A professional GitHub workflow isolates each change before it reaches the shared branch:
- Create feature branches from an up-to-date, clean
main. - Use descriptive branch names that communicate one specific purpose.
- Keep commits focused: source code, tests, and documentation may belong together when they implement the same behavior.
- Inspect
git diffbefore staging andgit diff --cachedbefore committing. - Run
./mvnw clean verifybefore proposing backend changes. - Use
git push -u origin <branch>the first time so later pushes can usegit push. - A pull request compares a feature branch with
main; it enables review and discussion but does not merge code by itself. - Review your own PR diff and include a clear purpose and verification summary.
Next, you will resolve a simple merge conflict and merge the corrected pull request while preserving both intended changes.