Recommended resources
The freely available resources this lesson will direct you to.
- How to clone, push, and pull with git (beginners GitHub tutorial)www.youtube.com
- VSCode + GitHub for Beginners (2025) | Setup | Create, Clone, Commit, Push, Pull, Merge!www.youtube.com
- Adding locally hosted code to GitHubdocs.github.com
- Getting changes from a remote repository - Using Gitdocs.github.com
Welcome back. You’ve created commits, worked on branches, and resolved a merge conflict—all within a local repository. This final lesson in the Git workflow module adds a remote copy on GitHub. You’ll publish your expense-tracker repository, clone it into a second local folder, and use pull and push to keep the copies synchronized. Allow about 40 minutes, including the hands-on walkthrough.
One project, several copies
GitHub does not replace the Git repository on your computer. It hosts another copy that you can share and retrieve. For this lesson, picture three places:
- Your original local repository, where you’ve made the commits from previous lessons.
- The GitHub repository, addressed by a remote URL. In Git,
originis the conventional short name for that URL. - A second local repository, which you’ll create by cloning the GitHub copy.
Each local repository has its own working files, commits, and branch pointers. A commit made in one folder does not instantly appear in the others. Push sends committed work to the remote; pull retrieves remote work and integrates it into your current branch. Clone creates a new local repository from an existing remote one.
Git also keeps a remote-tracking reference such as origin/main: your local record of the remote branch’s position at the last exchange with it. It is not a live view of GitHub. This distinction matters when you check whether your local main is ahead of, or behind, the copy on GitHub.
Publish your existing repository
Start in the expense-tracker folder containing pom.xml. You already have a Git repository, so do not run git init again. Before publishing, check the branch, working tree, and files Git is tracking:
git branch --show-current
git status
git remote -v
git ls-files
mvn test
The steps below use main; substitute your actual branch name if it differs. Finish any work you intend to publish with a commit, and aim for a clean working tree. Review the tracked-file list before proceeding: Maven’s target/ output, local environment files, credentials, and signing keys should not be published. A .gitignore can prevent untracked files from being added accidentally, but it does not remove files already tracked by Git. If you find sensitive data in tracked files or earlier commits, stop and address that before pushing—deleting it from the latest file is not enough to remove it from published history.
GitHub’s Adding locally hosted code to GitHub gives the official sequence for connecting an existing local repository. Read the subsection below; skip the earlier “Initializing a Git repository” section because you completed that work in previous lessons.
Adding locally hosted code to GitHub
Read GitHub Docs’ instructions to see why the new GitHub repository starts empty and how the local repository is connected to it.
In “Adding a local repository to GitHub using Git,” begin with the authentication note and read the first setup sequence, ending at the first git push -u origin main example. Focus on the distinct jobs of git remote add, git remote -v, and the initial push; the page repeats some later command variants.
Create a new repository on GitHub for this project. Choose its visibility deliberately: a public repository can serve as portfolio evidence once its contents are safe to share; a private repository is also suitable while you are still checking it. Do not ask GitHub to initialize it with a README, license, or .gitignore. Your local project already has a history, and starting the remote with a separate commit would complicate this first push.
Copy the new repository’s URL from its Quick Setup page. An HTTPS URL works for this workflow; SSH is also supported if you have configured SSH authentication. On the command line, use the URL you copied—not the example text below:
git remote add origin <YOUR-REPOSITORY-URL>
git remote -v
git push -u origin main
If git remote -v already showed an origin before you started, do not add another one. First inspect where it points and whether it is the repository you intend to use.
The first command records the remote URL under the name origin; it uploads nothing. The push uploads commits on main. Its -u option establishes origin/main as the upstream for your local main, so subsequent git push and git pull can usually infer the destination. GitHub requires authentication to push. With HTTPS, use a supported credential flow such as a credential manager or token—not your GitHub account password. Never put a token in a command you plan to commit, paste into documentation, or share.
Refresh the GitHub repository page after the push. Check that you see your source files and commit history, not merely an empty repository.
Clone it without disturbing your original copy
Cloning is how a developer obtains a new working repository from GitHub. The Code menu in the image offers URLs for HTTPS and SSH cloning. It also offers “Download ZIP,” which downloads files but does not give you a Git repository with its history and remote configuration.
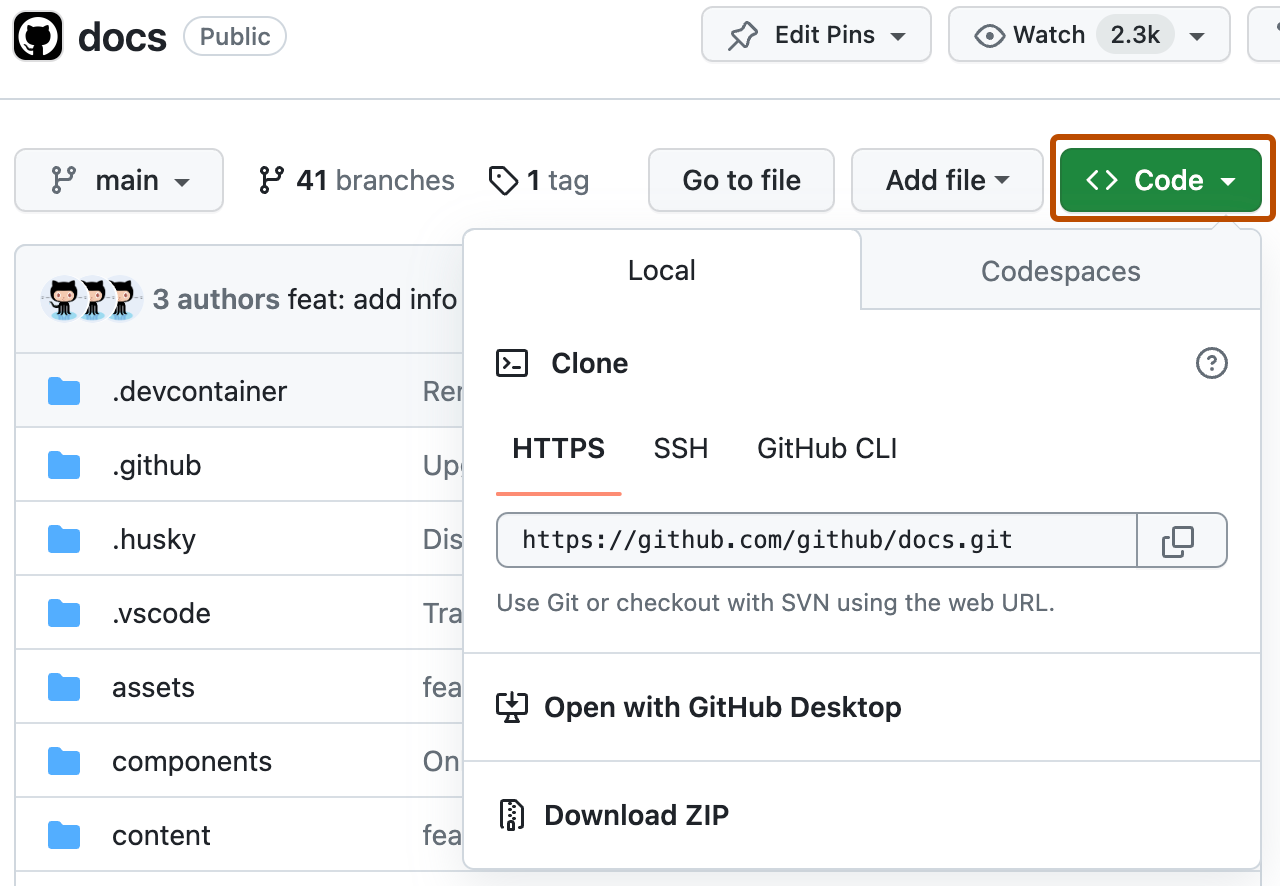
Read GitHub Docs’ explanation of what git clone sets up automatically.
Getting changes from a remote repository - Using Git
Read the “Cloning a repository” subsection of GitHub Docs to connect the clone command with the folder, origin remote, checked-out branch, and downloaded history it creates.
Under “Cloning a repository,” start at the git clone command introduced by the cloning explanation. Continue through the following paragraph about remote-tracking branches. In particular, notice that a clone sets up origin for you; unlike your original repository, it does not need git remote add origin.
To try it, move to the parent of your original project folder and give the clone a different folder name:
cd ..
git clone <YOUR-REPOSITORY-URL> expense-tracker-clone
cd expense-tracker-clone
git remote -v
git branch --show-current
git log -1 --oneline
git status
Using a separate folder avoids overwriting or confusing your original project. The clone has its own .git directory and working tree. It also has origin already configured to point at GitHub. If the remote is private, cloning may require authentication too.
Exchange changes with push and pull
Watch How to clone, push, and pull with git (beginners GitHub tutorial) by Tony Teaches Tech for a compact demonstration of a remote change arriving through pull, followed by a local commit leaving through push. Its example uses small Python files; the Git operations are the same for your Maven project.
How to clone, push, and pull with git (beginners GitHub tutorial)
Watch the pull-and-push portion of Tony Teaches Tech’s tutorial to see that saving a file, committing locally, and publishing to GitHub are separate events.
In remote to local, a change committed on GitHub appears locally only after a pull. Then watch local to remote for the status, stage, commit, and push sequence. Notice why a plain git push works after the initial upstream has been set.
Now simulate two developers using your two local folders. In expense-tracker-clone, create a small, non-sensitive Markdown file at docs/synchronization.md in your editor. Create the docs directory first if necessary, and give the file this content:
# Development workflow

Run the Maven tests before publishing changes.
Commit and publish it from the clone:
git status
git add docs/synchronization.md
git diff --staged
git commit -m "Document the test-before-push workflow"
git push
The new commit is now on GitHub, but your original folder has not changed. Return to that folder, check that you are on main with no uncommitted work, and pull:
git branch --show-current
git status
git pull
git log -1 --oneline
Open docs/synchronization.md to verify that it arrived. In this exercise, your original main had no new commits since the first push, so Git can simply advance it to the fetched commit.
For the return trip, append one useful line to that file in your original folder—for example, “Keep generated build output out of source control.” Then run:
git add docs/synchronization.md
git diff --staged
git commit -m "Clarify what stays out of source control"
git push
Finally, go back to expense-tracker-clone and run git pull there. Check the file and git log -1 --oneline. You should see the new line and the latest commit in both local folders and on GitHub.
What happened under the hood? A normal pull retrieves remote commits, updates remote-tracking information, and integrates those commits into the branch you have checked out. A push sends commits, not uncommitted edits in your working tree. Checking git status before each operation helps prevent surprises.
When synchronization does not go smoothly
This walkthrough deliberately took turns: one copy published while the other had no competing commits. In day-to-day work, check your branch and commit or otherwise safeguard local changes before pulling. If a pull encounters competing edits, Git may require a merge decision. The conflict-reading, editing, staging, testing, and finishing process from the previous lesson applies here too. Some Git configurations require you to choose how to reconcile diverged branches before a pull proceeds; do not assume a failed pull has discarded your commits.
A push can also be rejected when GitHub’s branch has commits your local branch has not incorporated—for example, if you try to push from the original folder after the clone has published new work. Do not force-push to get past that rejection. Retrieve and integrate the remote work, resolve any conflict if needed, test, and then push again. If a command reports an authentication or permission error instead, check that git remote -v points to the intended repository and that your account has access; pulling will not repair missing permissions.
Key takeaways
origin names a remote URL; it is not another branch or a second folder. The first git push -u origin main publishes your existing history and sets an upstream. git clone creates a separate local repository with its remote already configured. Thereafter, pull brings remote commits into your current branch, while push publishes your local commits. Keep an eye on git status, your checked-out branch, and what you are about to make public.
You’ve now taken the project from local Maven and Git workflows to a shareable repository. Next, you’ll turn to HTTP—the request and response language your Java backend will use to communicate with clients.