Recommended resources
The freely available resources this lesson will direct you to.
Hello! Welcome to your fifth and final lesson in our first module on SQL foundations.
In our last session, we learned how to use DISTINCT to find and count unique values, a key skill for understanding the variety within your product's data.
Lesson 5: Sampling Data with LIMIT
Today's Goal: By the end of this lesson, you will be able to use LIMIT to sample a small number of rows for quick exploration.
As a product designer, you'll often encounter tables with millions or even billions of rows, such as user event logs or transaction histories. Trying to view all of this data at once is impractical—it would be incredibly slow and overwhelm you and your analytics tool (like Metabase).
Today, we'll learn the LIMIT clause, a simple but essential tool that acts as a safety valve. It lets you take a quick peek at a table's structure and content by fetching just a small, manageable number of rows. This is fundamental for the initial discovery phase of any data analysis.
1. Why You Need to LIMIT Your Queries
Imagine you're given access to a new events table and you want to understand what kind of data it contains. Your first instinct might be to write:
SELECT * FROM events;
If this table has millions of rows, this query could take minutes to run, or even crash your browser tab. It's the data equivalent of trying to download a 4K movie on a dial-up connection.
The LIMIT clause solves this by telling the database, "Don't send me everything, just give me the first N rows you find." This makes your exploration fast and efficient.
The article below explains this core benefit and introduces the syntax.
How to Best Use the SQL LIMIT Clause
This article from DataCamp, 'How to Best Use the SQL LIMIT Clause', clearly explains why LIMIT is important for performance and data sampling.
Please read the sections 'The Short Answer: What is the SQL LIMIT Clause?' and 'Common Use Cases of the SQL LIMIT Clause'. Focus on how it helps with performance and data sampling.
2. Basic Usage of LIMIT
The syntax for LIMIT is straightforward: you add it to the very end of your query.
Let's say you want to get a feel for the users table. You can grab 5 rows to see the column names and the type of data in them.
SELECT
    user_id,
    email,
    created_at
FROM
    users
LIMIT 5;
This query will instantly return just five rows, allowing you to quickly verify you're looking at the right table and columns before you build a more complex query.
This short video provides a great visual demonstration of this basic concept.
Limit + Aliasing in MySQL | MySQL Beginner Series
This clip from Alex The Analyst's 'Limit + Aliasing in MySQL' video demonstrates the basic LIMIT functionality.
Watch the first 29 seconds of the video. It shows a simple example of how LIMIT 3 returns the top three rows from a table.
3. Making Your Sample Meaningful with ORDER BY
Using LIMIT by itself gives you an arbitrary sample of rows. The database doesn't guarantee which five rows it will return. For a quick glance at data types, this is fine. But what if you want a more specific sample?
By combining LIMIT with ORDER BY (which you'll learn more about in the next module), you can retrieve a very specific and useful subset of data. This is one of the most common patterns in data analysis.
Product Design Scenario: You want to see the 10 most recently created user accounts to check if their onboarding status is being set correctly.
You would first sort all users by their signup date in descending order (DESC), and then take the top 10.
SELECT
    user_id,
    signup_date,
    onboarding_status
FROM
    users
ORDER BY
    signup_date DESC
LIMIT 10;
This query is powerful because it answers a specific question—"who are the newest users?"—while remaining fast and efficient.
The following resources provide clear, practical examples of this combination.
Understanding LIMIT in PostgreSQL (With Examples)
This article from TigerData, 'Understanding LIMIT in PostgreSQL', provides excellent examples of using LIMIT with and without ORDER BY.
Read the section 'Practical examples with LIMIT'. Pay close attention to Example 1 (basic limit) and Example 3 (combining with ORDER BY).
Limit + Aliasing in MySQL | MySQL Beginner Series
Let's return to the Alex The Analyst video to see a demonstration of combining LIMIT with ORDER BY.
Watch from 00:29 to 01:00. The video shows how to find the three oldest employees by ordering by age and then applying a limit.
4. A Quick Note on OFFSET and Pagination
Sometimes you don't want the first N rows, but a "page" of results from the middle of the dataset. For this, you can use the OFFSET clause along with LIMIT. OFFSET tells the query to skip a certain number of rows before it starts counting for the LIMIT.
LIMIT 10 OFFSET 20 means: "Skip the first 20 rows, then give me the next 10."
As a product designer, you'll recognize this as the logic behind pagination, which is used everywhere from search results to user lists.
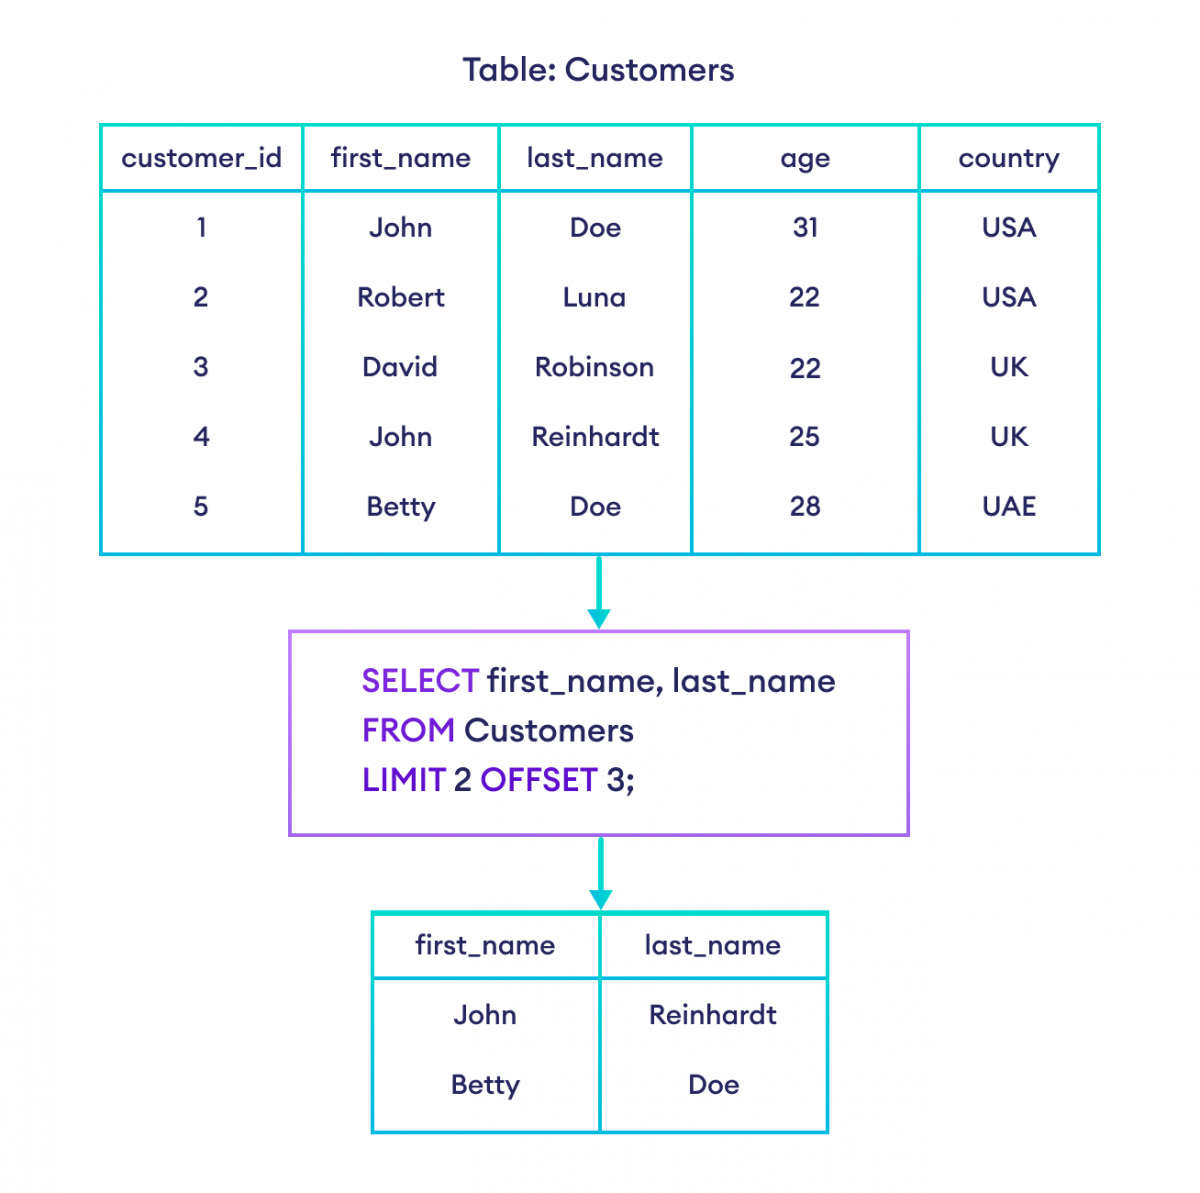
While OFFSET is useful for this, be aware that it can be inefficient on very large tables. For now, the key takeaway is its role in fetching specific slices of data.
5. Practice Exercise
Let's apply these concepts. Imagine you are exploring a user_feedback table for the first time. The table contains the columns: feedback_id, user_id, submitted_at (a timestamp), rating (from 1 to 5), and comment_text.
Task 1:
You're not sure what the data looks like. Write a query to fetch just 3 rows from the user_feedback table to get a quick preview.
Task 2:
Your team is interested in the most recent feedback. Write a query to find the 5 most recent feedback submissions.
Take a moment to write your queries before looking at the solutions.
Click to reveal the solution for Task 1
SELECT
    *
FROM
    user_feedback
LIMIT 3;
This is a perfect "discovery" query. Using * with LIMIT is safe and lets you see all columns for a small sample of rows.
Click to reveal the solution for Task 2
SELECT
    feedback_id,
    submitted_at,
    rating,
    comment_text
FROM
    user_feedback
ORDER BY
    submitted_at DESC
LIMIT 5;
This query first sorts all feedback entries by their submission time from newest to oldest, and then takes the top 5 from that sorted list.
Conclusion
Congratulations on completing the first module! You've built a solid foundation for writing SQL queries. LIMIT is the final piece of this initial puzzle, giving you a crucial tool for safely and quickly exploring data.
Key Takeaways:
LIMIT Nrestricts your query output toNrows, preventing you from accidentally fetching millions of rows.- It is your best friend for initial data exploration, allowing you to get a "peek" at a table's contents.
- Combine
LIMITwithORDER BYto retrieve meaningful samples, such as the "top 10," "bottom 5," or "most recent 20." LIMITis always placed at the end of your SQL statement.
Next Lesson:
In our next module, "Filtering and Sorting for User Insights," we'll dive into one of the most important clauses in SQL: WHERE. You'll learn how to move beyond just looking at data to filtering it to answer specific questions, such as finding all events performed by a single user or identifying all users from a specific country.