Recommended resources
The freely available resources this lesson will direct you to.
- Drafting Fitted Bodice Sloper - Professional Method, Part 1www.youtube.com
- How to draft a bodice block (or sloper) from your own measurements. Detailed step by step tutorial.www.youtube.com
- Dresspatternmaking - Drafting the Bodice Back (Metric Version)dresspatternmaking.com
- How to Draft a Bodice Blockinthefolds.com
Welcome back! In our last lesson, you successfully established the upper foundation of your back bodice pattern by drafting the neckline and shoulder slope. This was the first critical step in transforming your 2D framework into a pattern that reflects your body's three-dimensional form.
Today, we will complete the back bodice sloper. We will focus on two key areas: constructing the back armhole curve and drafting the back waist dart. The armhole is a crucial ergonomic feature, defining the garment's fit around the shoulder and allowing for comfortable movement. The waist dart is a powerful shaping tool that tailors the flat fabric to the curve of your lower back. By the end of this lesson, you will have a complete back bodice block, a fundamental component for your top design.
Constructing the Back Armhole Curve
The armhole, or armscye, is more than just a hole for your arm. Its specific shape is the result of careful geometric construction designed to provide a close fit without restricting movement. Think of it as designing the housing for a rotating joint; the form must accommodate the full range of motion.
To draft this curve, we will establish key guide points based on your measurements and then connect them with a smooth line using your French curve ruler. We'll primarily follow the logic from the detailed guide by In The Folds.
Please read the section titled "Drafting the armhole". While this section drafts both front and back armholes simultaneously, we will focus only on the back portion for now. The process involves establishing the back width, plotting several guide points, and then connecting them.
To begin, locate the heading "Drafting the armhole". Read the first step to establish the back width. On the horizontal line that represents your armhole depth (the one that passes through point H in the diagrams), you'll measure from the Center Back line. Use your back width measurement, divide it by two, and add 0.5 cm of ease. Mark this point. For our purposes, let's call this the Back-Width Point. Next, the guide squares up from this point to create a vertical guideline. Read how to find the midpoint of this guideline. This midpoint is a key landmark for our curve. Finally, focus on the instructions for the back half of the armhole. Read about drawing the diagonal guideline from the Back-Width Point. This small diagonal line helps shape the underarm part of the curve.
Now, let's apply this to your draft:
- Mark the Back-Width Point: On your armhole depth line, measure out from your Center Back line using the formula:
(Your Back Width / 2) + 0.5 cm. Mark this point. - Draw Vertical and Midpoint Guides: From your Back-Width Point, draw a vertical line straight up to your shoulder slope guideline. Find the midpoint of this new vertical line and mark it.
- Draw the Diagonal Guide: From the Back-Width Point, draw a 2.5 cm line inwards, at a 45-degree angle, pointing towards the center of your bodice block.
- Draw the Curve: Now, use your French curve. You want to create a smooth, continuous line that connects three main areas:
- It should start at the end of your shoulder line (the shoulder point).
- It should touch the midpoint guide you marked in step 2.
- It should blend smoothly into the side seam line, guided by the diagonal line you drew in step 3. The curve will be fairly straight as it descends from the shoulder, then curve more sharply underneath the arm.
Take your time with the French curve, repositioning it as needed to create one fluid line. This is a process of visual and geometric refinement, much like perfecting a curve in a vector illustration program.
Drafting the Back Waist Dart
With the upper portion shaped, we now turn our attention to the waist. Your bust and back measurements create a wider rectangle than your waist measurement requires. The waist dart is how we remove that excess fabric, cinching the garment in at the waist to create shape.
First, we need to calculate how much fabric to remove in total.
This short section explains the logic and calculation for waist darts.
Find the heading creating darts. Read the paragraph explaining how to calculate the total amount to be removed at the waist. The formula subtracts your waist measurement (plus a little ease) from your bust measurement.
The calculation from the guide is:
- Total to Remove (on half pattern):
(Your Bust Measurement / 2) - ((Your Waist Measurement / 2) + 1 cm ease) - Back Dart Width:
Total to Remove / 3
This calculation divides the excess equally among three shaping points: the back dart, the front dart, and the side seam. For now, just calculate the width for your back dart.
Now, let's position and draw this dart. While there are several methods for placement, a very precise way is to align it with the front dart's position, which is based on the distance between your bust points. This creates a harmonious and balanced structure in the final garment.
Drafting Fitted Bodice Sloper - Professional Method, Part 1
This video from Christopher Sartorial demonstrates a professional method for placing the back waist dart. He uses the bust apex measurement to determine its location.
Watch from this segment. Notice how he uses the "distance between apex points" measurement to mark the dart's center line, and then distributes the calculated dart width on either side of that line.
Follow this logic on your pattern:
- Position the Dart's Center Line: Take your "Bust point to point" measurement and divide it by two. Measure this distance out from your Center Back line along your waistline, and make a mark. Do the same on your bust line. Draw a straight vertical line connecting these two marks. This is the center of your dart.
- Mark the Dart Width: Take the Back Dart Width you calculated earlier and divide it by two. At the waistline, mark this half-width distance on either side of the dart's center line.
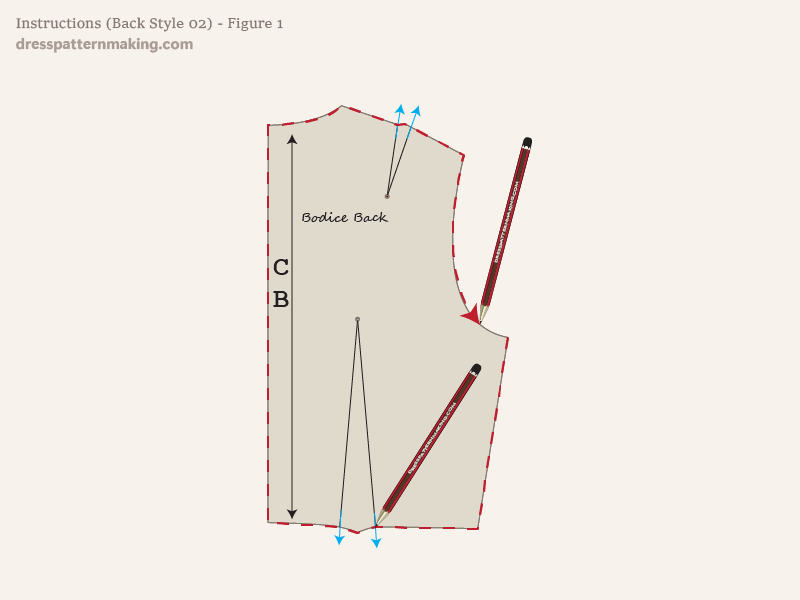
- Draw the Dart Legs: The top of your dart (the "dart point") is the mark you made on the bust line. Draw two straight lines connecting this dart point to the two width marks you made on the waistline.
You have now created a triangular dart that, when sewn, will pull the fabric inwards to shape your waist.
Key Takeaways
In this lesson, you've completed the construction of your back bodice sloper. The key achievements were:
- Constructing the back armhole curve by plotting key reference points and using a French curve to create a smooth, functional shape.
- Calculating the waist dart intake to understand how much fabric needs to be removed for shaping.
- Drafting the back waist dart by positioning it precisely and drawing the dart legs to create the final contours of the pattern.
Your back bodice piece is now a complete 2D representation of your back, ready to be used as a foundation for your design.
Next Steps
With the back block finalized, our next lesson will turn to the front of the body. We will plot and draw the front neckline and shoulder slope. Drafting the front is similar in principle but introduces the new challenge of shaping for the bust, which we will tackle step-by-step.