Recommended resources
The freely available resources this lesson will direct you to.
Hello! Welcome back to your course on DJing DnB.
In the last lesson, we isolated the skill of phase correction. You learned how to use the jog wheel to nudge and drag a track, aligning its beats with another track at a specific moment. This is the skill that corrects the immediate alignment when two drum hits are slightly off.
Today, we address the other half of the beatmatching equation: tempo matching. What do you do when the tracks aren't just slightly misaligned, but are running at entirely different speeds? This lesson will teach you how to use the CDJ-3000's BPM counter and pitch fader to match the tempo of two tracks.
Mastering this, combined with the phase correction you learned previously, will give you the two fundamental skills required to manually beatmatch.
1. The Tools for Tempo Adjustment
To control a track's tempo, you'll use a physical control—the pitch fader (or tempo slider)—and verify your adjustments using a visual reference—the BPM counter on the main display.
Let's locate these essential components on the CDJ-3000.
The official CDJ-3000 manual provides detailed diagrams of all its controls. We'll use it to pinpoint exactly where the tempo controls and displays are located.
First, refer to the 'Top panel' diagram. Find the TEMPO slider (item 42) and the TEMPO ±6/±10/±16/WIDE button (item 40). Next, look at the 'Playback screen' diagram to locate the BPM display (item 25) and the Playback speed display (item 23), which shows the percentage of change.
Now that you've seen the diagrams, here is a clear photo of the unit in action.
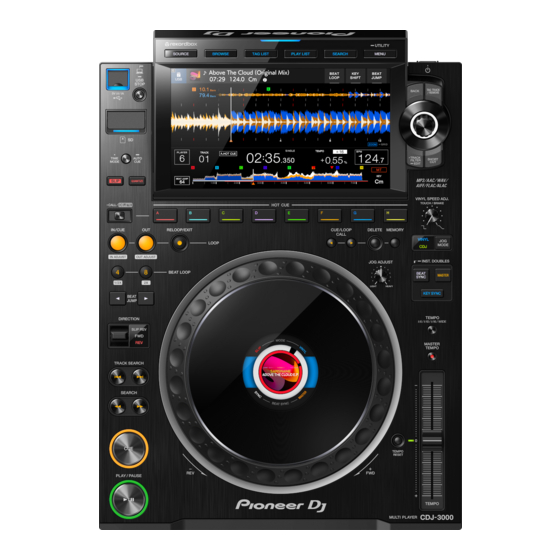
Here's how these controls work together:
- Pitch Fader (Tempo Slider): This is your primary control. Sliding it down (towards you) increases the tempo (+%), and sliding it up (away from you) decreases the tempo (-%). The center position is 0%, the track's original speed.
- BPM Counter: This display shows the current calculated tempo of the track, reflecting any adjustments you make with the pitch fader in real-time. This is your target.
- Pitch Range Button (
TEMPO ±...): This button cycles through the fader's sensitivity.- ±6%: The most precise range. A large physical movement of the fader results in a small change in BPM. This is ideal for fine-tuning and is the recommended setting for mixing DnB, where tracks are often close in tempo.
- ±10% / ±16%: Less precise, but allow for larger tempo jumps between different genres or styles.
- WIDE: Allows you to change the tempo by up to ±100%. This is typically used for creative effects rather than standard beatmatching.
- Master Tempo (
MT): When theMASTER TEMPObutton is activated (indicated by "MT" on the screen), the musical key of the track remains the same even when you change the tempo. This is crucial for preventing the "chipmunk" or "Darth Vader" effect, where vocals and instruments sound unnaturally high or low-pitched. It's best practice to always leave this on.
2. Why Tempo Matching Matters: Understanding Drift
In the last lesson, you used two copies of the same track, so their tempos were identical. But what happens when you try to align two tracks with different BPMs?
Even if you perfectly align their beats with a nudge of the jog wheel, they will inevitably fall out of sync. This is called tempo drift. The track with the faster BPM will slowly "run away" from the slower one. The speed at which they drift apart is a direct indicator of how different their BPMs are.
This next reading explains the relationship between the speed of the drift and the required tempo adjustment.
The 'How to Beatmatch' guide from Pirate.com provides a great explanation of how to interpret tempo drift. This will help you build an intuition for how much you need to adjust the pitch fader.
Please read point #3, 'Adjust the tempo', within the 'How To Beatmatch By Ear' section. Focus on the core idea: if tracks drift apart quickly, you need a larger BPM adjustment. If they drift apart slowly over several bars, you only need a small tweak.
While your ears are the ultimate judge, the BPM counter on the CDJ-3000 allows you to bypass the guesswork. You can simply match the numbers.
3. The Technique: Matching the Numbers
Here is the step-by-step process for matching the tempo of two tracks using the CDJ's display.
Let's assume Deck 1 is playing the "master" track out to the audience, and you want to mix in a new track on Deck 2.
- Identify the Master Tempo: Look at the screen for Deck 1. Let's say its BPM is 174.0. This is your target BPM.
- Check the Incoming Tempo: Look at the screen for Deck 2. Its original BPM might be 172.8.
- Set Your Precision: On Deck 2, press the
TEMPObutton until the range is set to ±6%. This gives you the most control for a precise match. - Adjust the Pitch Fader: Since the incoming track (172.8 BPM) is slower than the master track (174.0 BPM), you need to speed it up. Slowly slide the pitch fader on Deck 2 downwards (in the
+direction). - Watch the Numbers: As you move the fader, watch the BPM counter on Deck 2's screen. Continue moving the fader until the display reads 174.0.
- Confirm the Match: Both decks now show 174.0 BPM. Their tempos are matched. They will no longer drift apart due to a speed difference. Any misalignment you hear now is purely a phase issue, which you can correct with the jog wheel as you learned in the last lesson.
4. Practical Exercise: Tempo Matching Drill (25 minutes)
Time to build muscle memory. This exercise is focused purely on the mechanical skill of using the fader to hit a target BPM.
Setup:
- You'll need two different DnB tracks. The wider the BPM difference, the better the practice.
- Load one track on Deck 1. This will be your "master" track for the exercise.
- Load the second track on Deck 2.
- On Deck 2, set the pitch range to ±6%.
- Ensure Master Tempo is on for both decks.
The Drill:
- Press play on Deck 1 and note its original BPM (e.g., 175.0). You don't need to have it playing out loud, just use it as a reference.
- Look at the original BPM of the track on Deck 2 (e.g., 173.5).
- Your task is to move the pitch fader on Deck 2 until its BPM display reads exactly 175.0.
- Focus on making a smooth, controlled movement. Notice how a very small adjustment is needed to change the BPM by just 0.1.
- Once you hit 175.0, press the
TEMPO RESETbutton (located near the fader) on Deck 2. This will instantly snap the tempo back to its original 173.5 BPM. - Repeat this process 5-10 times with the same track until you feel comfortable hitting the target precisely.
- Now, swap the tracks. Load a new track on Deck 2, preferably one that is faster than the track on Deck 1. For example, if Deck 1 is 175.0 and Deck 2 is 176.2, you will need to slide the pitch fader upwards to slow it down.
- Practice this for the remainder of your time, using different tracks. The goal is to become proficient at moving the fader to match any target BPM, whether you're speeding up or slowing down.
Conclusion
Excellent work. You have now learned the second core mechanical skill of beatmatching. By combining today's tempo matching with the previous lesson's phase correction, you have the complete toolkit for manually syncing two tracks.
Key Takeaways:
- Tempo (speed) is controlled with the pitch fader and verified with the BPM counter.
- The pitch range should be set to ±6% for the most precise adjustments when mixing DnB.
- Master Tempo should be kept on to maintain the track's original musical key.
- The fundamental process is to identify the master BPM and adjust the incoming track's pitch fader until the numbers match.
Preview of the Next Lesson:
You know how to correct phase, and you know how to set tempo. Now it's time to put them together and maintain a mix. In the next lesson, we will return to the classic exercise of using two copies of the same track. You will practice keeping them perfectly in sync for an extended period (16 bars), using only the jog wheel for minor corrections. This will drill the active listening and subtle adjustments needed to hold a beatmatch steady.