Recommended resources
The freely available resources this lesson will direct you to.
Hello! In our previous lesson, we took the first step into the command-line world by demystifying the terminal and running your first command, pwd, to find out "where" you are in your computer's file system. You now understand why this text-based tool is the powerhouse behind so many of the instructions your AI coding assistant gives you.
This lesson builds directly on that foundation. If pwd is your GPS for telling you your current location, then the commands we'll cover today are your steering wheel and map. We'll master the essential trio of navigation commands—ls, cd, and pwd—that allow you to move around your project folders with speed and confidence, all without ever leaving your keyboard. By the end of this lesson, you'll be able to navigate your computer's file structure just as easily in the terminal as you do by clicking through folders in a GUI.
The Three Musketeers of Terminal Navigation
When you're working in the terminal, you'll use three commands more than any others to simply get around. Think of them as answering three basic questions:
pwd(Print Working Directory): Where am I?ls(List): What's around me?cd(Change Directory): How do I go somewhere else?
Mastering the interplay between these three is the key to unlocking the terminal's power. Almost every command you run for a project, from installing a new library to starting your app, will be preceded by you navigating to the correct project folder first.
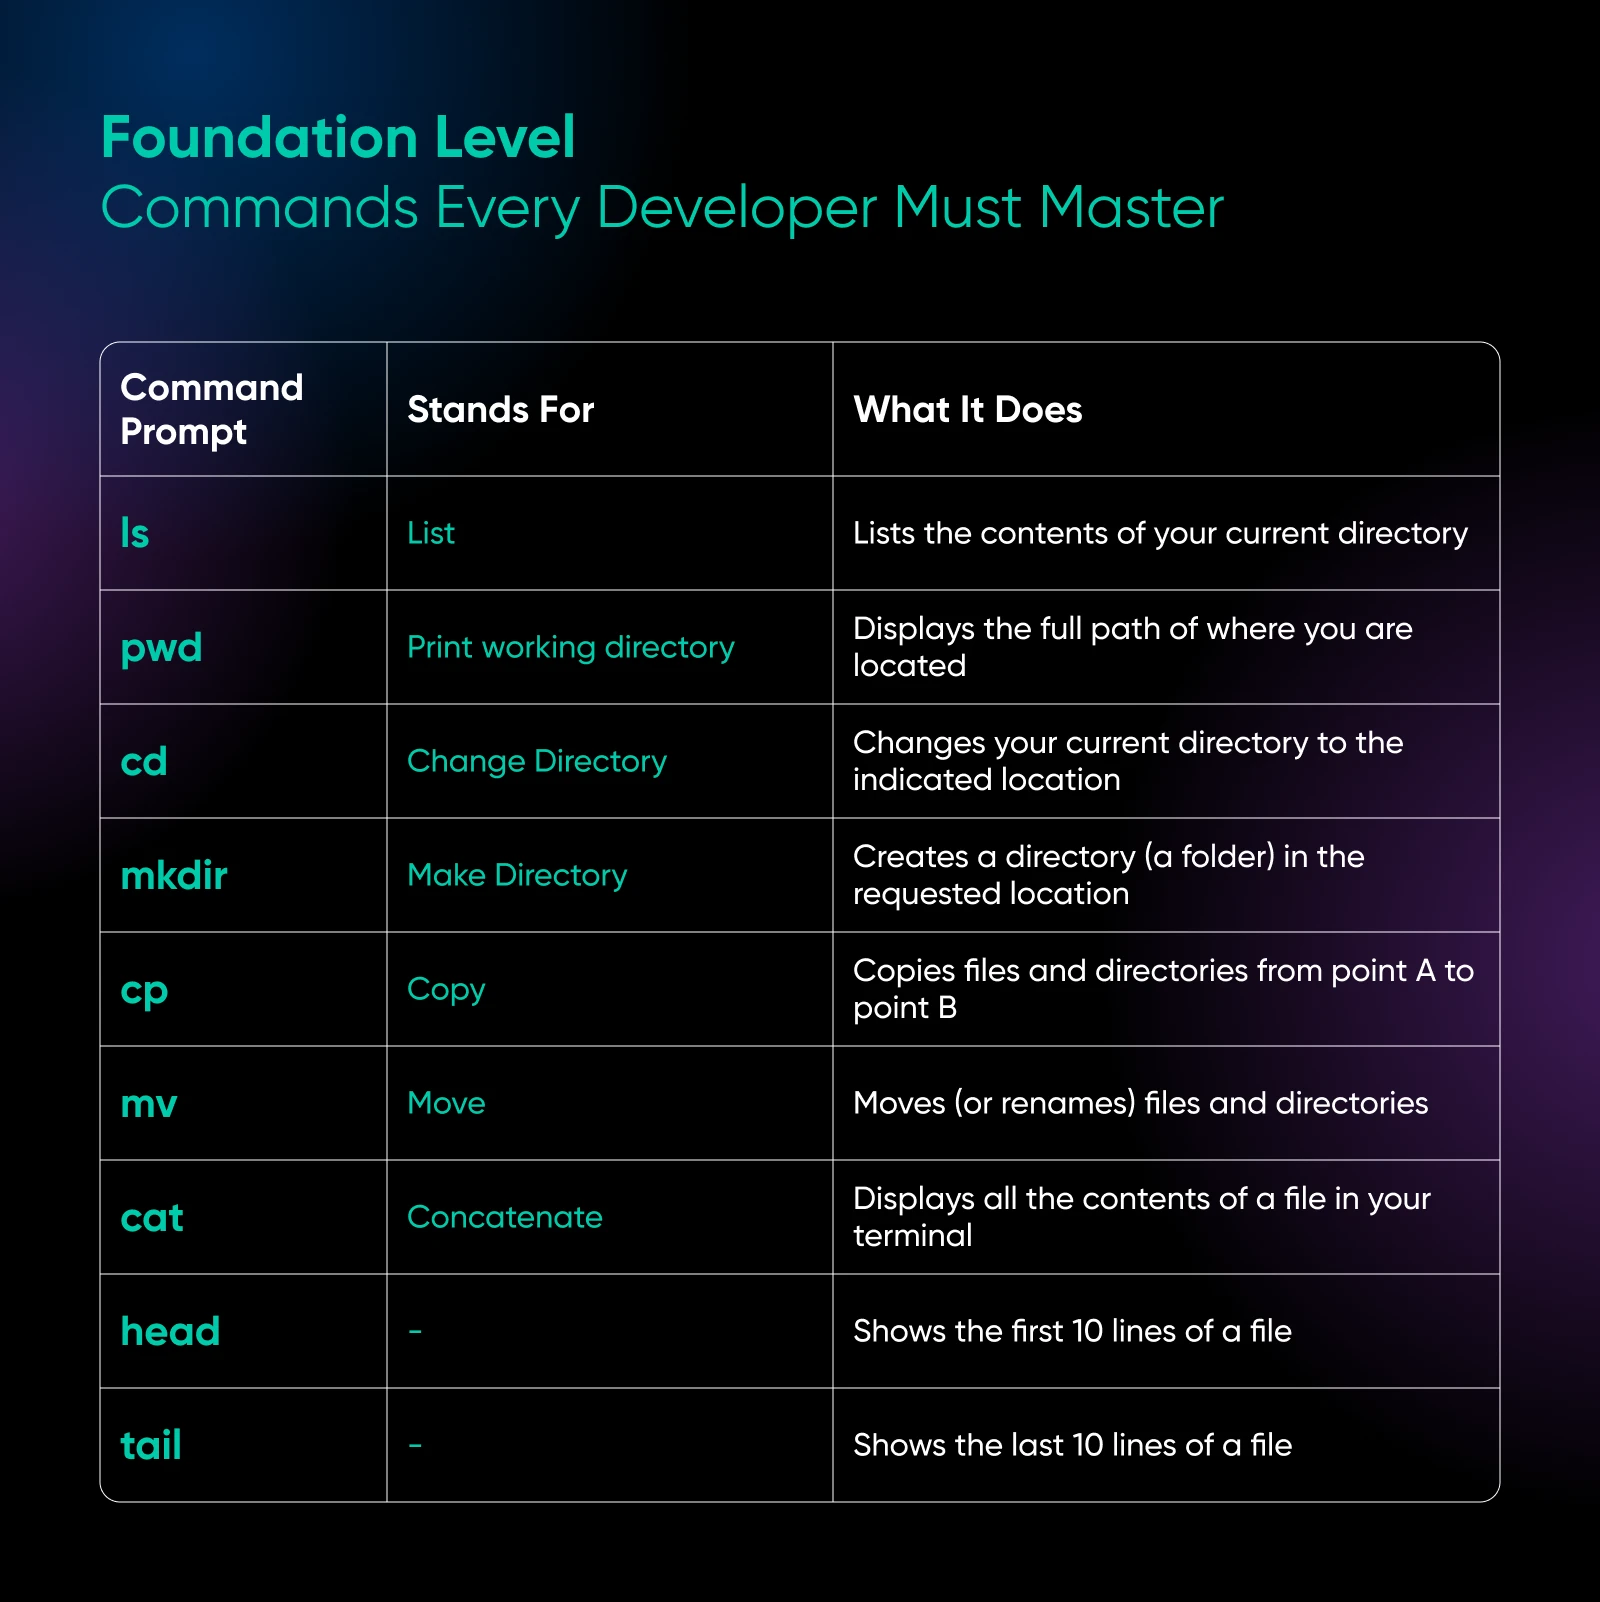
Let's break down each one.
pwd and ls: Your Location and Surroundings
As you learned last time, pwd tells you your exact "present working directory." It prints the full path from the root of your hard drive to your current location. It's the most reliable way to orient yourself.
Once you know where you are, you'll want to see what files and folders are in that location. For that, you use ls.
Open your my-first-website project in VS Code from our last lesson, and open the integrated terminal (Ctrl + ). Let's try it:
- Type
pwdand pressEnter. It should show you the path to yourmy-first-websitefolder. - Now, type
lsand pressEnter.
You should see index.html (and perhaps other files if you've added them) listed in the terminal. The ls command simply lists the contents of your current directory, just like looking inside a folder in Finder or Windows Explorer.
cd: Changing Your Location
This is the command that lets you move. cd stands for "change directory," and it's your primary tool for navigating the folder tree.
To see it in action, we will move out of our project folder and then back into it.
- In your terminal, which should still be inside
my-first-website, typecd ..and pressEnter. - Now type
pwdagain.
Notice how the path is now one level shorter? The .. is a universal shortcut that means "the parent directory" (i.e., the folder that contains the current folder). You've just moved one level up the directory tree.
- Now, type
ls. You should seemy-first-websitelisted as one of the folders in this directory. - To get back into your project, type
cd my-first-websiteand pressEnter. - Type
pwdone last time to confirm you're back where you started.
This sequence of moving up with cd .., looking around with ls, and moving down into a specific folder with cd foldername is the fundamental rhythm of terminal navigation.

For a great visual walkthrough of these commands, Jesse Showalter (a designer-developer) explains them very clearly.
How to use the Command Line | Terminal Basics for Beginners
This video provides a friendly and practical demonstration of the core navigation commands.
Watch the following segments to see these commands in action: pwd: Start at this timestamp for a recap of the "Print Working Directory" command. ls: Continue from here to see how to "List" the contents of a directory. cd: From this point, he explains how to "Change Directory". Confirmation: Finally, watch this short clip to see how he uses pwd again to confirm his new location after using cd.
Pro Tips for Faster Navigation
Typing out long folder names is tedious and prone to typos. Here are two "pro-tips" that will make your life in the terminal much easier. These are the kinds of things that separate beginners from people who are comfortable on the command line.
The following article, written by a designer, is a fantastic resource. We'll focus on the sections that give you these powerful shortcuts.
Chris Peak Designs - Terminal Tips
This article from Chris Peak Designs provides a perfect summary of the basic commands and some essential shortcuts for efficient navigation.
First, quickly review the Basic commands section for another clear explanation of pwd, cd, and ls. Then, read these two crucial tips: Tab to Autocomplete: This is the most important terminal shortcut. Read the section Tab to autocomplete to learn how pressing the Tab key can finish typing folder and file names for you. Drag-and-Drop: As a designer, you might appreciate this visual shortcut. Read the Drag-and-drop section to see how you can literally drag a folder from your desktop into the terminal to get its path.
Let's practice Tab-completion right now.
- In your terminal, go up one level with
cd ... - Now, instead of typing
cd my-first-website, typecd my-fand then press theTabkey. - The terminal should automatically complete the rest of the folder name for you! Now just press
Enter.
From now on, you should almost never type a full file or folder name. Always type the first few unique letters and hit Tab.
Keeping the Terminal and VS Code in Sync
One final, important point. The VS Code file explorer on the left shows the folder you have open. Your integrated terminal, however, is independent. You can use cd to navigate anywhere on your computer, and the file explorer will not follow.
This can be confusing. You might think you're about to run a command on your project, but your terminal is actually in a completely different location.
Terminal Basics in VSCode - Javascript In Depth
This video clearly illustrates the potential confusion when your terminal's location becomes "out of sync" with your editor.
Watch this segment from cd .. to see how using cd .. moves the terminal to a different folder than what is shown in the VS Code explorer. This demonstrates why you must always be aware of your terminal's current location.
This is why pwd is so important. Whenever you're about to run a critical command, take half a second to run pwd first. It will save you from countless headaches of running commands in the wrong place.
Conclusion
You've now learned the fundamental vocabulary of movement within the terminal. With pwd, ls, and cd, you can get your bearings, survey your surroundings, and move to any location on your computer. This skill is the bedrock of everything else we will do.
Key Takeaways:
- The three essential navigation commands are
pwd(Where am I?),ls(What's here?), andcd(Let's go somewhere else). cd ..moves you up one level in the folder structure.cd foldernamemoves you down into a specific folder.- Tab-completion is your best friend. Use it constantly to avoid typos and save time.
- Always use
pwdto confirm you're in the right directory before running important commands, as your terminal location can be different from the folder open in VS Code.
Now that you can confidently find your way to your project folder, you're ready to start using the powerful tools that operate there. In the next lesson, we will demystify Node.js, a piece of technology that Claude and other tools constantly rely on to run modern web projects. You'll finally understand why it's a prerequisite for so many "vibe coding" projects.