Recommended resources
The freely available resources this lesson will direct you to.
Hello again. Last time, you saw how a finished Brain Boy page preserved the essential story while changing some of the script’s visual choices. This lesson turns to the document itself: how do you make a page easy for an artist to draw and a letterer to follow?
You will learn one practical full-script format and see a complete sample page using it. There is no single mandatory comic-script layout. For your short-comic portfolio, the useful standard is whether a collaborator can quickly find each panel, understand what must be pictured, and identify every word that will appear in the comic.
Give the comic page a visible structure
A comic page is not necessarily the same thing as a page in your writing document. Label it by its position in the finished comic, then list its panels in reading order. A heading such as PAGE 1 — FOUR PANELS tells a collaborator both where they are in the story and how many separate images you intend.
Watch the selected passages of How to Format a Comic Book Script, a Quickstart Guide, from Justin Jordan’s Death or Comics. Jordan treats formatting as a tool for communication rather than a fixed set of industry rules. Allow about 5 minutes for these passages.
How to Format a Comic Book Script, a Quickstart Guide - Death or Comics
Justin Jordan explains why clarity matters more than allegiance to a particular template, then demonstrates page and panel labels.
Begin with tools, not rules. Then watch page labels, noting that the comic page number must be unmistakable. Continue with panel labels: each heading marks the next image the reader will encounter. For this lesson, you can leave aside his later discussion of elaborate page layouts.
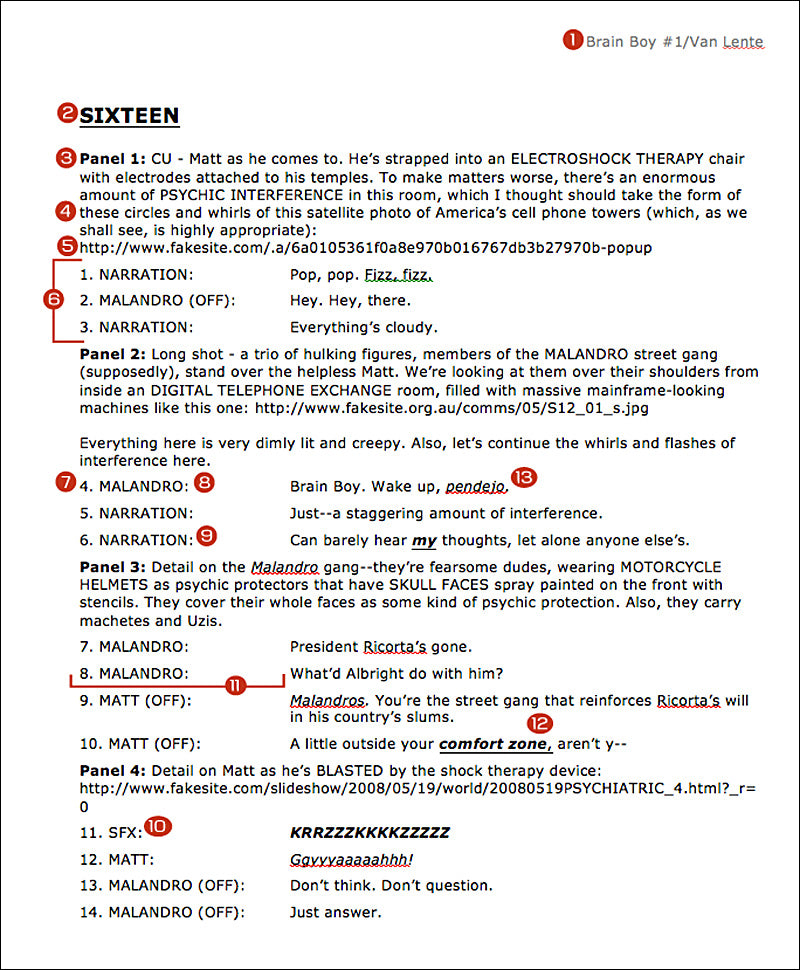
Under each panel heading, put a description for the artist: what is visible at that moment, including any detail the story depends on. Beneath that, put the lettering cues: words the reader will see as dialogue, captions, or sound effects. Keeping these functions separate prevents an instruction such as “the door slams” from being mistaken for text that should appear on the page.
The script you examined last time made those divisions conspicuous. Its large page label and panel headings help a collaborator navigate; its numbered lines beneath the descriptions identify individual lettering items. You can use different typography, but preserve that distinction.
Label words by the job they do
Now look more closely at the material beneath a panel description. Dialogue names the speaker and gives their spoken words. A caption gives text outside ordinary on-scene speech, such as a time marker or a character’s narration. SFX marks a sound effect intended to appear in the art. Write the actual wording for each; a letterer should not have to invent it from a description.
Jordan’s next passages distinguish these cues. Allow about 4 minutes.
How to Format a Comic Book Script, a Quickstart Guide - Death or Comics
Jordan shows how a script can identify speech, captions, and sounds, and explains why some writers number lettering items.
Watch spoken lines for the speaker-and-dialogue convention. In caption types, concentrate on the difference between a setting or time caption and character narration. Finish with sounds and numbering. Notice that numbering lettering items helps collaborators refer to them, but Jordan treats it as optional rather than universal.
For a compact written example, read the formatting guidance and sample page in Celtx’s How to Write a Comic Book Script (Format + Free Template). Allow about 6–8 minutes. The example uses unnumbered lettering cues; the Brain Boy page uses numbered ones. Both make the kind of cue clear.
How to Write a Comic Book Script (Format + Free Template)
Read Celtx’s format guide to see the labels together, then inspect its four-panel sample as a complete page.
Under “Comic Script Format,” start at the “Page Heading” subsection with “Begin each new comic page with a clear heading.” Read the format guidance through the end of “Lettering Notes.” Focus on what goes beneath a panel description and how an off-panel speaker is identified. Then go to “Comic Script Example.” Starting at “Here is a short example using full-script format,” read the sample page through its explanatory paragraph. Notice how the script specifies necessary story information without drawing the layout for the artist.
One useful distinction is easy to miss: PAT (OFF-PANEL) means Pat speaks but is outside the pictured frame. It does not mean Pat is invisible to the other characters or narrating in a caption. Use a label only when it removes a real ambiguity. Similarly, CAPTION (TIME) tells the team what kind of caption you intend; SFX tells them that the written noise belongs on the finished page. The artist and letterer can still make creative choices about appearance and placement.
A complete four-panel script page
Here is a sample page for a small, self-contained situation. It uses panel numbers that restart on each page and lettering numbers that run continuously down this page. Those are conventions you can keep consistent across a longer script.
PAGE 1 — FOUR PANELS

PANEL 1
Before sunrise at a bus stop. JUNE stands near the curb with a work bag.
A bus approaches. Beside her, PAT holds a paper grocery bag.

1. CAPTION (TIME): 6:10 a.m.

PANEL 2
The bottom of Pat's grocery bag tears open. Oranges spill onto the
pavement.

2. SFX: RRRIP!

PANEL 3
The bus doors are open. June stands at the entrance with one orange
stopped against her shoe. Behind her, Pat kneels to gather the others.

3. PAT: Go on. You'll miss it.

PANEL 4
June kneels beside Pat and offers him the orange. Behind them, the bus
doors are sliding shut.

4. JUNE: I'll catch the next one.
5. SFX: PSSSH.
The heading identifies comic page 1, not “the first sheet of the document.” FOUR PANELS is a helpful count, though not a requirement in every format. Each bold-in-principle PANEL label marks one image; the descriptions tell the artist which visible facts matter. The second panel, for instance, shows the instant the bag gives way rather than asking one drawing to show Pat carrying the bag, dropping it, and beginning to collect the fruit at three different times.
The lettering lines are separate from those descriptions. Line 1 is a time caption, not something spoken aloud. Line 2 spells out the bag’s tear as a printed sound effect; if the noise were unnecessary to the moment, the description could stand without it. Lines 3 and 4 give the speakers’ exact words. In panel 4, June’s line and the closing-door sound are listed in the intended reading order. The letterer has a clear starting point while still having room to design the page.
Notice also what the sample does not prescribe: exact camera angles, a grid of panel shapes, balloon coordinates, or Pat’s precise expression. Those choices may be useful to discuss if the story depends on them, but they are not needed to understand this page. The script’s job here is to protect the readable choice: June sees that Pat needs help and stays as the bus closes.
Numbering the lettering items is optional, as the resources show. If you choose to do it, use one sequence for captions, dialogue, and SFX—not a separate count for each type. If you choose not to, maintain clear labels and spacing so none of the text can be mistaken for an artist instruction.
A final formatting check
Before treating a sample page as ready for a collaborator, scan it in two passes. First, look only at its page heading, panel headings, and descriptions. Can you identify the images in order, and does each description give the artist enough to draw the intended moment? Then look only at the lettering cues. Can you tell who speaks, what text is a caption, which noises should be printed, and the order in which those items are read?
Clear formatting is not decoration. It lets the team find and discuss a particular moment without guessing which words belong in the art. You now have a workable model for a short-comic script page: a visible page heading, numbered panels, drawable descriptions, and distinctly labeled lettering. In the next module, you will look more closely at how images, words, panel sequence, and the spaces between panels share the storytelling work.