Recommended resources
The freely available resources this lesson will direct you to.
- Multi Sig Wallet | Solidity 0.8www.youtube.com
- SAFE Smart Contract Multi-Sig Storage 🔒 (Better than Hardware Wallet!⭐️) Step-by-Step Setup Guide ✅www.youtube.com
- Tutorial on Using a Gnosis Safe MultiSig with a TimeLock ...forum.openzeppelin.com
- OpenZeppelin Upgrades: Step by Step Tutorial for Hardhatforum.openzeppelin.com
Hello! Welcome to the final module of our course.
In our last lesson, we brought your project to life by performing the initial token distribution, funding your staking contract with the rewards pool. While your contracts are now operational on the mainnet, there remains one critical vulnerability we need to address: the centralization of power. Currently, your personal wallet (an Externally Owned Account or EOA) is the "owner" of your token and staking contracts. This gives you unilateral power to perform administrative actions, but it also represents a massive single point of failure. If your private key were ever compromised or lost, the entire project would be at risk.
Today, we will solve this problem. The learning outcome for this lesson is to transfer contract ownership to a secure multi-signature wallet. This is one of the most important steps in decentralizing your project and securing its assets for the long term.
1. The Problem with Single-Key Ownership
Your contracts, likely built using OpenZeppelin's Ownable utility, have a designated owner. This owner can call privileged functions, such as minting new tokens or changing key parameters. When this power is held by a standard EOA, you have a "single-signature" setup.
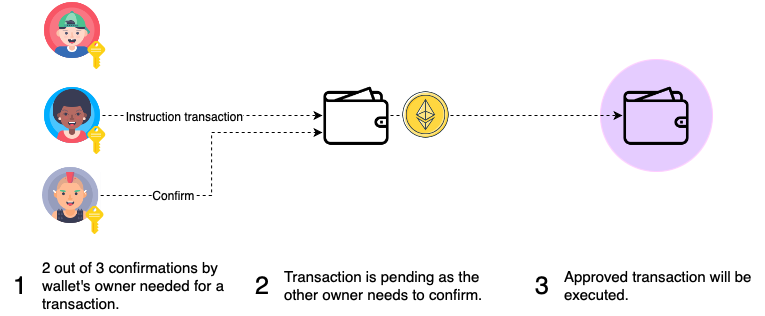
The risks of single-signature ownership are significant:
- Theft: If a hacker gains access to your private key, they can take control of your contracts.
- Loss: If you lose your private key (e.g., hardware failure, lost recovery phrase), control is lost forever. There is no "forgot password" option in blockchain.
- Centralization: It undermines the trust and decentralized ethos of a blockchain project. Your community and investors are trusting a single person, not a secure process.
The solution is to transfer ownership to a multi-signature wallet, which is itself a smart contract.
2. Introducing Safe: The Industry Standard Multi-Sig
A multi-signature (multi-sig) wallet is a smart contract that requires a predefined number of approvals (M) from a total set of owners (N) to execute a transaction. This is known as an M-of-N policy (e.g., 2-of-3, 3-of-5).
Safe (formerly Gnosis Safe) is the most trusted and widely used multi-sig platform on Ethereum. It's a smart contract account, not an EOA, meaning it's controlled by code, not a single private key.
To understand the fundamental difference between the accounts you've used so far and a Safe, and to see a complete walkthrough of the setup process, please watch the following video.
SAFE Smart Contract Multi-Sig Storage 🔒 (Better than Hardware Wallet!⭐️) Step-by-Step Setup Guide ✅
The video 'SAFE Smart Contract Multi-Sig Storage' by Crypto Casey provides an excellent introduction to the concept and a step-by-step guide to setting up your own Safe. It's the most practical way to learn this process.
Please watch the following segments: EOAs vs. Contract Accounts (2:27 - 5:51): This section explains the crucial difference between the wallet you currently use and the Safe you are about to create. This is foundational knowledge. Creating a New Safe (7:37 - 15:27): This is the core of the tutorial. Follow along to create your own Safe. We recommend you do this on a testnet like Sepolia first to practice without risk. Pay close attention to adding multiple owner wallets and setting the confirmation policy. Deployment & Dashboard (15:27 - 17:54): This segment shows the final deployment and a brief tour of the Safe dashboard, where you will manage your contracts in the future.
Your Task: Create a Safe
Follow the steps in the video to create a new Safe on the Sepolia testnet.
- Choose Owners: For a real project, you would add addresses from different hardware wallets, team members, etc. For this exercise, you can create and add a few different test accounts from MetaMask. A
2-of-3policy is a common and secure starting point. - Deploy the Safe: Confirm the deployment transaction. Once deployed, you will have a unique Ethereum address for your new Safe. Copy this address, as you will need it in the next step.
While the video shows the mobile app, you can also use the Safe web application, which offers the same functionality. The process is very similar and is also described in the "Create a Safe Multisig" article from the Safe Help Center if you prefer a text guide.
3. Transferring Contract Ownership with a Script
Now that you have a secure multi-sig address, the final step is to make it the new owner of your deployed contracts. Since your contracts use OpenZeppelin's Ownable, they have a function called transferOwnership(address newOwner).
We will write a Hardhat script to call this function on your token and staking contracts, passing your new Safe address as the newOwner. This is much more reliable and repeatable than trying to do it manually through Etherscan.
The pattern is similar to scripts we've used before and is a standard practice for managing contract administration.
- Create a new file in your
scriptsdirectory namedtransfer-ownership.js. - Add the following code. Remember to replace the placeholder addresses with your actual deployed contract addresses and your new Safe address.
// scripts/transfer-ownership.js
const { ethers } = require("hardhat");
require("dotenv").config();

async function main() {
  // --- CONFIGURATION ---
  // The address of the Safe multi-sig wallet you just created.
  const newOwnerAddress = "0x..."; // <-- PASTE YOUR NEW SAFE ADDRESS HERE

  // The addresses of the contracts you want to transfer ownership of.
  const tokenContractAddress = "0x..."; // <-- PASTE YOUR TOKEN CONTRACT ADDRESS HERE
  const stakingContractAddress = "0x..."; // <-- PASTE YOUR STAKING CONTRACT ADDRESS HERE
  // -------------------

  const [deployer] = await ethers.getSigners();
  console.log("Using account:", deployer.address, "to transfer ownership.");
  console.log("New owner will be:", newOwnerAddress);

  // Get contract instances
  // Make sure to use the correct contract names ("MyToken", "Staking", etc.)
  const myToken = await ethers.getContractAt("MyToken", tokenContractAddress);
  const staking = await ethers.getContractAt("Staking", stakingContractAddress);

  // --- EXECUTE OWNERSHIP TRANSFER ---

  // 1. Transfer ownership of the token contract
  console.log(`\nTransferring ownership of MyToken (${tokenContractAddress})...`);
  let tx = await myToken.transferOwnership(newOwnerAddress);
  await tx.wait(1); // Wait for 1 block confirmation
  console.log("✅ Ownership of MyToken transferred successfully.");
  console.log(`   Transaction hash: ${tx.hash}`);

  // 2. Transfer ownership of the staking contract
  console.log(`\nTransferring ownership of Staking (${stakingContractAddress})...`);
  tx = await staking.transferOwnership(newOwnerAddress);
  await tx.wait(1);
  console.log("✅ Ownership of Staking transferred successfully.");
  console.log(`   Transaction hash: ${tx.hash}`);

  console.log("\nAll ownership transfers complete.");
}

main()
  .then(() => process.exit(0))
  .catch((error) => {
    console.error(error);
    process.exit(1);
  });
- Run the script on the network where your contracts are deployed (first on Sepolia, then repeat the entire process for mainnet when you are ready).
npx hardhat run scripts/transfer-ownership.js --network sepolia
4. Verifying the New Ownership
After the script runs successfully, you must verify the change on-chain.
- Go to the Etherscan page for your token contract.
- Click on the Contract tab, then Read Contract.
- Find the
owner()function and click to query it. - The result should now be the address of your Safe wallet.
- Repeat this process for your staking contract.
Congratulations! Your contracts are now secured by a multi-sig. From this point forward, any onlyOwner function cannot be called from your personal wallet. Instead, you must initiate the transaction from the Safe UI, have it approved by the required number of owners, and then execute it. You have successfully decentralized control and implemented a crucial security layer for your project.
Test your understanding!
After transferring ownership of your token contract (which has a minting function restricted by onlyOwner) to a 2-of-3 Safe, you decide you need to mint more tokens. What is the high-level process you must now follow?
Show answer
You can no longer just call the mint function from your personal wallet.
- Propose Transaction: Go to your Safe's web or mobile interface. Create a new transaction that calls the
mintfunction on your token contract with the desired parameters (e.g., recipient address and amount). - Confirm Transaction: As the creator of the transaction, your signature is the first confirmation. You now need at least one other owner of the Safe to connect their wallet and sign/confirm the same transaction.
- Execute Transaction: Once the transaction has the required number of signatures (2 in this case), anyone (usually one of the owners) can trigger the
executetransaction to dispatch the call from the Safe to your token contract, finally minting the tokens.
Conclusion
In this lesson, you addressed one of the most significant security vulnerabilities in any new crypto project: centralized ownership. By moving control from a single EOA to a multi-signature Safe, you have established a foundation of security and trust.
Key Takeaways:
- Single-signature ownership by an EOA is a major security risk due to single points of failure (theft or loss of the private key).
- Safe provides a battle-tested smart contract wallet that enforces M-of-N signature policies for executing transactions.
- The process involves creating a Safe, adding owners, setting a policy, and then calling the
transferOwnership()function on your existing contracts to point to the Safe's address. - This transfer is best performed using a Hardhat script for reliability and repeatability.
- Once transferred, all administrative actions must be managed through the Safe's multi-signature confirmation process.
Preview of the Next Lesson:
With your on-chain infrastructure now deployed, funded, and secured, your technical launch preparations are complete. The final step is to prepare for your public launch. In our next and final lesson, we will focus on project management and community readiness by learning how to outline a basic launch plan, including documentation, a simple project website, and community communication.