Recommended resources
The freely available resources this lesson will direct you to.
Hi! Your repaired beat grid gives you dependable beat and bar markers. Now you can use that foundation to save places you actually want to start, leave, or return to in a house or techno track. Today’s goal is to prepare one track you know well, not to fill every available cue slot. Allow about 40 minutes, including time to listen and place the cues yourself.
A cue is useful only if it answers a practical question: Where can I bring this track in? Where should I prepare to take it out? If I need another starting point, where can I safely reset?
Find a musical beginning, not just a grid line
In 4/4 house and techno, four beats make a bar. Arrangements often change in groups of eight bars (32 beats), or across longer 16- and 32-bar sections. A new drum layer, a bass entrance, a breakdown, or the start of an outro can signal a useful boundary. The first beat of a bar is not automatically the first beat of a useful phrase: your grid shows every bar, while your ears identify the structural change.
How DJs Know EXACTLY When To Mix (Phrasing Explained)
Watch “How DJs Know EXACTLY When To Mix (Phrasing Explained)” by DJ Blakey for a short visual and audible introduction to finding those changes.
In the section where a techno track’s overview waveform is followed by an on-screen beat and bar count, watch the structure. Notice the added percussion after 32 beats. Treat eight bars as a useful listening interval, not a promise that every track changes in the same way.
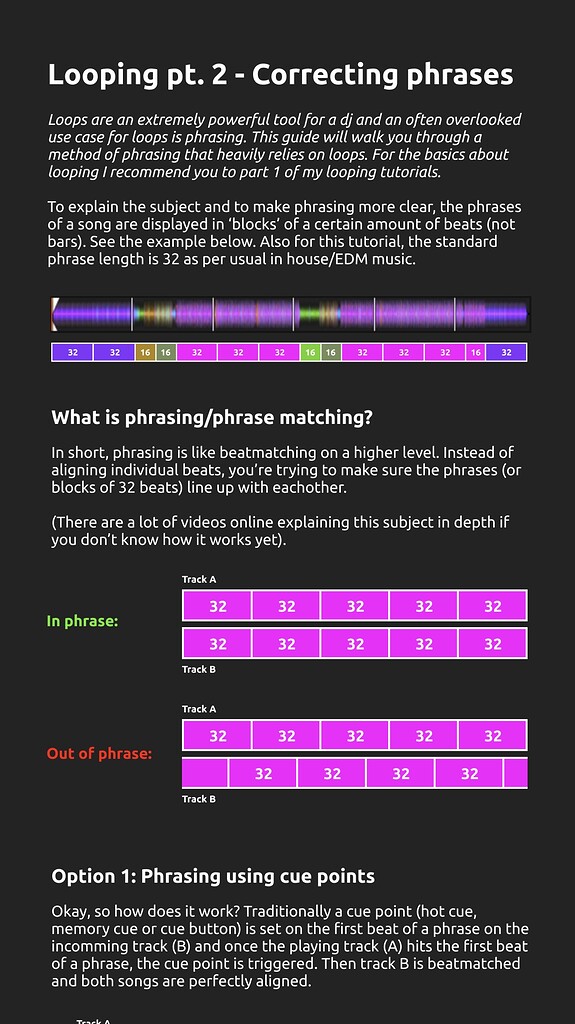
Before setting anything, play your track from its intro into its main section, then listen near its end. Look for three kinds of location:
- Entry: the first beat of a section you could start beneath another track—often a relatively uncluttered drum intro.
- Exit: the first beat of a section that gives you room to blend out—often an outro where prominent melodic or vocal elements have eased.
- Recovery: another dependable first beat you could return to if your planned entry is missed or you decide to use a shorter intro.
An exit cue marks when to begin managing the mix out, not necessarily when to stop the track. Likewise, a recovery cue is not a licence to jump abruptly while that deck is prominent in the speakers.
Crossfader’s guide offers a more extensive map of intros, builds, drops, and breakdowns. Read its structural approach, but keep only the markers that serve your track.
Hot Cues in DJing: The Complete Guide - We Are Crossfader
Read Crossfader’s “Hot Cues in DJing” for its consistent approach to marking track sections. We will adapt it to entry, exit, and recovery rather than copy every suggested pad assignment.
Under “How to Set Up Hot Cues Like a Pro,” find “Top Row: Track Structure (Phrasing).” Read the structural layout, ending with the paragraph about fast access to key sections. Focus on why a marker is placed at a section entrance; you do not need the later performance-cue ideas today.
Choose memory or hot cue according to the job
A memory cue is a saved marker that helps you navigate and plan. When the deck is paused, you can move among saved memory positions and then launch playback deliberately. A hot cue is for an immediate jump to—and ordinarily playback from—its saved position. That makes a hot cue useful for an alternative entry or recovery point, but easy to trigger accidentally on a playing deck.
Memory Cues vs Hot Cues - Where To Set & How To ACTUALLY Use Them
Watch Crossfader’s “Memory Cues vs Hot Cues - Where To Set & How To ACTUALLY Use Them” to see both types used in Rekordbox.
Watch hot cues for pad assignment, instant playback, and Quantize. Then watch memory cues for saved markers and navigation while stopped. The controller shortcut shown for saving a memory cue is one route; the Rekordbox MEMORY button described below is another.
For a simple preparation system, use memory cues to describe the track and hot cues where an instant launch would genuinely help. You can place both kinds at the same position, but do so only when each has a purpose. Labels such as INTRO 16B, BASS IN, OUT 16B, and ALT IN 8B are more useful at a glance than an unexplained row of coloured pads.
Here is one hypothetical track map. The bar numbers are examples, not a template to impose on your music:
| Position | What you hear | Useful marker |
|---|---|---|
| Bar 1 | Clean drums; bass arrives 16 bars later | Memory cue INTRO 16B; hot cue A for the full entry |
| Bar 9 | Clean drums; bass arrives 8 bars later | Hot cue B ALT IN 8B for a shorter entry or reset |
| Bar 17 | Bass or main hook enters | Memory cue BASS IN to show where the entry develops |
| Bar 97 | A clean, 16-bar outro begins | Memory cue OUT 16B to flag mix-out space |
The second hot cue gives you a recovery option only if eight bars leave enough time for what you intend to do. If you need a longer lead-in, return to the full intro instead. Choose a recovery point from the actual arrangement: a loud vocal, fill, or breakdown may sit on a perfect downbeat yet be a poor place to restart a blend.
Save the cues on your prepared track
Use the fixed-tempo track whose grid you verified last lesson. Work with the deck paused as you locate each point. Listen into the candidate section, count back if needed, then zoom in and position the playhead on its first downbeat. Check that this is the musical start you intended, not merely a convenient-looking waveform peak.
Rekordbox’s manual gives the controls for Export mode. Interface positions may vary by version, but the distinction between setting a cue, saving it to memory, and assigning a hot cue remains important.
Use the official Rekordbox 6.0 manual as a reference while you place your first cues. Read the short passages on Quantize, saving a memory cue, and saving a hot cue; skip the surrounding loop features.
On p. 77, under “Using beat grids (quantize),” read the Q steps. On p. 78, under “Set a cue point,” follow the pause-and-CUE steps from the instruction to pause playback through the basic cue explanation. Continue on p. 79, under “To save a cue point,” through the MEMORY step. Finally, on p. 83, under “Using a Hot Cue” and “To save Hot Cues,” read from the instruction beginning “During the play or pause mode” through the hot-cue guidance.
Turn on Q (Quantize) while placing beat-aligned cues on your verified grid. It can snap a cue to a nearby beat, but it cannot decide whether that beat begins an intro, an outro, or the wrong bar of a phrase. Make that musical decision yourself before saving.
For each memory cue, pause at the chosen position, set the ordinary cue with CUE, then click MEMORY. For a hot cue, pause at the desired position and assign an unused hot-cue slot in Rekordbox’s HOT CUE panel; if you are using a controller, select its Hot Cue pad mode before assigning a pad. Name the important points consistently. Colours can help, but clear positions and labels matter more than a colour scheme.
Now make one pass through your track and save a modest set: a workable entry, a marked exit, and a second entry or recovery position if the arrangement offers one. If it does not offer a safe alternative, leave that hot-cue slot empty.
Check what the buttons will actually do
Reload the track and verify the saved points rather than trusting their appearance. Navigate to each memory cue while paused, then play a few bars. Confirm that it starts on the downbeat you heard and that its label accurately describes what follows. Trigger each hot cue while monitoring the deck privately or with its channel out of the main mix; check both the first sound and the amount of time before the next major change.
Pay special attention to the exit and recovery markers. Does the exit section really leave space to blend, or does another prominent hook enter two bars later? Does the recovery point give you enough bars to regain control? If either answer is no, move or remove the cue. A smaller trustworthy map is better than a crowded one.
Takeaway
Place cues at musically useful phrase starts, then give each saved point a clear job. Memory cues make entry and exit locations easy to find; hot cues provide immediate access to entries and carefully chosen recovery points. Quantize helps with beat placement, but listening confirms the phrase—and testing confirms the cue is usable.
Next, you’ll organise prepared tracks with Rekordbox tags and playlists so you can find the right one when you need it.