Recommended resources
The freely available resources this lesson will direct you to.
- What Makes A Good Difficulty Option?www.youtube.com
- The Idea Of A Difficulty CURVE Is All Wrong | Better Game Designwww.youtube.com
- Level 7: Advancement, Progression and Pacinggamebalanceconcepts.wordpress.com
- Spriting/Pixel Art Tutorialsforums.rpgmakerweb.com
- How to Balance Your Game - A Comprehensive Guidewww.reddit.com

Hello! Welcome back to our final module.
In our last lesson, we designed the "Rogue Alchemical Golem," a unique boss with distinct phases and telegraphed attacks. We established a strong architectural and narrative foundation for a memorable encounter. However, a great design can be undermined by poor numbers. A boss that's too weak feels anticlimactic, while one that's impossibly strong is just frustrating.
This brings us to today's crucial topic: balancing enemy stats, encounter rates, and rewards to create a smooth difficulty curve for your demo. This is where we translate our design concepts into the concrete numbers that will define the player's experience.
The Goal: The "Balanced Fun" Curve
Game balance isn't about making a game uniformly "hard" or "easy." It's about managing the flow of challenge over time. The ideal experience guides the player through moments of tension, triumph, and recovery, always keeping them engaged.
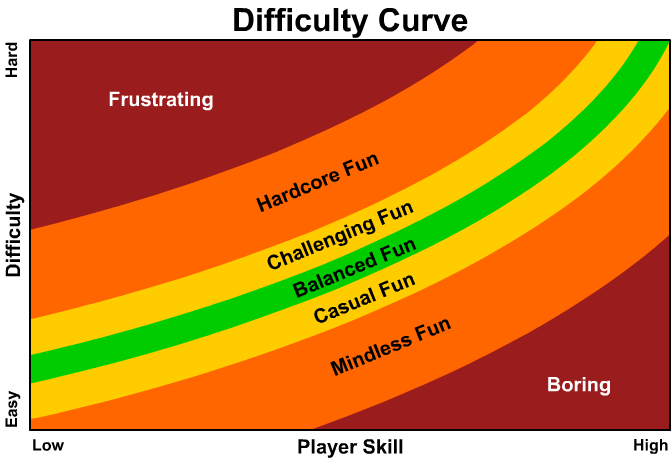
To achieve this, we won't guess at numbers for every enemy. Instead, we'll do what a good developer does: create a system. By defining a set of rules and formulas, we can ensure our game's difficulty is consistent, scalable, and easy to adjust.
Step 1: Establish the Baseline - The Player's Power
You cannot balance enemies without first understanding the player's strength at any given point in the game. The player's stat progression is the ruler against which all enemies are measured.
A common approach in JRPGs is to define stat growth curves for each character class. Some classes might excel in Strength, growing that stat quickly, while being weak in Magic Defense. You can define these curves using mathematical formulas, much like how you might define an animation easing function in CSS or JavaScript.

A structured way to manage this is with a "stat rank" system. You assign a letter grade (e.g., S, A, B, C) to each stat for a given class, and each grade corresponds to a specific value at the maximum level. The game engine then interpolates the stats for all levels in between.
How to Balance Your Game - A Comprehensive Guide
To see a practical implementation of this idea, please read the following section from 'How to Balance Your Game - A Comprehensive Guide'. It details a stat rank system for player characters.
Read 'Part 3: Player Stats'. Pay attention to how it assigns max-level values for different stat ranks (S, A, B, etc.) and for different stats (HP/MP vs. core stats). This establishes the player's power curve that we will balance against.
By defining these curves, you create a predictable baseline. For any given level, you know approximately what a player's HP, Attack, and Defense should be.
Step 2: Balance Progression and Economy - EXP & Gold
With the player's stats defined, the next question is: how quickly should they level up? This is controlled by Experience Points (EXP). The amount of EXP you award is directly tied to your desired game pace and encounter rate.
A systematic approach is to work backward:
- Decide on a "Pacing Target": How many battles, on average, should it take a player to gain a level? A common target is between 8 and 16 battles. Let's use 16 for this example.
- Define a Predictable EXP Curve: Instead of using arbitrary EXP values, use a formula so you know exactly how much total EXP is needed to reach any level.
- Calculate EXP per Enemy: From there, you can derive the required EXP drop for a single enemy.
EXP_to_next_level / Battles_per_level = EXP_per_battleEXP_per_battle / Enemies_per_battle = EXP_per_enemy
The guide you just read offers a complete, formula-driven system for this.
How to Balance Your Game - A Comprehensive Guide
Now, let's explore the mathematical approach to calculating EXP and Gold rewards. The same guide provides an excellent breakdown.
Please read 'Part 1: EXP' and 'Part 2: Gold, Items, & Equipment'. Focus on the logic of deriving enemy EXP drops from the total EXP needed to level up. Note the simple, corresponding rule for Gold drops.
As you've read, a formula like EXP = Enemy_Level * 6 (for a 4-person party) creates a scalable system where rewards automatically match the enemy's strength. Gold can then be tied to this with a simple rule, like Gold = Enemy_Level. This creates a predictable economy where the player can afford gear and items appropriate for their current level.
Step 3: Balance Enemy Stats - The Core Formulas
Now for the main event: setting enemy stats. We want enemies to be challenging but beatable. A robust method is to base enemy stats directly on the player's stats at the same level.
We'll look at two methods, one simple and one more complex, that both achieve this.
Method 1: The Baseline Multiplier
This approach is straightforward and highly effective. You create a "Default Class" that represents an average player character. Then, you define enemy stats as a simple multiplication of that baseline.
How i learned to do it (regarding enemy stats, gold, exp)
The following forum post outlines a simple and powerful formula for balancing. It's a great starting point for any JRPG.
Read the sections 'The Enemy Balancing', 'Bosses', and 'The Formula in a Nutshell'. Focus on the multipliers provided for regular enemies (e.g., HP x2, ATK x1.3) and bosses (e.g., HP x5, ATK x2.3) relative to the 'Default Class' baseline.
For example, if your "Default Class" player at level 10 has:
- HP: 800
- ATK: 25
Then a standard level 10 enemy would have:
- HP: 800 * 2 = 1600
- ATK: 25 * 1.3 = ~33
And a level 10 boss would have:
- HP: 800 * 5 = 4000
- ATK: 25 * 2.3 = ~58
This method ensures that enemies always scale their power in direct, predictable proportion to the player.
Method 2: The Archetype System
This method builds on the first one to allow for more enemy variety without manual tuning. Instead of one set of multipliers, you create several, each representing an "archetype" or role. This is analogous to a component-based architecture in front-end development, where you have a base component and apply modifiers for different variations.
How to Balance Your Game - A Comprehensive Guide
For a more advanced system that allows for greater enemy variety, let's return to the comprehensive guide. This method introduces enemy archetypes.
Read 'Part 5: The Enemies'. The key concept here is the use of a generic 'enemy' class as a baseline, which is then modified by percentage spreads for different subgroups like 'Strong Attacker', 'Weak Defender', 'Boss', etc. You don't need the specific plugins mentioned; the architectural pattern is the important part.
With this system, you could have:
- A "Slime" enemy using the Weak Defender archetype (High HP, Low ATK/AGI).
- A "Goblin Archer" using the Weak Speedster archetype (High AGI, Low DEF).
- A "Minotaur" using the Strong Attacker archetype (High ATK, Moderate HP, Low AGI).
All these enemies could be level 10, but their stat profiles would make them feel distinct in battle, forcing the player to adapt their tactics.
Test your understanding!
Let's say your baseline "enemy class" at level 20 has 100 ATK and 100 DEF. Using the stat spreads from the "Archetype System" reading, what would the ATK and DEF be for a level 20 "Strong Attacker" enemy?
Show answer
According to the "Strong Attacker" archetype from the guide:
- ATK modifier is 120%
- DEF modifier is 60%
So the final stats would be:
- ATK: 100 * 120% = 120
- DEF: 100 * 60% = 60
This creates an enemy that hits hard but is relatively fragile—a classic "glass cannon."
Step 4: Putting It All Together for Your Demo
Now, let's apply these systems to your demo.
- Define Player Power: Set up the stat curves for your player character class(es).
- Define Progression: Decide how many battles it should take to level up and use a formula to set the EXP rewards for your enemies (slimes, bats, etc.).
- Balance the Rogue Golem: Your golem is the "Special Boss" of the demo. Apply the appropriate multipliers. Using the archetype system, this might be:
HP: Base_HP * 2500%ATK: Base_ATK * 200%DEF: Base_DEF * 150%
The EXP reward should be significant, giving the player at least one level-up to create that satisfying feeling of accomplishment.
- Consider Encounter Rate: The formulas for EXP assume a certain encounter rate (e.g., 1 encounter every 50 steps). If you make encounters more frequent, you may need to lower EXP/Gold rewards to prevent the player from over-leveling. If encounters are rare, each one should be more meaningful and rewarding. This is a key tuning parameter.
- Use a Spreadsheet: As suggested in the LINK resource, laying all this out in a spreadsheet is invaluable. You can create columns for Level, Player HP, Player ATK, Enemy HP, Enemy ATK, Enemy EXP, etc. This gives you a bird's-eye view of your entire difficulty curve.
These formulas are not magic; they are a starting point. They provide a robust, balanced foundation. The final step is always playtesting. Does the first dungeon feel too long? Is the boss a pushover? Use your formulas to make adjustments. For example, if a dungeon feels like a slog, you can either lower the encounter rate or reduce enemy HP across the board by tweaking the HP multiplier in your formula.
Conclusion
You now have a powerful, systematic framework for balancing your JRPG. By treating balance as an architectural problem, you can avoid guesswork and create a consistently engaging experience for the player.
Key Takeaways:
- Game balance is about creating a smooth, engaging difficulty curve.
- Anchor all your balancing decisions to a predictable player power curve.
- Work backward from a pacing target (e.g., battles per level) to determine EXP and Gold rewards.
- Use formula-based systems (like Baseline Multipliers or Archetypes) to calculate enemy stats efficiently and consistently.
- These formulas provide a strong baseline, but playtesting is essential for final tuning and polishing.
Preview of the next lesson:
With our systems designed and our numbers balanced, the next step is to ensure everything works together as a cohesive whole. In our next lesson, we will integrate all systems (events, combat, menus, progression) to create a seamless gameplay loop. We'll make sure that winning a battle, leveling up, using menus, and triggering events all flow into one another to create a polished, playable demo.