Recommended resources
The freely available resources this lesson will direct you to.
- Easy Lottie Animation with Figma & Lottielab - Complete Step-by-Step Tutorialwww.youtube.com
- You Can FINALLY Export Figma Animations To Lottie! – LottieFiles Features + Tutorialwww.youtube.com
- Mastering Lottie Animations in Figma with LottieFiles Pluginwww.yuyadesigninnovations.com
- Elevate Your Designs & Create Animations with Figma to Lottielottiefiles.com
Hello! In our last lesson, you learned how to capture your browser-based CSS animations as high-quality MP4 video files. This is a fantastic skill for creating shareable content for presentations or social media.
Today, we'll explore the second major export format for motion designers: Lottie. Unlike a video file, a Lottie is a lightweight, scalable, and interactive animation format perfect for websites and apps.
This lesson addresses your goal of creating standalone motion graphics by teaching you the primary workflow for creating Lottie animations directly from Figma. We will focus on using the official LottieFiles plugin, a process that leverages your existing design skills within the familiar Figma environment. By the end of this lesson, you will be able to describe how to turn a Figma prototype into a production-ready Lottie animation.
1. What is Lottie and Why Is It a Game-Changer?
Before we dive into the workflow, it's important to understand what makes Lottie so powerful, especially compared to the MP4s we created in the last lesson.
- Lottie: A Lottie is a JSON file that contains animation data. Think of it as a set of instructions that tells a device how to draw and move vector shapes over time.
- MP4/GIF: These are raster formats, essentially a sequence of images (pixels).
The key differences are significant:
- File Size: Lottie files are incredibly small, often just a few kilobytes, while videos can be many megabytes.
- Scalability: Because Lotties are vector-based, they can be resized to any dimension without losing quality, just like an SVG. Videos become pixelated when scaled up.
- Interactivity: Lottie animations can be controlled with code. You can play, pause, reverse, or even link the animation's progress to a user's scroll. Videos are generally just played from start to finish.
For a product designer, this means you can create animations that are not only beautiful but also performant and interactive, directly within your UI. The bridge that makes this possible is a plugin that translates your Figma design into the Lottie format.
Mastering Lottie Animations in Figma with LottieFiles Plugin
To start, let's get a brief overview of why integrating Lottie into a Figma workflow is so valuable for designers. This article by Yuya Design Innovations provides excellent context.
Read the introduction and the section 'Why Use LottieFiles with Figma?'. This will set the stage for the practical steps that follow.
2. The Figma-to-Lottie Workflow
The process of creating a Lottie is a designer-centric one. You will do all the creative animation work inside Figma using its native tools. The plugin simply acts as an exporter.
Step 1: Install the LottieFiles Plugin
First things first, you need to add the LottieFiles plugin to your Figma environment. This is a one-time setup.
Mastering Lottie Animations in Figma with LottieFiles Plugin
The same article provides a clear, step-by-step guide for installation.
Follow the instructions under the heading 'Getting Started: Installing the LottieFiles Plugin'.
Step 2: Prepare the Animation in Figma
This is the core creative step. You will build your animation using frames and Figma's Smart Animate feature, which you may already be familiar with from creating interactive prototypes. The process involves creating key states of your animation on different frames and then linking them together in Prototype mode.
The following video provides an excellent, detailed walkthrough of someone creating a "like" button animation from scratch in Figma, preparing it specifically for Lottie export.
You Can FINALLY Export Figma Animations To Lottie! – LottieFiles Features + Tutorial
Watch how Punit Chawla designs and animates a heart icon. This demonstrates the fundamental technique of laying out your animation across multiple frames.
Watch from 00:50 to 06:52. Designing the states (00:50 - 05:05): Pay attention to how he sets up the start, middle, and end states of the animation using different frames. Notice he isn't using any special animation software, just Figma's standard design tools. Prototyping with Smart Animate (05:05 - 06:52): This is the crucial part where the motion is defined. Observe how he links the frames together in Prototype mode, using 'After Delay' triggers and 'Smart Animate' to create the smooth transitions.
Step 3: Export Using the LottieFiles Plugin
Once your prototype is working in Figma, you can use the plugin to convert it into a Lottie file. The plugin will analyze the prototype flow you created and translate the Smart Animate properties (position, scale, opacity, etc.) into the Lottie JSON format.
Let's continue with the same video to see this final step in action.
You Can FINALLY Export Figma Animations To Lottie! – LottieFiles Features + Tutorial
Now, see how the Figma prototype is exported as a Lottie file.
Watch from 06:52 to 09:05. Focus on how he opens the LottieFiles plugin, selects the correct 'Flow', and previews the final animation within the plugin before saving it.
The interface shown in the video is your main point of interaction for the export. You select your animation source—either individual frames or a prototype flow—and the plugin handles the conversion.
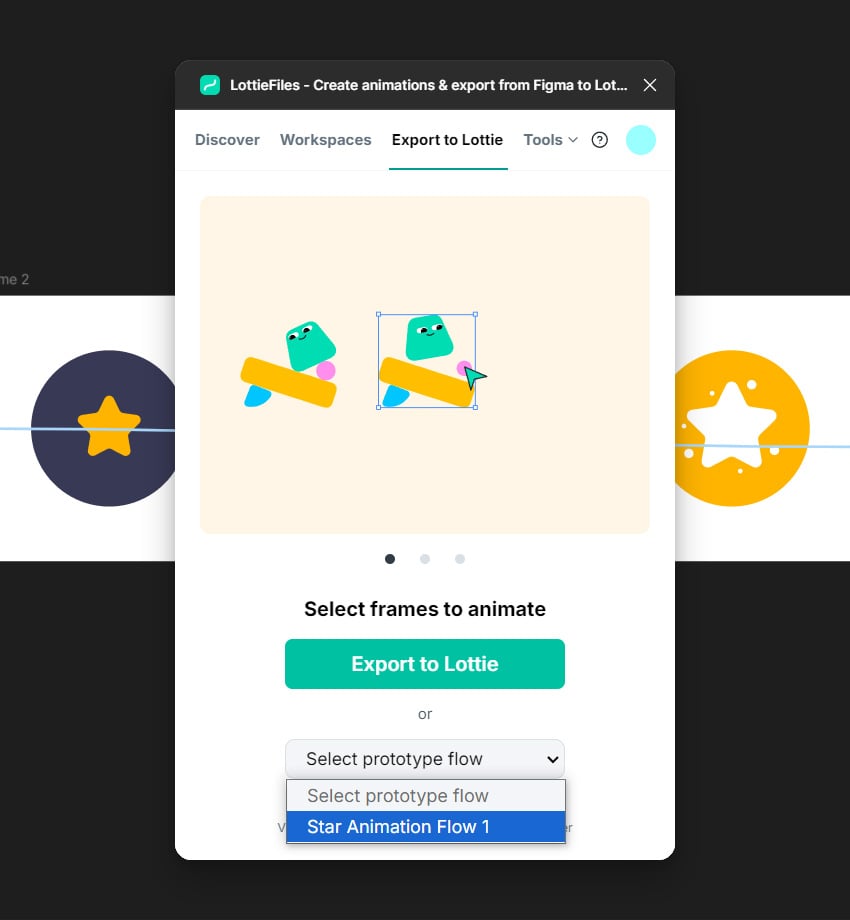
3. Best Practices & Known Limitations
While the plugin is powerful, it can't convert every possible Figma feature perfectly. To avoid frustration and ensure a smooth export, it's essential to design with Lottie in mind from the start. This involves knowing what's supported and what isn't.
The official LottieFiles guide is the best source for this information.
Figma to Lottie: Official Export Guide
This official guide from LottieFiles is your reference for a successful export. It details the supported features and best practices you should follow.
Read the sections 'Choose your render method' and 'Best practices'. Pay close attention to the tips on keeping layers consistent, using supported features, and setting up the prototype flow correctly. This is crucial information for avoiding errors.
Here are the most critical takeaways from the guide:
- Layer Consistency is Key: Ensure all animated layers exist on all frames in your sequence, in the same order. To make an element disappear, set its opacity to 0% rather than deleting it.
- Use Prototype Flows: For multi-frame animations, always define a "Flow starting point" in Figma's Prototype mode. This is what the plugin looks for.
- Stick to Supported Features: Avoid complex features like multiple fills/strokes on a single object, certain gradient types (angular/diamond), and some advanced effects, as they may not render correctly.
- Don't Group Randomly: The video author (Punit Chawla) also gave a great tip: avoid grouping elements unnecessarily, as it can sometimes confuse the export process. Keep your layer structure as clean and logical as possible.
Conclusion
You now understand the complete primary workflow for creating a Lottie animation using Figma. This method is incredibly powerful because it allows you to stay within your primary design tool, using familiar prototyping features to create sophisticated, web-ready animations.
Key Takeaways:
- Lottie is a lightweight, scalable, and interactive vector animation format ideal for web and mobile UI.
- The primary workflow is to design and animate using Figma's native tools (frames and Smart Animate) and then use the LottieFiles plugin to export.
- The plugin works by converting a Figma Prototype flow into a Lottie JSON file.
- To ensure successful exports, it's crucial to follow best practices, such as maintaining layer consistency and using only supported Figma features.
In the next lesson, we will take the Lottie file you've conceptually "exported" today and bring it to life on a webpage. You'll use Claude to write the basic JavaScript needed to load and control your Lottie animation, bridging the gap between design and interactive implementation.