Recommended resources
The freely available resources this lesson will direct you to.
Welcome back. In the last lesson, you mastered the art of the "muted scratch," learning to execute precise, syncopated trap-style hi-hat patterns on your guitar. You turned your instrument into a purely rhythmic engine, laying down grooves with 16th notes, 32nd-note rolls, and sextuplet stutters.
Today, we complete the picture. Our goal is to integrate those trap-style rhythmic accents into a simple melodic riff. This is where the percussive and melodic aspects of your playing merge. You'll learn to maintain a constant rhythmic pulse with your picking hand while your fretting hand juggles the dual responsibilities of sounding notes and silencing strings. Think of it as a form of multithreading for your hands: one process maintains the rhythmic clock, while the other handles the melodic data and percussive gating.
1. Deconstructing the Target Sound
Before we can replicate a trap beat on guitar, we need to understand its architecture. A typical trap beat is a layered system where different percussive elements interact to create the overall groove.
Let's look at a visual representation of a simple trap pattern.
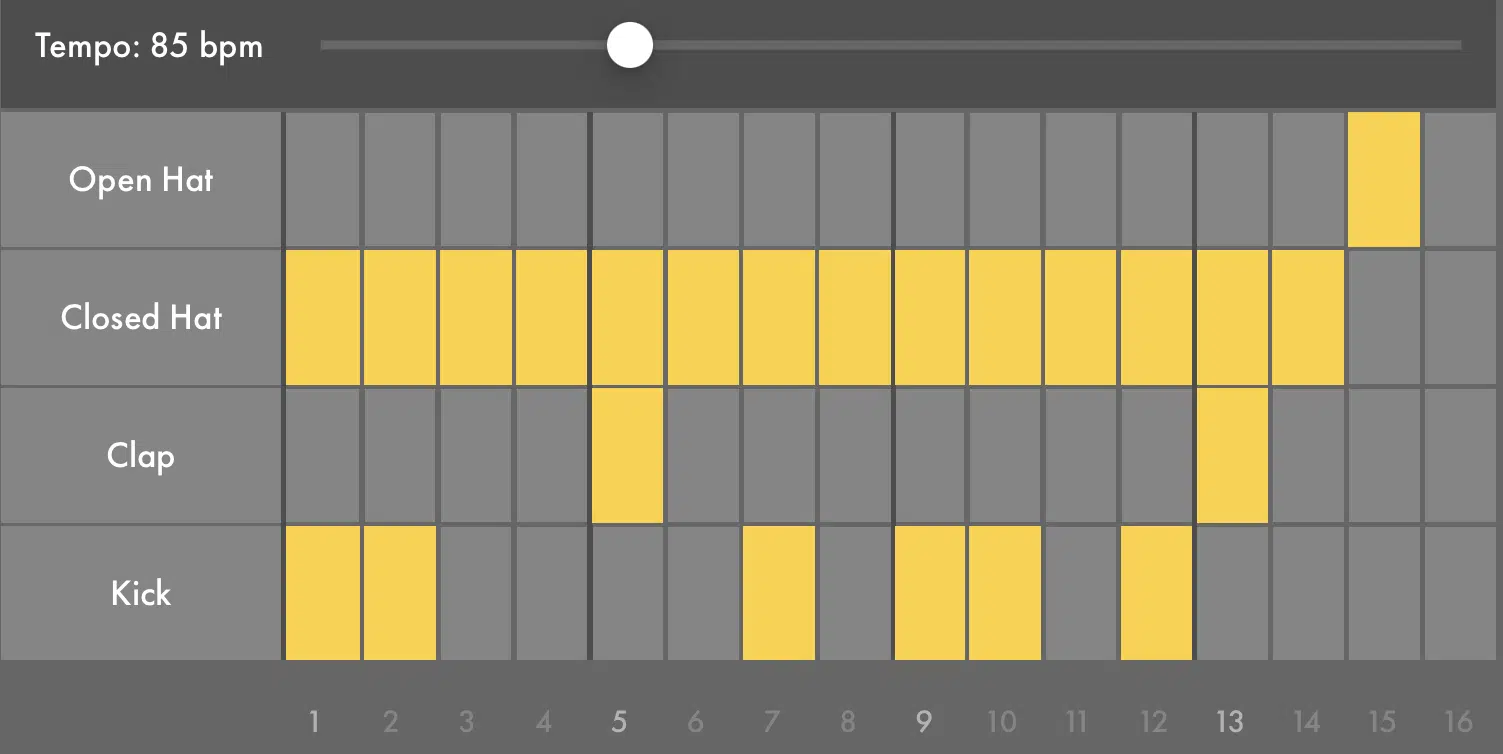
Let's break down what's happening here:
- Clap: The clap hits on steps 5 and 13. In a 4/4 measure, these are beats 2 and 4. This provides the steady, reliable backbeat.
- Kick: The kick pattern is syncopated. It establishes the downbeat on step 1, but then adds rhythmic push with hits on steps 7, 9, 10, and 12.
- Closed Hat: This is the element we focused on in the last lesson. Notice it plays a near-constant stream of 16th notes, but with strategic gaps (like at step 6 and 14) that create rhythmic interest. This constant subdivision is the engine of the groove.
Your goal on the guitar is to emulate this layered feel, primarily by combining the melodic notes (which often align with the kick and clap accents) with the percussive hi-hat scratches.
To solidify this concept, it's helpful to understand the foundational elements of these drum patterns from a producer's perspective.
Trap Drum Patterns: The Ultimate Guide
This article from eMastered provides a clear overview of how trap beats are constructed. It will reinforce the roles of the different drum parts we just discussed.
Focus on the sections The Trap Beat Basics and Kick and Snare. Pay attention to how the kick and snare/clap form the "foundation," while the hi-hats are described as the "most defining feature." This is the hierarchy you'll be replicating.
2. The Mechanic: Combining Notes and Scratches
In the previous lesson, your fretting hand's only job was to mute the strings. Now, it must perform two actions in rapid succession: fretting a note and then lifting off just enough to mute the strings for the percussive scratch. Your picking hand, meanwhile, will often maintain a steady alternate picking motion, indifferent to whether it's striking a ringing note or a muted string.
This technique is central to the sound of modern players like Manuel Gardner Fernandes, who describes a similar concept as "selective picking."
Manuel Gardner Fernandes: 5 techniques that define my ...
This article from Guitar World features Manuel Gardner Fernandes breaking down his core techniques. His description of "selective picking" is highly relevant to our goal today.
Read the section titled Selective picking. Notice his method: "picking a note and then tapping/hammering-on other notes with the fretting hand." While he mentions hammer-ons, the core idea of interspersing picked notes with fretting-hand articulations and muting is the same. He explicitly states that combining this with light palm muting creates "vibrant percussive guitar parts."
3. Building the Riff: From Components to Integration
Let's apply this in a structured way. Set your metronome to a slow tempo, around 70 BPM. We'll work on your 7-string, using the lower strings for our scratches.
Exercise 1: The Note-to-Scratch Transition
This first exercise isolates the most critical new skill: the seamless transition from a fretted note to a muted scratch.
- Melody: A single note. Let's use the 5th fret on the 4th string (G string).
- Rhythm: A one-bar pattern.
- Beat 1: Play the fretted note on the downbeat (a
Dnote). Let it ring for the duration of that one 16th note. - Rest of the bar: Immediately after playing the note, lift your fretting finger slightly to mute the string, and continue playing 16th-note scratches on the same string (or across the lower strings) for the remaining 15 sixteenth notes of the bar.
- Beat 1: Play the fretted note on the downbeat (a
- Picking Hand: A constant
D-U-D-Ualternate picking pattern for all 16th notes. - Fretting Hand: Press on the first "1-e-and-a", then lift to mute for the rest of the measure.
The goal is to hear a clean, pitched note followed immediately by a clean, percussive "chka" sound. There should be no sloppy transition or unintentional ringing. Loop this until the motion feels automatic.
Exercise 2: A Syncopated Melodic Riff
Now let's create a simple riff that combines melody and rhythm in a more musical way. This two-bar phrase introduces syncopation, forcing you to place notes off the beat.
We'll use a simple two-note motif on your G string: 5th fret (D) and 7th fret (E).
- Bar 1:
- Beat 1: Play D on the downbeat, followed by three 16th-note scratches. (Picking:
D U D U) - Beat 2: Four 16th-note scratches. (Picking:
D U D U) - Beat 3: Play E on the downbeat, followed by three 16th-note scratches. (Picking:
D U D U) - Beat 4: Four 16th-note scratches. (Picking:
D U D U)
- Beat 1: Play D on the downbeat, followed by three 16th-note scratches. (Picking:
- Bar 2:
- Beat 1: Four 16th-note scratches. (Picking:
D U D U) - Beat 2: One scratch, then play D on the 'e' of the beat, followed by two scratches. (Rhythm: scratch-note-scratch-scratch)
- Beat 3: A full beat of sextuplet scratches, just as you practiced in the last lesson. (Count: "3-trip-let-and-trip-let", Pick:
D U D U D U) - Beat 4: Play E on the downbeat, followed by three scratches.
- Beat 1: Four 16th-note scratches. (Picking:
Practice each bar individually before combining them. This riff is a direct implementation of the integration we're aiming for. It forces your fretting hand to be rhythmically precise, fretting notes on and off the beat while your picking hand acts as the metronome.
4. Final Integration: A Complete Phrase
Let's synthesize everything into a final, more challenging two-bar phrase. This pattern incorporates the melody, 16th-note scratches, and a 32nd-note roll, all working together. We'll stay at 70-85 BPM.
- Melody: A three-note pattern on the B string: 5th fret (E), 7th fret (F#), 8th fret (G).
- Percussion: Scratches on the muted lower strings (F#, B, E). Your picking hand will strike the B string for notes and sweep down slightly to hit the lower strings for scratches.
Here is the pattern:
- Bar 1:
- Beat 1: Note E (5th fret) on the downbeat, followed by three scratches.
- Beat 2: Four scratches.
- Beat 3: Note F# (7th fret) on the "and" of the beat. The rhythm is
scratch - scratch - note - scratch. - Beat 4: Four scratches.
- Bar 2:
- Beat 1: Note G (8th fret) on the downbeat, followed by three scratches.
- Beat 2: Four scratches.
- Beat 3: Two 16th-note scratches, followed by a 32nd-note roll on the last two 16ths of the beat. (Rhythm:
16th, 16th, 32nd, 32nd, 32nd, 32nd. Pick:D, U, D U D U). - Beat 4: Note E (5th fret) on the downbeat, then a pause for the rest of the beat.
This phrase encapsulates the final goal. You are playing a distinct melody, providing your own rhythmic accompaniment with the scratches, and adding a characteristic trap-style rhythmic flourish with the 32nd-note roll.
Conclusion
In this lesson, you've taken the abstract rhythmic vocabulary from our previous session and integrated it directly into your melodic playing. You've effectively programmed your hands to run two processes in parallel: a melodic line and a percussive engine. This skill is a cornerstone of the modern, rhythmically complex guitar style you are aiming to master.
Key Takeaways:
- Integrating trap accents involves a coordinated effort between the fretting and picking hands. The fretting hand handles both notes and muting, while the picking hand often maintains a steady subdivision.
- The structure of a trap beat—kick, snare/clap, and hi-hats—provides a blueprint for how to place melodic notes (accents) and percussive scratches (subdivision).
- Building this skill requires breaking it down: first mastering the note-to-scratch transition, then practicing simple syncopated phrases, and finally combining all elements into a complete musical statement.
This concludes our module on Percussive Guitar & Groove. You've built a formidable toolkit of techniques, from thumb-slaps to these intricate trap rhythms. In our next module, "Modern Harmonic Vocabulary," we'll shift our focus from rhythm to harmony. You'll begin by learning to construct the lush, complex 7th chords that provide the harmonic color for the styles you love.