Recommended resources
The freely available resources this lesson will direct you to.
- Step-by-Step Guide: How to 3D Print Dental Implant Surgical Guides | iDDwww.youtube.com
- Guided Dental Implant Surgery: Part 2www.youtube.com
- Accuracy of implant surgical guides fabricated using computer ...bmcoralhealth.biomedcentral.com
- Computer-Aided Design and Computer-Aided Modeling (CAD ...pmc.ncbi.nlm.nih.gov
Hello! Welcome back to our exploration of the implant surgical procedure.
In our last lesson, we focused on the final moments of placement, examining the mechanics of driving the implant home and the critical importance of measuring insertion torque. We established that achieving adequate primary stability is the mechanical prerequisite for successful biological healing.
Now, we address a fundamental question: How does the surgeon ensure that this mechanically stable implant ends up in the exact three-dimensional position that was meticulously planned beforehand? The answer lies in bridging the gap between the digital world of planning and the physical reality of the patient.
Today's lesson addresses the learning outcome: Describe how a surgical guide is used to translate the digital plan into a precise osteotomy and final implant position. This process is a fantastic example of a complete digital workflow in medicine, involving 3D imaging, computer-aided design (CAD), and computer-aided manufacturing (CAM) to create a patient-specific surgical instrument. This workflow is analogous to many engineering disciplines where a virtual design is translated into a physical object with high fidelity.
1. From Virtual Plan to Digital Blueprint
The foundation of guided surgery is the digital plan. As we touched upon in Module 5, modern implantology follows a "prosthetically-driven" philosophy. The process begins with the end in mind—the final tooth—and works backward to determine the ideal implant position.
This involves a data fusion process in specialized software:
- Anatomical Data: A Cone Beam Computed Tomography (CBCT) scan provides a detailed 3D map of the patient's jawbone, including the location of critical structures like nerves and sinuses.
- Prosthetic Data: An intraoral scan of the patient's mouth or a digital scan of a diagnostic wax-up provides the 3D model of the teeth and gums, defining the desired position of the final crown.
The surgeon then superimposes these datasets. In this virtual environment, they can place a digital implant, precisely controlling its position, angulation, and depth to optimize both bone support and the prosthetic outcome.

Once the virtual implant placement is finalized, the software is used to design the surgical guide itself. This is a custom-fit template, typically made of a biocompatible polymer, that will snap onto the patient's remaining teeth (tooth-supported), rest on the jawbone (bone-supported), or sit on the gums (mucosa-supported). The critical features of this guide are the cylindrical channels, or sleeves, that are perfectly aligned with the axis of the planned implants.
2. Manufacturing the Guide: From CAD to CAM
The digital design of the guide, once finalized, is exported as a file (commonly an STL file). This file serves as the blueprint for manufacturing the physical guide.
To understand how this digital file becomes a sterile, clinical tool, please watch the following video. It demonstrates the entire workflow, from digital design to the 3D printing of a surgical guide.
Step-by-Step Guide: How to 3D Print Dental Implant Surgical Guides | iDD
The video 'Step-by-Step Guide: How to 3D Print Dental Implant Surgical Guides' from the Institute of Digital Dentistry provides an excellent visual overview of the CAD/CAM process.
Please watch the video from the beginning to 02:47. As you watch, focus on: Digital Design (0:11-1:07): Observe how the virtual implant placement is used to automatically generate the guide design, including channels for guide sleeves. Manufacturing (1:07-2:47): Note the key steps of stereolithography (SLA) 3D printing: setting up the print, the layer-by-layer printing process, and the crucial post-processing steps (washing in IPA, curing with UV light) needed to ensure the guide is strong, accurate, and biocompatible.
As the video shows, 3D printing (an additive process) is a common method. Another method is CNC (Computer Numerical Control) milling, a subtractive process where a robotic arm mills the guide from a solid block of polymer.
To get a more formal, academic description of the entire technical protocol, from planning to manufacturing, let's turn to a peer-reviewed paper.
Computer-Aided Design and Computer-Aided Modeling (CAD/CAM)...
The paper 'Computer-Aided Design and Computer-Aided Modeling (CAD/CAM)...' outlines the complete workflow as a step-by-step technical protocol.
Please read Section 3, 'Technical Protocol' (Steps 3.1 to 3.4). This section provides a concise summary of the entire process you just saw visually: planning the prosthesis, acquiring the scans, performing the virtual planning, and finally, manufacturing the stereolithographic drilling guide.
At the end of this CAD/CAM process, the surgeon has a physical, patient-specific jig that precisely embodies the digital treatment plan.
3. Executing the Plan: Using the Guide in Surgery
With the physical guide in hand, the surgeon is ready to translate the plan into a precise osteotomy. The guide acts as a high-precision mechanical constraint on the surgical instruments.
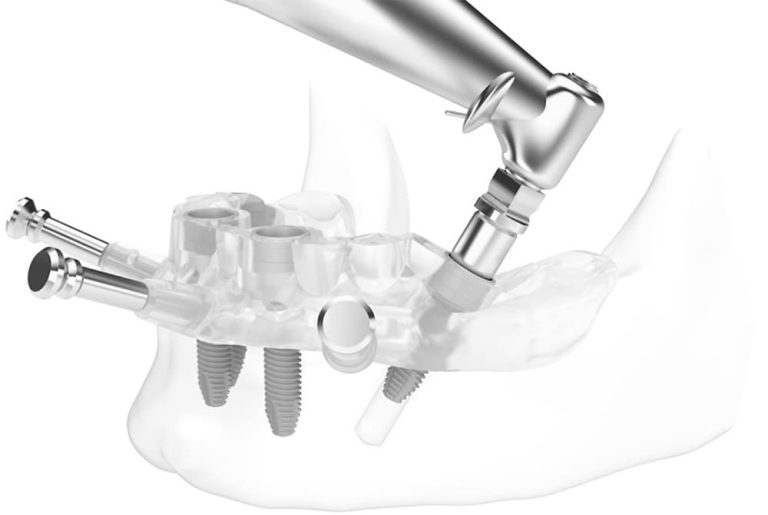
The clinical use of the guide is demonstrated beautifully in the following video. It's a real surgical recording (viewed through a microscope) of a guided implant placement.
Guided Dental Implant Surgery: Part 2
The video 'Guided Dental Implant Surgery: Part 2' by Dr. Stephen Phelan offers a clear, real-world demonstration of a guide in action.
Please watch the video from 00:29 to 05:34. This is a clinical video, so be prepared for a real surgical view. Focus on these key steps: Guide Placement and Stability (0:29): The surgeon places the guide and confirms it's 'very stable, not rocking around'. This is a critical first step. Guided Osteotomy (1:13): Note the use of special drills that fit through the guide's sleeves. The surgeon uses a sequence of drills of increasing diameter. Crucially, observe the 'stop' on the drill handle (e.g., at 2:20), which hits the top of the guide sleeve to provide precise depth control. Guided Implant Placement (4:15): In this fully guided case, the implant itself is carried and inserted through the guide, ensuring it follows the exact path of the osteotomy.
The video effectively shows how the guide de-skills the most difficult part of implant placement: achieving the correct 3D position and angle. By physically constraining the path of the drills and the implant carrier, the guide ensures that the physical outcome mirrors the virtual plan with a high degree of accuracy. The surgeon's task shifts from freehand spatial navigation to executing a pre-defined mechanical protocol.
Test your understanding!
A surgeon is performing a guided surgery. The digital plan calls for an osteotomy to be drilled to a depth of 12mm. How does the surgical guide system ensure the surgeon does not drill too deep or too shallow?
Show answer
The system ensures depth control through the physical interaction between the guided drills and the guide itself. The surgical drills designed for guided systems have built-in physical "stops" or are used with drill handles of a specific length. When the drill reaches the planned depth, this stop makes contact with the top of the metal sleeve in the surgical guide, physically preventing the drill from advancing any further. This provides a clear, tactile endpoint that corresponds exactly to the depth determined in the virtual plan.
4. Accuracy and Limitations: A Critical View
While guided surgery dramatically improves accuracy over freehand placement, it is not infallible. As someone with a background in simulation and data analysis, you know that any process chain is subject to cumulative errors.
Accuracy of implant surgical guides fabricated using computer ...
To quantify the accuracy and understand the sources of error, let's look at the paper 'Accuracy of implant surgical guides fabricated using computer...'. This study specifically investigates the precision of CNC-milled guides.
First, read the 'Abstract' to get the key results. Note the reported deviation values. Then, read the 'Discussion' section. Focus on the paragraphs that contrast the error sources in RP (SLA/3D printing) versus the CNC-milled workflow, and the part that discusses 'positioning error of the surgical template' as a principal factor.
As the paper highlights, deviations between the plan and the result do occur. The abstract reports a mean 3D deviation of about 1.5 mm. These deviations arise from a cascade of small, cumulative errors:
- Acquisition Errors: Inaccuracies in the initial CBCT or intraoral scan.
- Planning Errors: Errors in the software registration (alignment) of the different datasets.
- Manufacturing Errors: The physical tolerance of the 3D printer or milling machine.
- Surgical Errors: This is often the largest contributor. If the guide is not seated perfectly, if it rocks during drilling, or if there is play between the drills and the guide sleeves, the final accuracy will be compromised.
Despite these potential errors, the resulting accuracy is a significant improvement over freehand surgery, especially in complex cases, making the procedure more predictable and safer.
Conclusion
Today, we've walked through the entire workflow of guided surgery, seeing how a digital concept is transformed into a precise clinical reality.
Key Takeaways:
- A surgical guide is a patient-specific jig, manufactured via CAD/CAM (e.g., 3D printing or CNC milling), based on a virtual plan that merges anatomical (CBCT) and prosthetic (scan) data.
- The guide's primary function is to constrain the surgical drills, dictating their precise position, angulation, and depth.
- This is achieved using sleeves within the guide and drill systems with physical stops for depth control.
- The process translates the surgeon's digital plan into a highly accurate and predictable osteotomy, which is the prerequisite for a precise final implant position.
- While highly accurate, the process is subject to a chain of small, cumulative errors from scanning to surgical execution.
Preview of the Next Lesson:
The implant is now placed, ideally with high primary stability and in the exact intended location. The final step of the surgery is to manage the interface between the implant and the overlying soft tissue. In our next lesson, we will describe the placement of a healing abutment (for a one-stage protocol) or a cover screw (for a two-stage protocol) to conclude the surgery. This decision has major implications for the subsequent healing and prosthetic phases.