Recommended resources
The freely available resources this lesson will direct you to.
Hello! Welcome back to our journey of building your own cryptocurrency.
In the last lesson, you accomplished a huge step: you deployed your ERC-20 token contract to the Sepolia public testnet. Your contract is now "live" on a decentralized network, accessible from anywhere in the world. However, just because it's deployed doesn't mean it's usable or trusted.
Today's lesson focuses on the crucial post-deployment step: verifying your deployed token's functionality on a testnet block explorer. This process is similar to running smoke tests on a newly deployed backend service and then publishing its API documentation for others to see and use. You'll confirm your token works as intended and make it transparent for potential future users.
By the end of this lesson, you will be able to:
- Find and inspect your deployed contract on the Etherscan block explorer.
- Import and manage your token in your MetaMask wallet.
- Perform token transfers on the testnet.
- Verify your contract's source code on Etherscan to build public trust.
1. What is a Block Explorer?
A block explorer is a web application that allows you to browse and search a blockchain. For Ethereum and its testnets, the most popular block explorer is Etherscan. Think of it as a specialized search engine and database browser for the blockchain. You can use it to view details about blocks, transactions, and smart contracts.
Our first step is to find the token you just deployed.
- Go to the Sepolia testnet's Etherscan: https://sepolia.etherscan.io.
- Take the contract address you saved from the previous lesson's deployment.
- Paste this address into the search bar at the top of the page and press Enter.
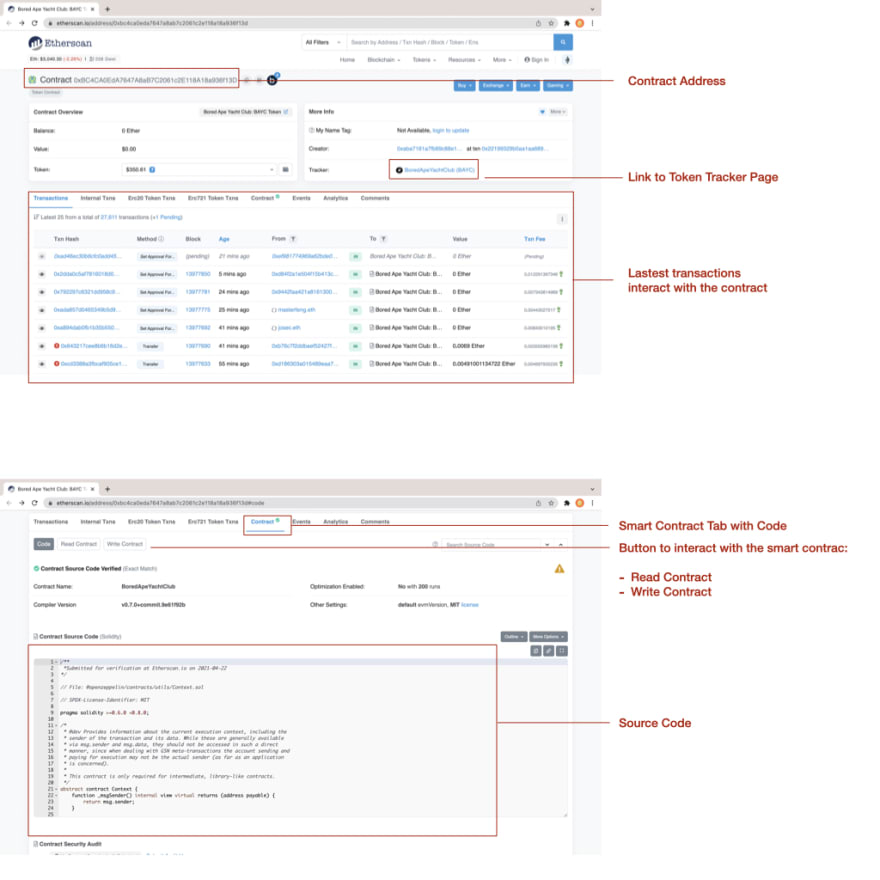
You should now be on a page dedicated to your smart contract. It will show its balance (which should be 0 ETH), and a list of transactions. You should see at least one transaction: the "Contract Creation" transaction.
For a visual guide on this process, you can refer to the following article.
Deploying ERC20 Token With Hardhat: A Step-by-Step Guide
This article, 'Deploying ERC20 Token With Hardhat,' provides a clear, screenshot-guided walkthrough for locating your contract on Etherscan.
Read the section 'Verifying the Contract on Etherscan'. It shows exactly how to use your contract address to find your token's page on the block explorer.
2. Bringing Your Token to Life in MetaMask
Right now, your token exists on the blockchain, but your MetaMask wallet doesn't know about it yet. We need to "import" it so we can see our balance and interact with it. The video below provides an excellent walkthrough of this entire interaction phase.
ERC20 Token Tutorial | Create Your Own Cryptocurrency [2025]
Watch this section of 'ERC20 Token Tutorial' to see how to import your token into MetaMask, check the balance, and perform a test transfer. This is the most direct way to confirm your token is functional.
Watch from 16:06 to 18:54. Follow along with the steps in your own MetaMask wallet using your deployed contract address.
Here's a summary of the steps you'll perform:
A. Import the Token
- Open your MetaMask extension, ensuring you are on the Sepolia network.
- Click on the "Tokens" tab, then click "Import tokens".
- On the "Custom token" tab, paste your token's contract address into the "Token contract address" field.
- MetaMask should automatically detect the Token Symbol (e.g., "MTK") and Decimals (18). If it does, this is a great sign!
- Click "Add custom token," then "Import tokens."
You should now see your token's balance in your wallet! The account that deployed the contract (and minted the initial supply) should hold all the tokens.
B. Perform a Test Transfer
The true test of an ERC-20 token is whether it can be transferred.
- Create a second account in MetaMask: Click the account icon in the top-right and select "Create account". Name it something like "Account 2".
- Copy the address of Account 2: Click the account name at the top to copy its address to your clipboard.
- Switch back to your main account (Account 1): This is the account holding the tokens.
- Send tokens: Click on your new token in the assets list, then click "Send." Paste Account 2's address into the destination field and enter a small amount to send (e.g., 100).
- Follow the prompts and click "Confirm" to approve the transaction.
After a few moments, the transaction will be confirmed. You can then switch to Account 2, import the token just as you did before, and you will see the 100 tokens you just sent.
Congratulations! You have now empirically proven that your token contract works. You can check your token's page on Etherscan again and you'll see a new "Transfer" transaction listed, and the number of "Holders" will have increased to 2.
3. Public Verification: Why You Must Verify Your Source Code
You've proven to yourself that the token works. But how do others trust it? Right now, on Etherscan, all anyone can see is the compiled bytecode of your contract. This is not human-readable.
Source code verification is the process of publishing your Solidity code to Etherscan and proving that it matches the deployed bytecode.
Why is this essential?
- Trust: It allows anyone to read your code and verify it does what it's supposed to do (and doesn't contain malicious logic). This is non-negotiable for a token you want people to buy or use.
- Interaction: It unlocks powerful features on Etherscan, enabling users to call your contract's functions directly from the web interface.
We will use a Hardhat plugin to automate this process.
A. Setting up for Verification
The verification process requires three steps: installing a plugin, getting an API key, and updating our configuration.
-
Install the Hardhat-Verify Plugin
In your project's terminal, run:npm install --save-dev @nomicfoundation/hardhat-verify -
Get an Etherscan API Key
To programmatically submit your code to Etherscan, you need an API key.- Create a free account on https://etherscan.io.
- Navigate to your user dashboard, go to "API Keys," and create a new key.
- Copy this key.
-
Update Your Configuration (
.envandhardhat.config.ts)- Open your
.envfile and add your Etherscan API key. Your file should now look like this:SEPOLIA_RPC_URL="https://sepolia.infura.io/v3/your-infura-api-key" PRIVATE_KEY="your-metamask-private-key" ETHERSCAN_API_KEY="your-new-etherscan-api-key" - Next, update your
hardhat.config.tsto include the plugin and the API key configuration.
- Open your
The official Hardhat documentation is the best resource for the exact configuration code.
The official Hardhat documentation, 'Verifying smart contracts', explains exactly how to configure the hardhat-verify plugin.
Follow the sections 'Setup' and 'Configuration'. First, add the import statement for hardhat-verify to your hardhat.config.ts. Then, add the verify block to your config object, referencing your Etherscan API key from your environment variables.
After following the documentation, your hardhat.config.ts should be updated to look similar to this:
import { HardhatUserConfig } from "hardhat/config";
import "@nomicfoundation/hardhat-toolbox";
import "dotenv/config";
import "@nomicfoundation/hardhat-verify"; // Import the plugin

const SEPOLIA_RPC_URL = process.env.SEPOLIA_RPC_URL || "https://sepolia.infura.io/v3/your-infura-api-key";
const PRIVATE_KEY = process.env.PRIVATE_KEY || "your-metamask-private-key";
const ETHERSCAN_API_KEY = process.env.ETHERSCAN_API_KEY || "your-etherscan-api-key";

const config: HardhatUserConfig = {
  solidity: "0.8.20",
  networks: {
    sepolia: {
      url: SEPOLIA_RPC_URL,
      accounts: [PRIVATE_KEY],
    },
  },
  etherscan: { // Add this object
    apiKey: ETHERSCAN_API_KEY,
  },
};

export default config;
B. Running the Verification Command
With the setup complete, verifying is as simple as running one command.
npx hardhat verify --network sepolia YOUR_CONTRACT_ADDRESS
Replace YOUR_CONTRACT_ADDRESS with the address of your deployed token.
Hardhat will compile your code, send it to Etherscan, and Etherscan will confirm that it matches the bytecode at that address.
Test your understanding!
Your colleague deployed an ERC-20 token that had a constructor argument for the initial supply (e.g., constructor(uint256 initialSupply)). They try to run the verification command above but it fails. What do they need to add to the command?
Show answer
They need to add the constructor argument to the end of the command. For example, if they deployed the contract with an initial supply of 1,000,000 tokens (with 18 decimals), the command would be:npx hardhat verify --network sepolia 0x... 1000000000000000000000000
Upon successful verification, you'll get a link to your contract's page on Etherscan. Go to it, and you will now see a green checkmark next to the word "Contract" and a new "Contract" tab containing your readable Solidity code!
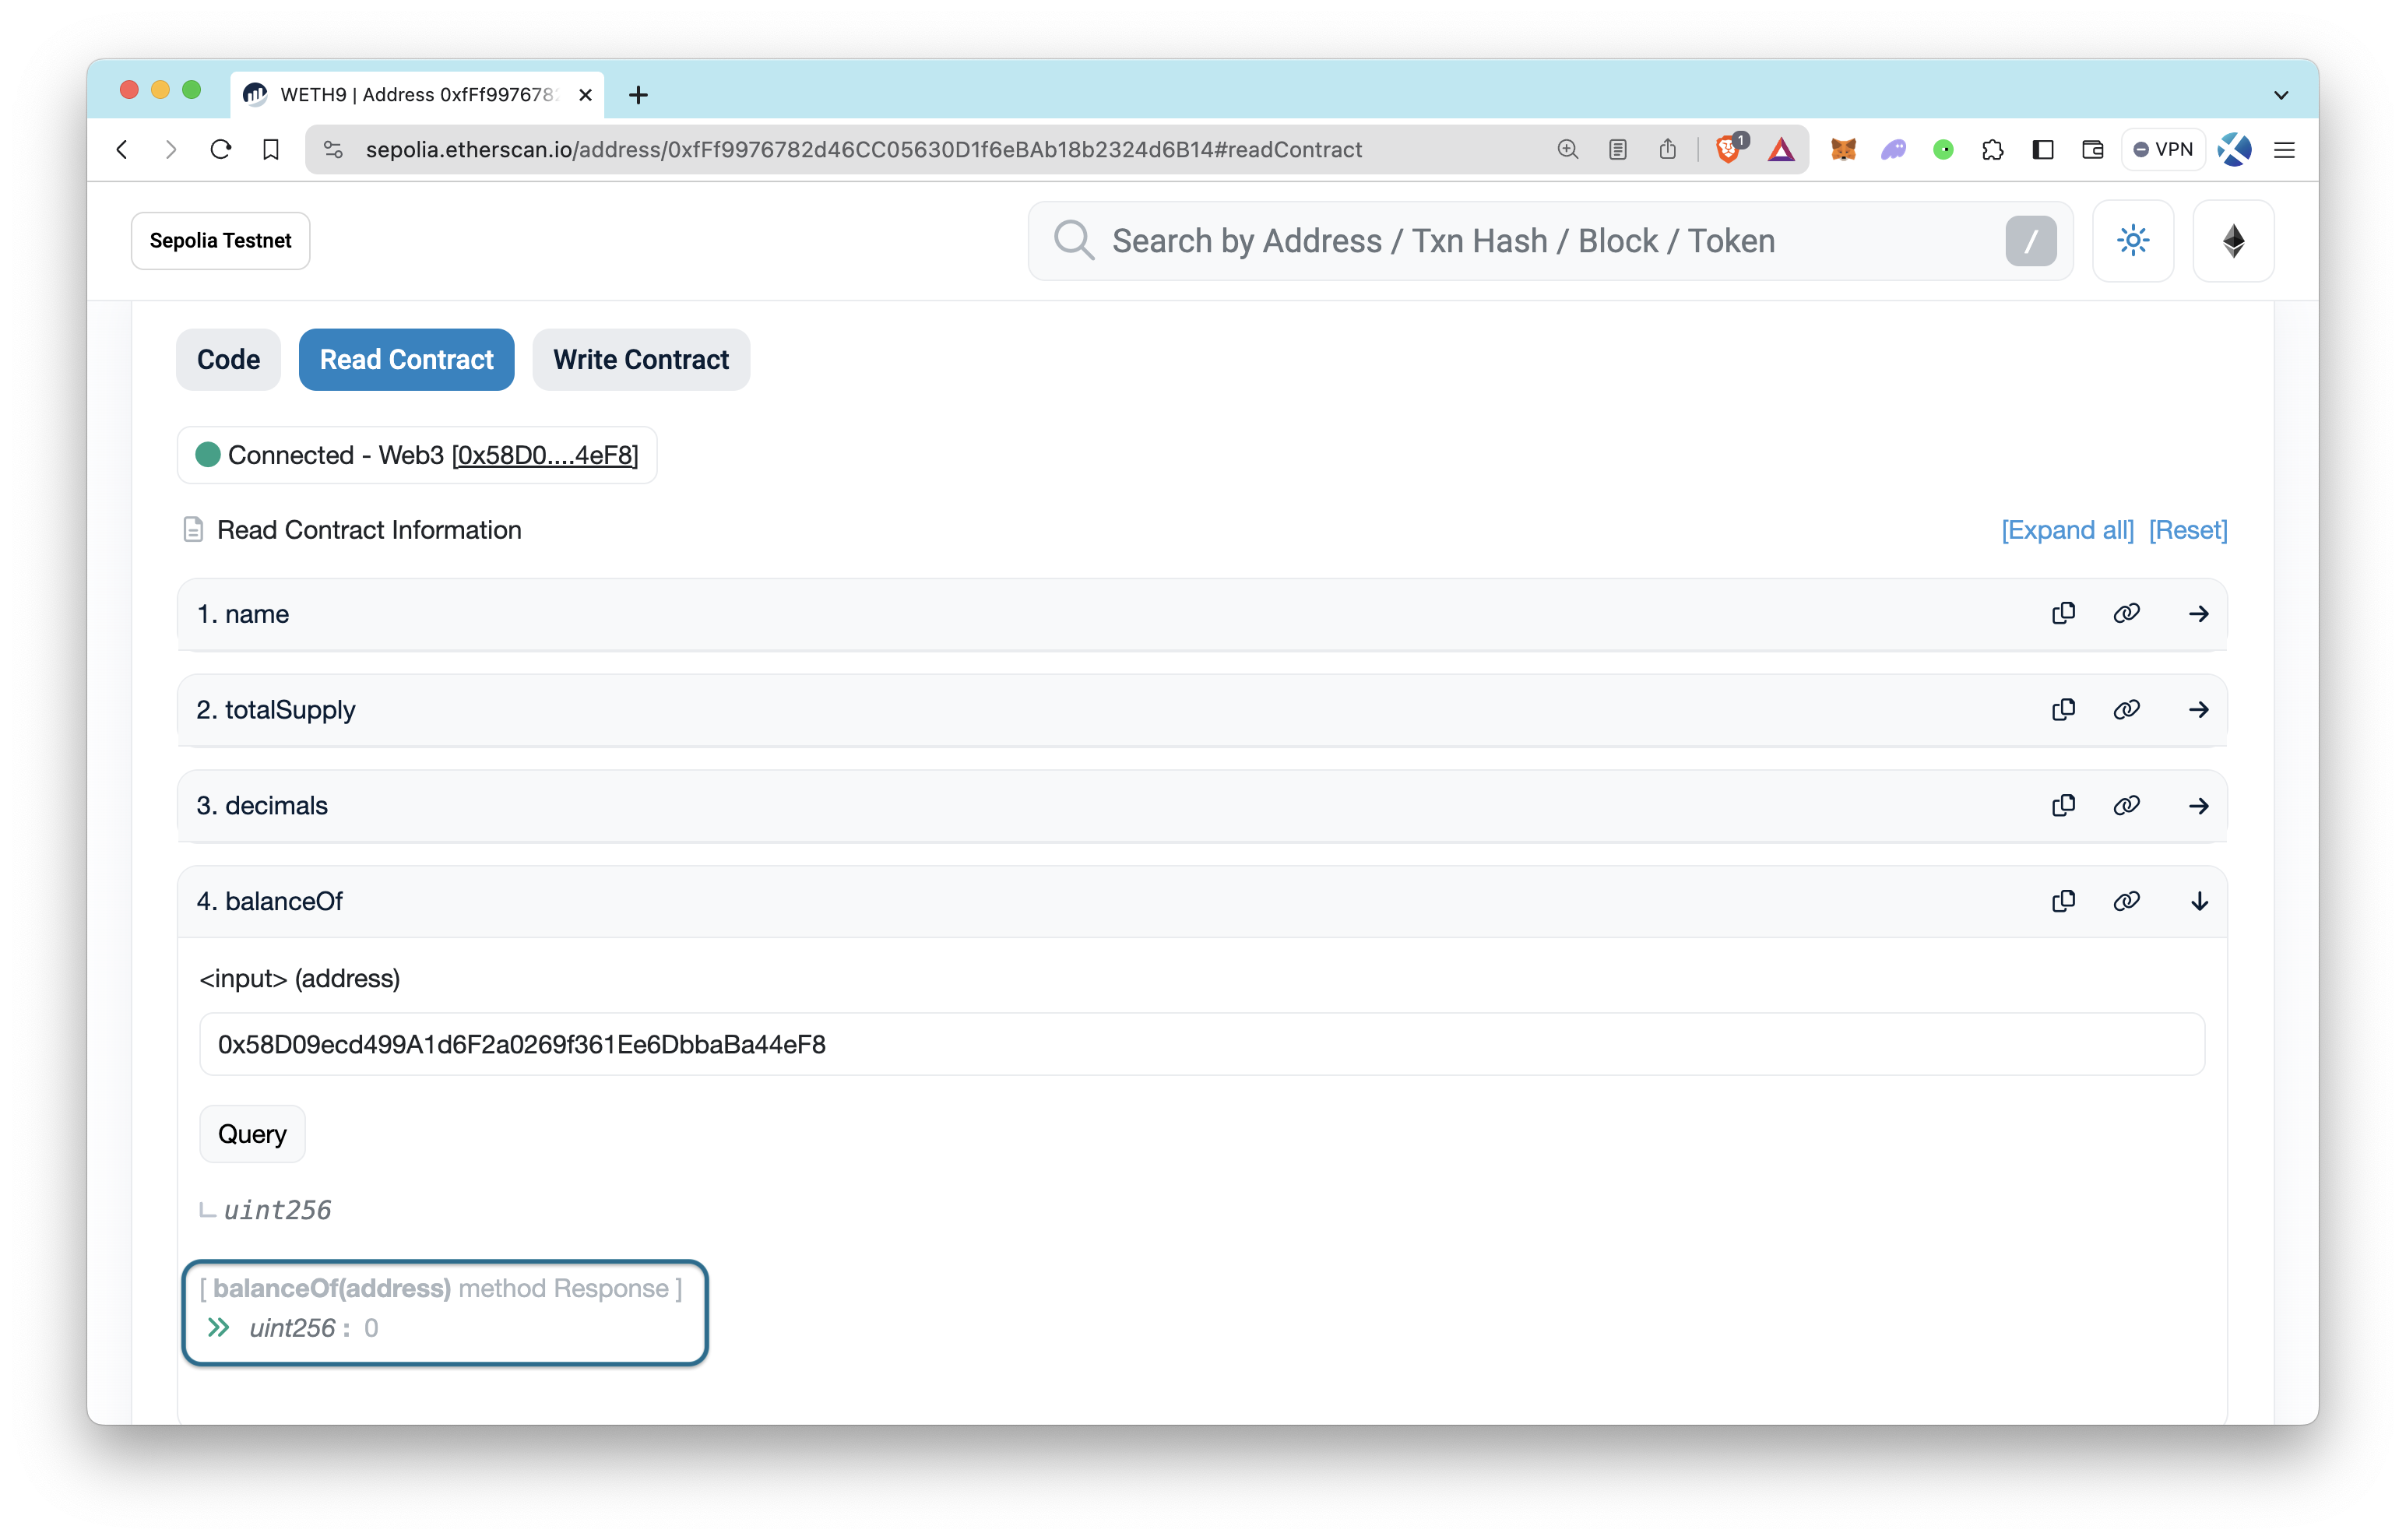
You can now also explore the Read Contract tab. This gives you a user interface to call all the public view and pure functions in your contract, like name(), symbol(), totalSupply(), and balanceOf(address).
Conclusion
In this lesson, you completed the full deployment lifecycle for a smart contract. You didn't just launch it; you tested its core functionality on a live network and took the crucial step of publishing its source code for public transparency and trust.
Key Takeaways:
- Block explorers like Etherscan are your primary tool for inspecting the state of the blockchain.
- You must import custom tokens into MetaMask to interact with them via the wallet interface.
- Performing a token transfer between two accounts is the definitive test of an ERC-20 token's core functionality.
- Verifying your source code on Etherscan is essential for building user trust and enabling easy on-chain interaction.
- The
@nomicfoundation/hardhat-verifyplugin makes source code verification a simple, one-command process.
Preview of the Next Lesson:
Your token is now built, deployed, and verified. But how can you be confident that it's bug-free and that future changes won't break existing functionality? The next module, Automated Testing with Hardhat, will introduce you to the professional standard for ensuring contract quality. You'll use your backend development experience with unit testing and apply it to the world of smart contracts using tools like ethers.js and Chai.