Recommended resources
The freely available resources this lesson will direct you to.
Welcome to the final lesson in our "Adding AI & Connecting Tools to Your App" module. In our previous lessons, you saw how to make your app call an AI model using an API, and how to manage the costs and rate limits involved. That was all about your app talking to an AI.
Today, we're flipping the script. We'll explore how your design tools can talk directly to an AI. You've mentioned struggling with the technical setup of connecting Figma to Claude, and this lesson is designed to pull back the curtain on exactly what's happening. We'll demystify the Model Context Protocol (MCP), the technology that makes this powerful workflow possible. By the end of this lesson, you'll understand what MCP is and how it acts as a bridge between your design environment and your AI coding assistant.
The Problem: AI Needs Eyes
Imagine trying to describe a complex user interface to someone over the phone. You'd say, "There's a main container with a light gray background, and inside, there's a hero image on the left, and on the right, there's a headline in a 32-pixel semi-bold font..." It's slow, inefficient, and likely to be misinterpreted.
Until recently, this was how you had to communicate with an LLM about your designs. You would describe the UI in your prompt, and the AI would do its best to generate code based on your words. MCP was created to solve this problem.
Instead of telling the AI about your design, MCP allows the AI to see it directly.
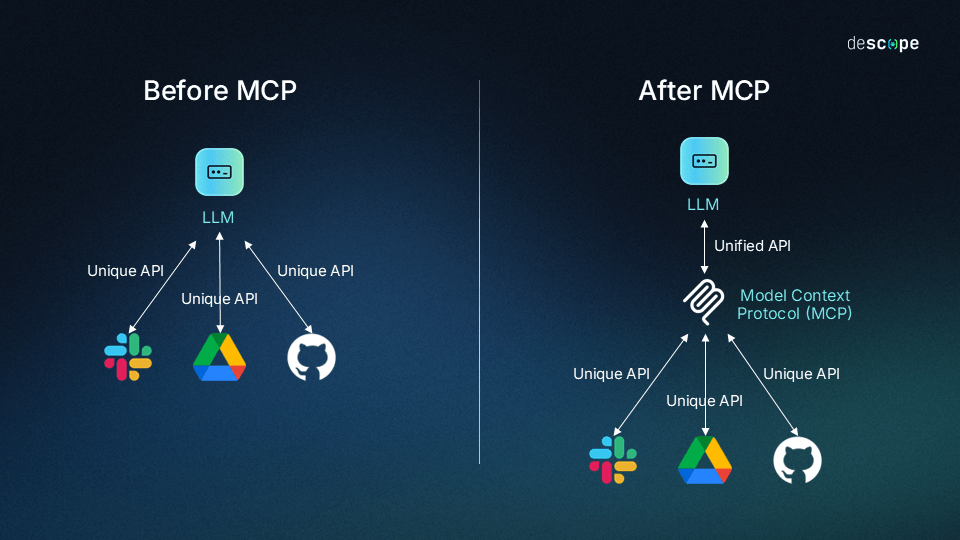
What is MCP? The Universal Translator for AI
MCP stands for Model Context Protocol. Think of it as a universal standard, much like USB-C. With a USB-C port, you can connect a huge variety of devices—your monitor, hard drive, or phone—to your computer without needing a different plug for each one. MCP aims to be the USB-C port for AI.
Model Context Protocol (MCP) Explained in 20 Minutes
This video, "Model Context Protocol (MCP) Explained," introduces the concept beautifully using the USB-C analogy.
Watch the first section from the beginning until this point. The speaker explains what MCP is and the key benefits of having an open standard, such as creating portable toolsets that can move between different AI applications.
As the video explains, MCP is a standardized way for external applications (like Figma, Slack, or Google Drive) to expose their context (your files, data, and settings) and tools (actions they can perform) to AI models like Claude.
How Does It Work? A Restaurant Analogy
To understand the mechanics without getting lost in technical jargon, let's use an analogy. Imagine you're at a restaurant.
Model Context Protocol (MCP) — A Product Designer's Perspective
This article from a fellow product designer provides an excellent, non-technical explanation of the components of MCP using a restaurant analogy.
Read from the beginning down to the end of the section titled A restaurant analogy. Focus on understanding the three core components: Host, Server, and Client.
As the article explains, the MCP architecture has three main parts:
- The AI Application (The Host/Waiter): This is the application you're interacting with, like Claude Desktop. Its job is to understand your request and coordinate the whole experience.
- The Tool (The MCP Server/Kitchen): This is the external application offering its services, like Figma. It runs a "server" that listens for requests. It's the kitchen, ready to prepare a meal.
- The Protocol (The MCP Client/Order Slip): This is the communication channel. The AI application has a "client" that knows how to talk to MCP servers. It's the order slip that the waiter writes on and passes to the kitchen, ensuring the order is understood correctly.
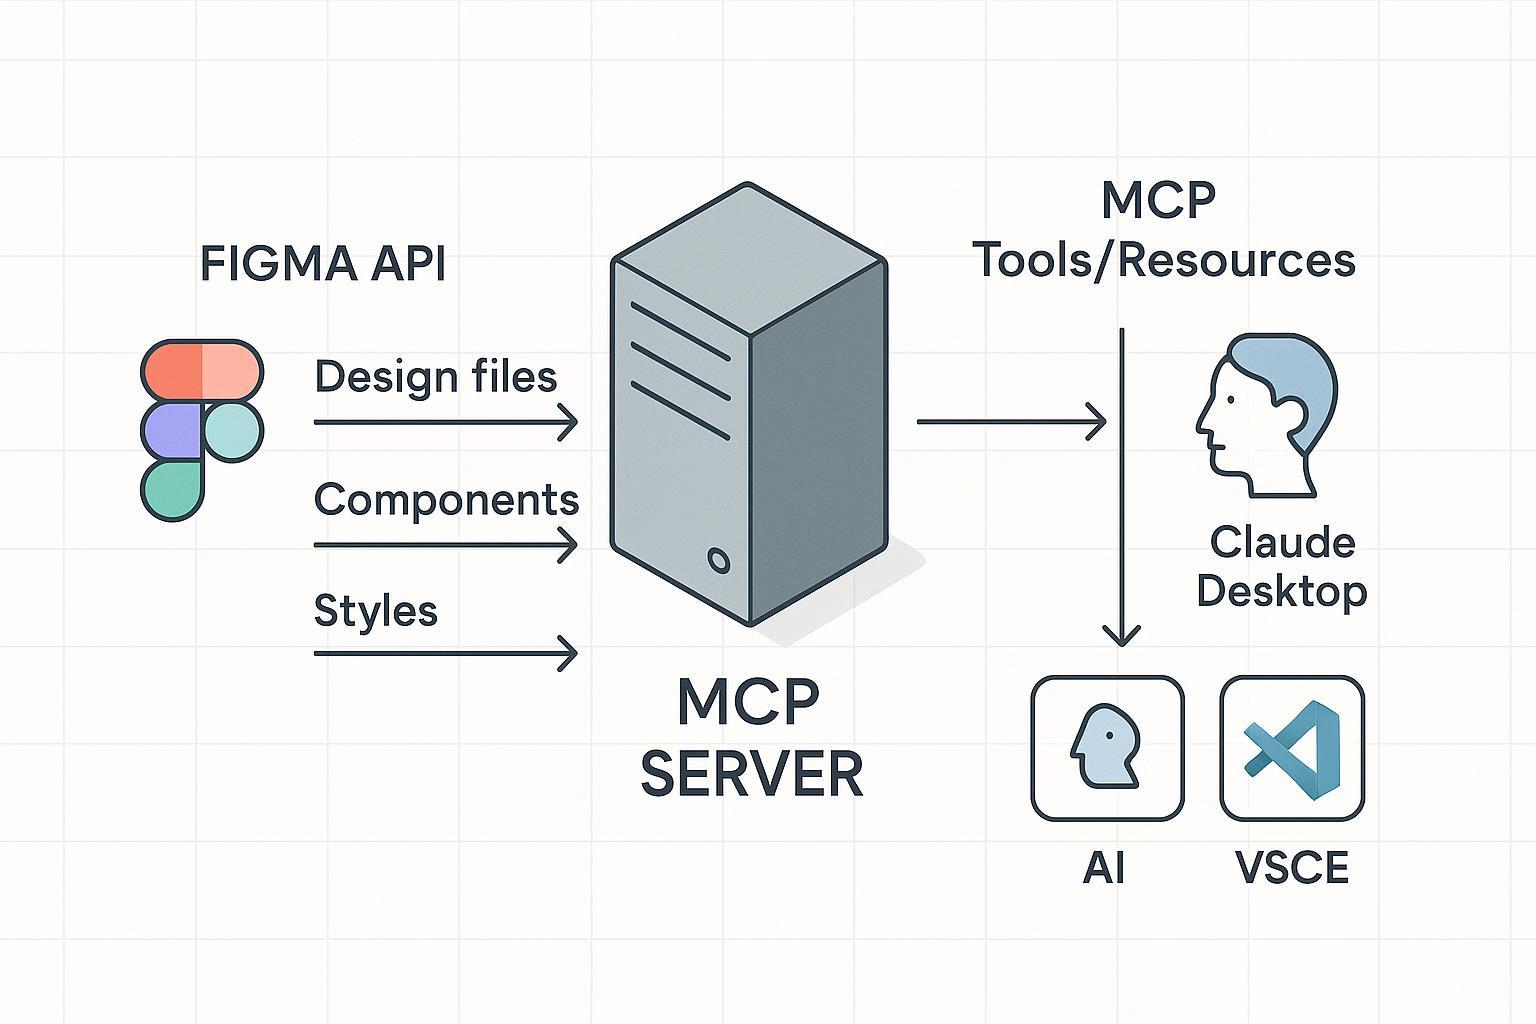
So, when you enable the "MCP Server" in Figma's settings, you are essentially "opening the kitchen" and publishing its menu of capabilities (e.g., "get component styles," "read frame layout," "send code to canvas"). When you connect this server to Claude, you are telling the "waiter" (Claude) about this new kitchen and giving it the menu.
MCP Tools vs. Traditional APIs
This is where the magic really happens, and it represents a fundamental shift in how we interact with software.
Model Context Protocol (MCP) — A Product Designer's Perspective
Let's revisit the same article to understand the crucial difference between a traditional API and an MCP tool.
Read the section titled So, what about APIs?
With a traditional API, a developer must write explicit, deterministic logic: WHEN a user clicks "Export," THEN call the exportToPNG() API function.
With MCP, you simply design the possibility. You create a "tool" and describe what it does, for example: tool: send_code_to_figma_canvas. You don't program when it should be used. The LLM itself reasons about your conversational request and decides on its own if and when to use the tools available to it. This is the shift from a deterministic experience (what will happen) to a probabilistic one (what can happen), which opens up incredible flexibility.
Connecting the Dots: A Practical Walkthrough
Now let's apply this to the process you struggled with: connecting Figma to Claude. Knowing the concepts above, the steps in the terminal should now make more sense.
There are a few ways to set this up, often involving the terminal. The goal is always the same: tell the Claude MCP Client about the Figma MCP Server.
Claude Code MCP with Figma: A Beginner’s Step-by-Step Setup Guide
This guide provides a clear, step-by-step process for making the connection. It demystifies the commands you've likely seen.
Read through the two main methods described: Path 1 and Path 2. As you read, notice what the commands are actually doing: claude mcp add ...: This command is explicitly telling your Claude client, "Here is the address of a new MCP server (kitchen) you can talk to." The .mcp.json file: This is just a configuration file that does the same thing, telling Claude where to find the server and how to run it.
This next video gives a fantastic visual walkthrough of the entire setup process. Seeing it in action can help solidify the concepts.
Claude + Figma MCP — Updated Setup for Designers
This video is a detailed guide for designers setting up the connection. It covers common issues and shows the "proof" that it's working correctly.
Watch from this section, where the presenter installs Claude Code in the terminal and then installs the Figma MCP plugin. Notice the explanation of installing it "globally" versus for a single project—this ensures the connection works everywhere. Continue watching from the next segment, where they test the connection. The black Figma bar that appears in the Claude UI is the visual confirmation that Claude's client has successfully connected to and is using the Figma server's tools. The video also highlights the "one-way" nature of the current workflow, which is a crucial practical limitation to understand.
By following these steps, you are manually configuring the "waiter" (Claude) to recognize the "kitchen" (Figma). Once connected, you can simply select a component in Figma and ask Claude, "Convert this selection to a React component," and the LLM will reason that it should use its newly available Figma tool to get the design context.
Conclusion: Designing for AI
You've now reached the end of your journey through the essential programming concepts for a designer. You started by understanding your local development environment, navigated the terminal, made sense of project files, and learned to deploy an app. You then dove into the world of APIs and, finally, have uncovered how your own design tools can interface directly with AI.
Here are the key takeaways on MCP:
- MCP is a standard protocol that acts like a universal translator, allowing tools like Figma to communicate their context and capabilities to AI models like Claude.
- It operates on a client-server model, where the tool (Figma) runs a server to offer its services, and the AI (Claude) uses a client to access them.
- It enables a shift from deterministic instructions (APIs) to probabilistic interactions, where the LLM reasons about which "tools" to use based on conversation.
- Setting up MCP involves telling the AI client the address of the tool's server, which can be done through UI settings or terminal commands.
This new paradigm doesn't just change developer workflows; it changes the role of the designer. You are no longer just designing static screens but also the very capabilities and tools that an AI can use to bring those screens to life. This is the new frontier of AI-native product design, and you are now perfectly positioned to explore it. Congratulations on completing the course