Recommended resources
The freely available resources this lesson will direct you to.
Welcome to the next module in our course on DnB lead design. In previous lessons, we focused on generating the core timbre and building expressive performance capabilities through modulation and sequencing. Now, we shift our attention to the crucial final stage: polishing your sound and making it sit powerfully in a mix using effects.
This lesson tackles the single most important principle of using effects: the order in which you place them. You will learn to justify the placement of effects in Serum's FX rack by understanding how the signal chain fundamentally alters the final sound. This isn't just a technical detail; it's a primary creative choice that separates intentional sound design from random tweaking. By the end of this lesson, you'll be able to strategically build an FX chain to achieve a specific sonic goal, whether it's a clean dancefloor lead or a gritty neurofunk texture.
1. The Principle of Signal Flow
Before we open Serum's FX rack, it's essential to understand the concept that governs it: signal flow. In essence, signal flow is the path your audio takes from its source (the oscillators) through every processing stage until it reaches the output. Each effect in the chain processes the output of the one before it. Therefore, changing the order of effects changes the input that subsequent effects receive, often with dramatic results.
To grasp the importance of this concept, let's start with a foundational reading.
Why Production Matters Less Than You Think It Does - Pheek's
This article from Pheek's AudioServices Studio makes a compelling case for why understanding signal flow is more critical than memorizing production "tricks."
Please read the sections titled "What Signal Flow Actually Is" and "Why this matters". Focus on how the author defines signal flow as the "order of operations" and how this order is the difference between outcomes like "pleasing saturation vs. ugly distortion."
As the article states, understanding the "plumbing" is key. A simple analogy from your software engineering background would be function composition. The result of f(g(x)) is rarely the same as g(f(x)). The same is true for audio effects: reverb(distortion(sound)) produces a very different outcome from distortion(reverb(sound)).
Let's look at a very clear, non-musical example.
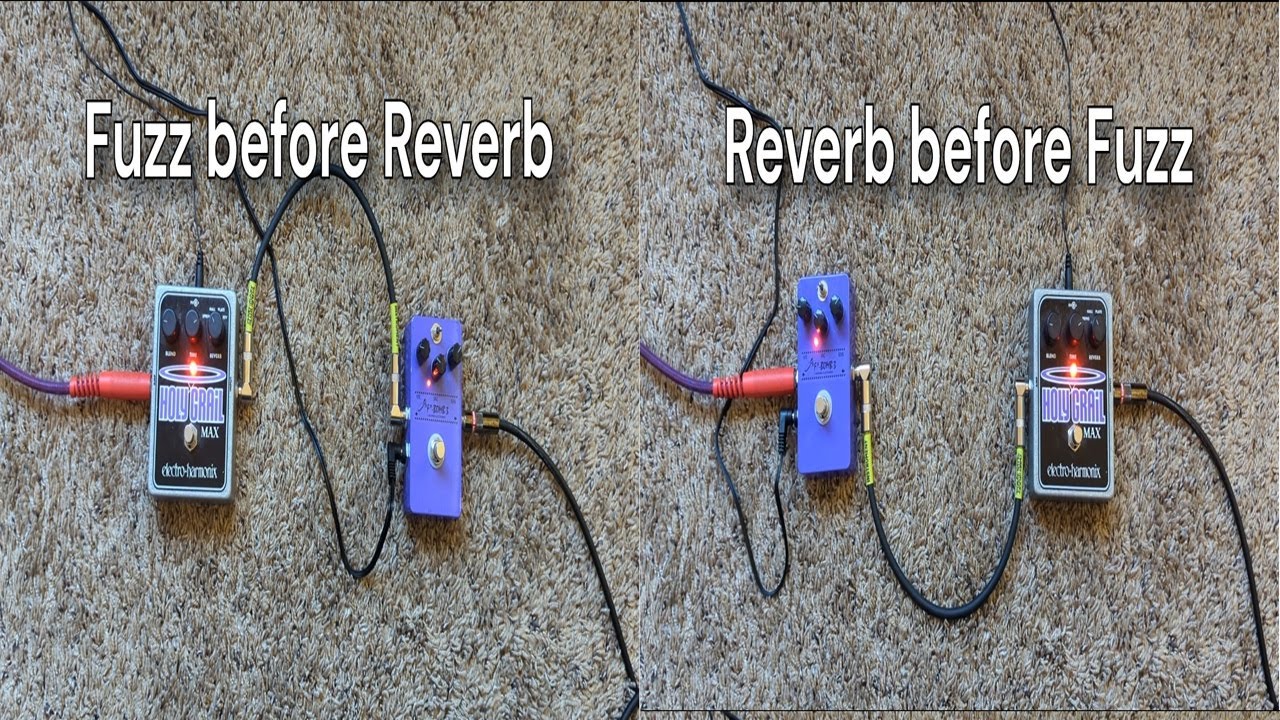
This simple visual demonstrates the core principle. The chain on the right is the conventional approach for clarity. The chain on the left is a more destructive, textural approach. Neither is "wrong," but they serve completely different purposes. Now, let's apply this thinking to Serum's FX rack.
2. Critical Effect Order Decisions for DnB Leads
While there are countless combinations, a few key effect-ordering decisions have an outsized impact on the character of a lead sound. We'll examine three common scenarios relevant to modern DnB production.
Scenario 1: Distortion vs. Spatial Effects (Reverb & Delay)
This is the classic choice illustrated by the guitar pedal image.
-
Distortion → Reverb/Delay: This is the standard, "clean" way to process a lead. You first shape the harmonic content and aggression with distortion, then use reverb or delay to create a sense of space. The result is a clear, distorted lead sound with a clean, ambient tail. This is ideal for most Dancefloor and Liquid DnB leads where clarity is paramount. The fundamental tone of the lead remains distinct from its spatial effect.
-
Reverb/Delay → Distortion: This is a creative, textural choice. The reverb creates a "wash" of sound, which is then fed into the distortion. The distortion saturates and compresses the reverb tail along with the dry signal, gluing them together into a single, massive, and often chaotic texture.
25 Essential Serum Sound Design Tips - CFA-Sound
This article from CFA-Sound provides several practical tips on effect ordering. We'll focus on a specific creative application.
Read tip #25, "Mix Up Your Effects Chain." Pay close attention to the suggestion of "placing the distortion effect... behind the reverb with a high mix level, to make it all more lo-fi-like." This directly describes the Reverb → Distortion chain and its specific sonic character.
Justification: You would choose Distortion → Reverb for a defined lead that needs to cut through a mix. You would choose Reverb → Distortion to create a gritty, atmospheric pad or a background textural element where the lead's definition is less important than its overall size and character.
Scenario 2: EQ vs. Distortion
The relationship between equalization and distortion is one of the most powerful tools in synthesis, especially for aggressive genres like Neurofunk.
- EQ → Distortion: Placing an EQ before distortion allows you to shape what the distortion circuit "sees."
- Subtractive EQ: Cutting frequencies (especially sub-bass) before distortion prevents them from being over-saturated, which can create a muddy, uncontrolled sound. This leads to a tighter, more focused distortion.
- Additive EQ: Boosting a narrow band of frequencies before the distortion will cause the saturation to react more intensely to that specific harmonic area. This "excites" the sound in a very controlled way, creating the complex, resonant tones characteristic of Neurofunk.
Let's see this additive technique in action.
ARTFX Tips: How to use Serum FX the right way (instead of note latch)
In this ARTFX video, he demonstrates precisely how an EQ placed before a distortion can create a signature neurofunk sound.
Watch from this demonstration. Notice how he uses the EQ to create a resonant peak and places it before the tube distortion. Listen to the difference when the EQ is active versus bypassed. The EQ isn't just changing the tone; it's fundamentally changing how the distortion behaves.
- Distortion → EQ: Placing an EQ after distortion is a corrective or tone-shaping tool. The distortion has already added a wealth of new harmonics. You can now use the EQ to tame any harsh frequencies that were created, boost pleasing ones, or carve out space for other elements in the mix.
Justification: Use EQ → Distortion when you want to fundamentally drive the character of the distortion itself. Use Distortion → EQ when you are happy with the distorted character but need to shape its final placement in the frequency spectrum.
Scenario 3: Compressor vs. Distortion
The interplay between dynamics and saturation is key to controlling a lead's punch and presence.
-
Compressor → Distortion: Compressing the signal before it hits the distortion results in a more consistent and predictable level of saturation. By reducing the dynamic range of the input signal, you ensure that both quiet and loud parts of your sound get distorted more evenly. This gives you "controlled harmonics," as mentioned in the Pheek article.
-
Distortion → Compressor: When you place the compressor after the distortion, you are taming the dynamic output of the distortion effect itself. Heavy distortion can often introduce new peaks and change the dynamic feel of a sound. A post-distortion compressor (especially a multiband one like Serum's OTT) can clamp down on these dynamics, bringing up the low-level details and creating a thick, "in-your-face" presence. This is what the CFA-Sound article refers to as taming the sound and giving it a "more useful shape."
Justification: Use Compressor → Distortion when you want precise control over the amount of saturation applied. Use Distortion → Compressor when you want to control the dynamic impact of the final saturated sound, making it feel denser and more powerful.
3. Practical Exercise: Building and Justifying a Chain
Now it's time to apply these principles. Load up a simple lead patch you've made, or initialize Serum and create a basic supersaw.
- In the FX rack, add three effects: Distortion, Reverb, and EQ.
- Arrange them in the following three orders, playing a melody after each change.
- Chain A (Standard Clarity): EQ → Distortion → Reverb
- Chain B (Creative Texture): Reverb → Distortion → EQ
- Chain C (Post-Shaping): Distortion → EQ → Reverb
- As you listen to each chain, ask yourself:
- How does the character of the reverb tail change between Chain A and Chain B?
- In Chain A, try creating a sharp peak in the EQ and boosting it by 10-15 dB. How does this affect the sound of the distortion compared to leaving the EQ flat?
- What is the primary function of the EQ in Chain C compared to Chain A?
This exercise will build your intuition for how signal flow works in practice, moving it from a theoretical concept to a tangible sound design tool.
Conclusion
In this lesson, we established that effect order is a critical decision, not an afterthought. Understanding signal flow allows you to move from simply adding effects to intentionally building a chain that serves a specific purpose.
Key Takeaways:
- Signal flow is fundamental: The output of one effect becomes the input of the next. Changing the order changes the sound.
- Distortion vs. Spatial: Distorting before reverb provides clarity. Distorting after reverb creates a massive, blended texture.
- EQ vs. Distortion: EQ before distortion shapes the character of the saturation itself. EQ after distortion shapes the final tone.
- Compressor vs. Distortion: Compressing before distortion controls the consistency of saturation. Compressing after controls the final dynamic impact.
You are now prepared to make deliberate choices when building your FX chains. In our next lesson, we will zoom in on one of the most important effects in that chain: distortion. We'll move beyond just its placement and explore how to select and apply specific distortion types to add everything from subtle harmonic richness to outright aggression.