Recommended resources
The freely available resources this lesson will direct you to.
Hello! In the previous lesson, you saved a histogram and an illustrative learning curve. Those files are useful, but an image alone does not tell you which code produced it or what changed between versions. Git gives a small experimental project a reviewable history.
This lesson takes about 45–50 minutes. You’ll create a local repository, record a baseline plot, make a change on a separate branch, and merge it back. The data will be explicitly illustrative—not a measured machine-learning result. The workflow will later apply to model code and quantum-circuit experiments.
What a commit records
A repository is a project directory whose history Git tracks. You edit files in the working directory, select content for the next snapshot in the staging area, and save that snapshot with a commit. This distinction matters when an experiment produces several files but you want to record only the code and small input needed to reproduce its plot.
Git Tutorial for Beginners: Learn Git in 1 Hour
Watch “Git Tutorial for Beginners: Learn Git in 1 Hour” by Programming with Mosh for its explanation of the working directory, staging area, and commits.
Watch the Git workflow. Focus on why editing a file, staging it, and committing it are three distinct states.
Git’s own documentation is useful alongside the demonstration. Read the selected passages below before working through the commands; you can return to them when git status reports something unexpected.
Git - Recording Changes to the Repository
Read these parts of Git - Recording Changes to the Repository from the official Git book to understand how to select and inspect an experimental snapshot.
In “Tracking New Files,” start where an untracked file is explained and read tracking and staging through the explanation of what a commit will contain. In “Staging Modified Files,” focus on the paragraph explaining why an edit made after git add needs to be staged again. In “Ignoring Files,” read ignore patterns from the example of generated files through the first pattern rules. In “Viewing Your Staged and Unstaged Changes,” read the diff explanation. Finally, in “Committing Your Changes,” read commit snapshots through the explanation of what a saved commit represents. The book’s examples may call the primary branch master; we’ll call ours main.
Two inspection commands will be especially useful: git diff shows unstaged edits to tracked files, while git diff --staged shows the changes selected for the next commit. If you edit a file after staging it, stage it again before committing the newer version.
Record a small experiment
Use the Python environment from earlier lessons, with pandas and Matplotlib available. Check that Git is installed by running git --version in a terminal. Then make a new folder called signal-study and open a terminal inside it. Keeping this practice repository separate from your earlier files prevents an accidental commit of unrelated work.
Create the following structure with your editor or file manager:
signal-study/
├── data/
│   └── measurements.csv
├── .gitignore
├── README.md
└── plot.py
Put this in data/measurements.csv:
signal_a
0.1
0.3
0.4
0.6
0.9
These are toy readings for Git practice, not experimental observations. Put two lines in README.md:
# Signal study

A histogram of five illustrative readings, not measured model results.
Put this in .gitignore:
.venv/
__pycache__/
outputs/
The small input CSV and plotting code belong in this history. The generated PNG will go in outputs/; Git can leave it out because the code can generate it again. An ignored file is not automatically removed from Git if it was already tracked, which is why it helps to create .gitignore before the first commit.
Finally, create plot.py. This uses the same Figure-and-Axes pattern as the previous lesson, but locates the input relative to the script so it can run from elsewhere.
from pathlib import Path

import matplotlib.pyplot as plt
import pandas as pd

root = Path(__file__).resolve().parent
data = pd.read_csv(root / "data" / "measurements.csv")
values = data["signal_a"].dropna().to_numpy(dtype=float)

fig, ax = plt.subplots(figsize=(6, 4), layout="constrained")
ax.hist(
    values,
    bins=[0, 0.2, 0.4, 0.6, 0.8, 1.0],
    edgecolor="black",
)
ax.set_xlabel("signal_a reading")
ax.set_ylabel("Number of records")
ax.set_title("Illustrative signal_a readings")

output_dir = root / "outputs"
output_dir.mkdir(exist_ok=True)
fig.savefig(output_dir / "signal_a_distribution.png", dpi=150)
plt.close(fig)
Run python plot.py and check that outputs/signal_a_distribution.png exists. Now initialize Git and inspect what it sees:
git init -b main
git status
If your Git version does not recognize -b, run git init followed by git branch -M main. git status should list the project files as untracked but should not list outputs/. If Git cannot make a commit because author information is missing, configure user.name and user.email locally for this repository using values you choose; commit metadata can be visible if you later publish the repository.
Stage only the files intended for the baseline, inspect the selection, and commit it:
git add .gitignore README.md data/measurements.csv plot.py
git status
git diff --staged
git commit -m "Add illustrative histogram baseline"
git status
git log --oneline
The staged diff should contain the four intended files and no PNG. The final status should say the working tree is clean. Your first commit now identifies a specific version of the code and its input. A commit message such as “Add illustrative histogram baseline” is more informative to a future reviewer than “update files.”
Develop a change without replacing the baseline
A branch gives a line of work its own name. Creating one does not make a second physical copy of the project folder; it gives you a place to advance commits while main stays at its existing commit. HEAD indicates the branch currently checked out.
Git Branching and Merging - Detailed Tutorial
Watch “Git Branching and Merging - Detailed Tutorial” by SuperSimpleDev to see a branch created, checked out, and given its own commits.
Watch branching in practice. The presenter uses git branch and git checkout; below, git switch -c performs the create-and-switch operation together. Focus on which branch receives a new commit, not on the tutorial’s example filenames.
Create a branch for one specific change:
git switch -c feature/median-marker
git status
Edit plot.py on this branch. Immediately after the ax.hist(...) call, add:
ax.axvline(
    float(data["signal_a"].median()),
    color="C1",
    linestyle="--",
    label="Median",
)
ax.legend()
Run python plot.py again and inspect the PNG. Its dashed line should now be labeled “Median.” Before committing, check that Git sees only the intended source-code change:
git diff
git add plot.py
git diff --staged
git commit -m "Mark median on illustrative histogram"
git log --oneline --graph --all --decorate
The feature commit belongs to feature/median-marker; main still points to the baseline. The PNG on your disk has changed, but it is ignored and is not evidence of a committed code change. The commit and its diff are that evidence.
Merge the reviewed change into main
To make the branch relationship visible, give main a separate, nonconflicting improvement. First ensure your working tree is clean, then switch branches:
git status
git switch main
The checked-out plot.py is now the baseline version, without the median marker. The ignored PNG may still show the marker: switching branches does not promise to delete or regenerate ignored outputs. If you need to inspect the plot for the current branch, run python plot.py again.
Add these lines to the end of README.md, then commit them on main:
Run `python plot.py` in an environment with pandas and Matplotlib.
The output image is written to `outputs/`.
git add README.md
git diff --staged
git commit -m "Document how to generate the plot"
git log --oneline --graph --all --decorate
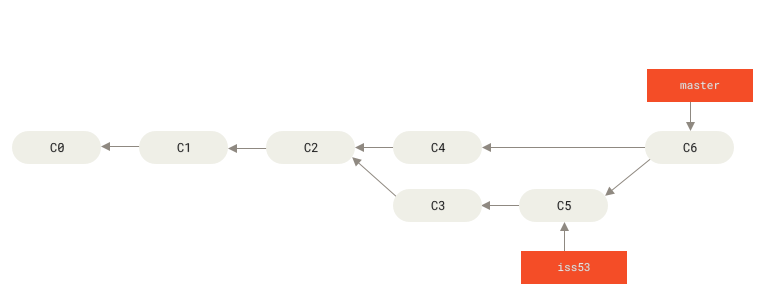
Now the two branch tips have different commits after their shared baseline. The supplied Git history image depicts this kind of divergence. Its primary branch is labeled master rather than main; arrows between commits point back toward their parents.
Git Branching and Merging - Detailed Tutorial
Return to SuperSimpleDev’s branching tutorial to see why the branch you have checked out determines where a merge lands.
Watch merging branches. Focus on the presenter switching to the primary branch before merging the feature branch, then checking the resulting history.
You are already on main. Bring the feature into it and inspect the result:
git merge --no-edit feature/median-marker
git status
git log --oneline --graph --all --decorate
python plot.py
Inspect outputs/signal_a_distribution.png one last time. main should now contain both the README instructions and the median marker in plot.py. Because each branch changed a different file, Git should merge them automatically and create a merge commit with two parents, like the supplied image. If only the feature branch had advanced, Git might instead have performed a fast-forward merge without a separate merge commit.
A conflict would require your decision rather than Git’s guess. If one occurs because you made additional overlapping edits, use git status to find the file, edit it into the final version you intend, remove any conflict markers, then git add the resolved file and commit the merge. Don’t treat an automatically successful merge as proof that the resulting program works; rerunning the plot is still part of the check.
What to take forward
You now have a local experimental history: a baseline commit, a focused plot change on a feature branch, a separate documentation commit on main, and an inspected merge. The habit is to check git status, review the staged diff, commit a coherent change with a meaningful message, and rerun the relevant code after merging.
This repository is local; using Git does not require publishing the toy data to a hosting service. In the next lesson, you’ll record seeds, configuration, and environment metadata so a saved code version also describes the conditions needed to repeat a numerical experiment.